
Rota, Spain: Instax SQ20 Edition
Check out some of the photos I took with the Instax SQ20 in Rota, Spain.
So of course I’ve been wanting to take my Instax SQ20 out for a test drive. Today was a perfect morning for that. I thought about going to Seville or Cadiz, but I had some stuff to do for work and I couldn’t afford to be gone all day (with tomorrow being the 4th and pretty much everything being closed). I packed pretty light this morning for this outing. I just took my Instax SQ20, my DJI Pocket 3, and my Insta360 Go 3. I brought the last two so I could record some video from this photo shoot. I’m trying to get back into my YouTube channel so I wanted to have some video footage to be able to create a quick video of the shoot.
I knew exactly what I wanted to take a picture of: the Rota sign. (insert Rota sign photo)
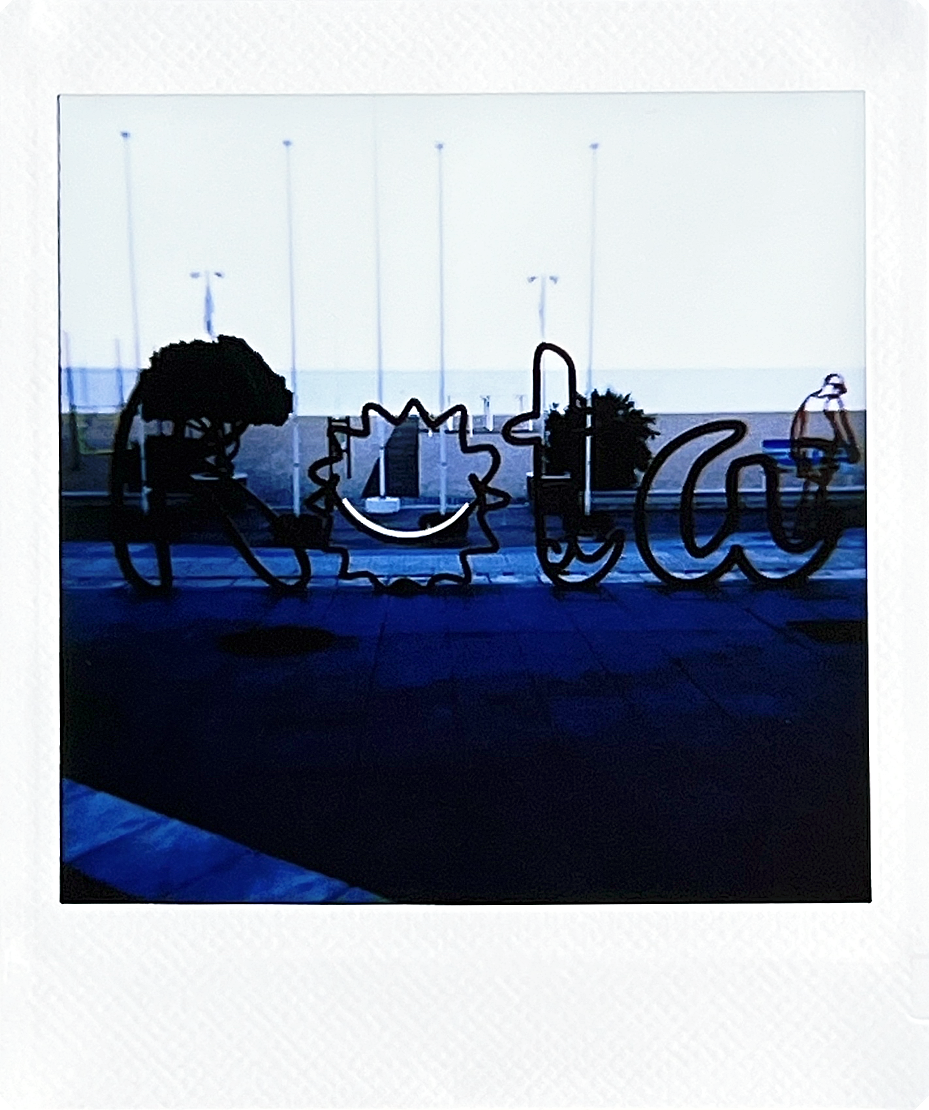
Rota Sign
To get to the sign from where I am, it’s about a 30 minute walk. I turned in my car to ship it back to the states so even if I wanted to drive to it, I wouldn’t be able to. Also, parking in Rota with my American size car can be a pain in the butt. Luckily, it was still cloudy and it wasn’t super hot outside. So about 0730, I put in my ear buds and got to walking. I make it to Rota sign, compose my shot, and take the photo.
Now, this photo is a bit dark and has a blue-ish tint. It’s about 0800 when I get to the sign, but the sun is being blocked by the buildings. Instax film needs a good amount of light in order to capture good details. You can of course still see the sign, but you don’t get to see the color of the different letters or more detail. If I went back around say 1100, when the sun was more overhead, I would be able to capture more of the details and colors of the area.
While not my favorite photo from my photo walk, I don’t have it. I just wish there was more light. I could have used exposure compensation to help with the darkness, but for this photo walk, I was just testing out the straight out of camera look.
Ruta Paseo
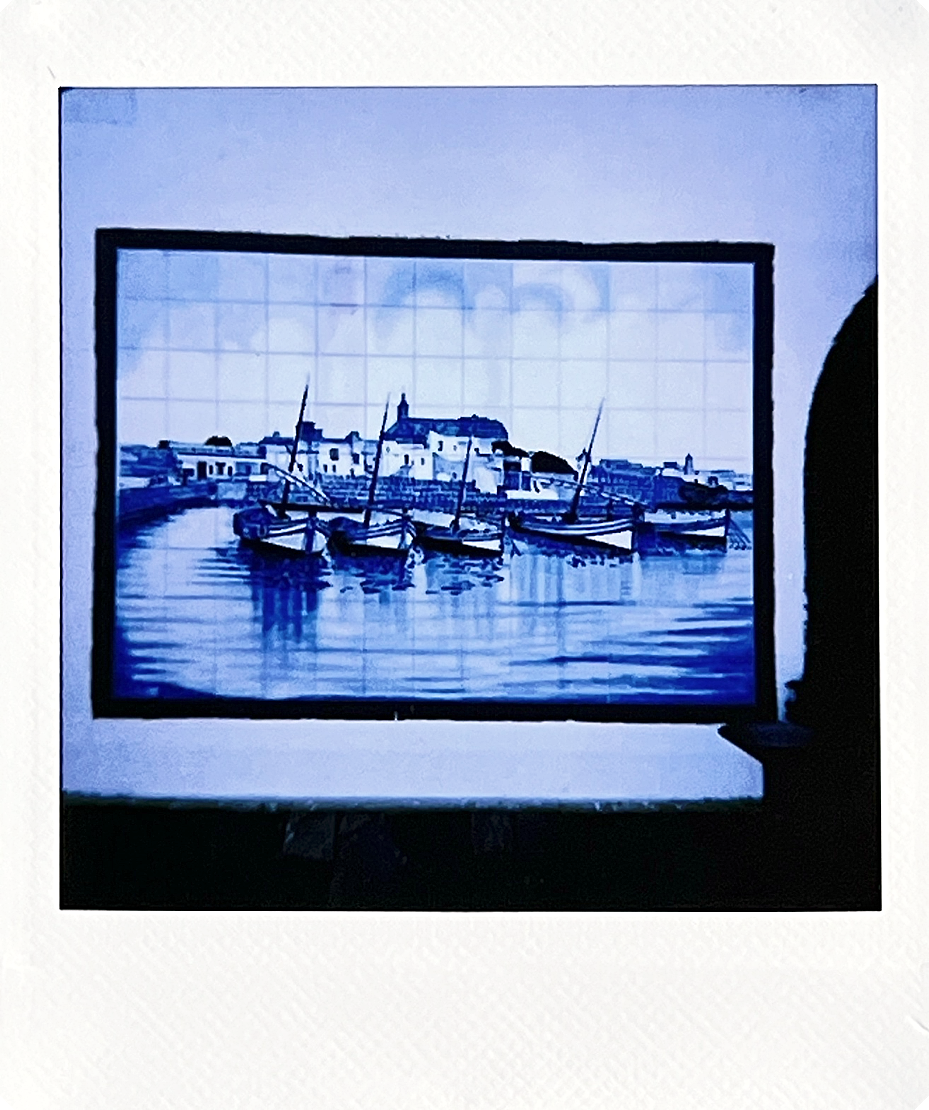
After I took a photo of the Rota sign, I was off again. I figured I would head to the Libertad statue. On the way there, I passed this cool tile painting on one of the walls. I was initially just going to walk past it. Much like the issue I had with the Rota sign, this image also came out bluer than I would have liked. Now yes, the painting is blue-tinted, but you can see like the white wall that the painting is on is also tinted blue. With a little more sunshine, I think the blue painting would have stuck out more in the photo.
I went back to heading towards Libertad when I ran across this archway. Now, I’m big on things like patterns, reflections, etc. Basically anything that catches my eye. Enter archway framing steeple in the background. When I stopped to take the photo, I wasn’t sure if the steeple would show up in the background. I was concerned the background (sky/steeple) would be over exposed due to the darker portion of the archway and tunnel.
However, I was pleasantly surprised when I was able to see the steeple in the background. Like the previous photo, the overall image is still a bit blue (it’s still early-ish in the morning), but I’m not upset with this photo. Besides the color temperature of this photo, the only really thing I think I would change about this photo is to better center the steeple in the archway. As you can see in the image, it’s slightly off center of the archway.
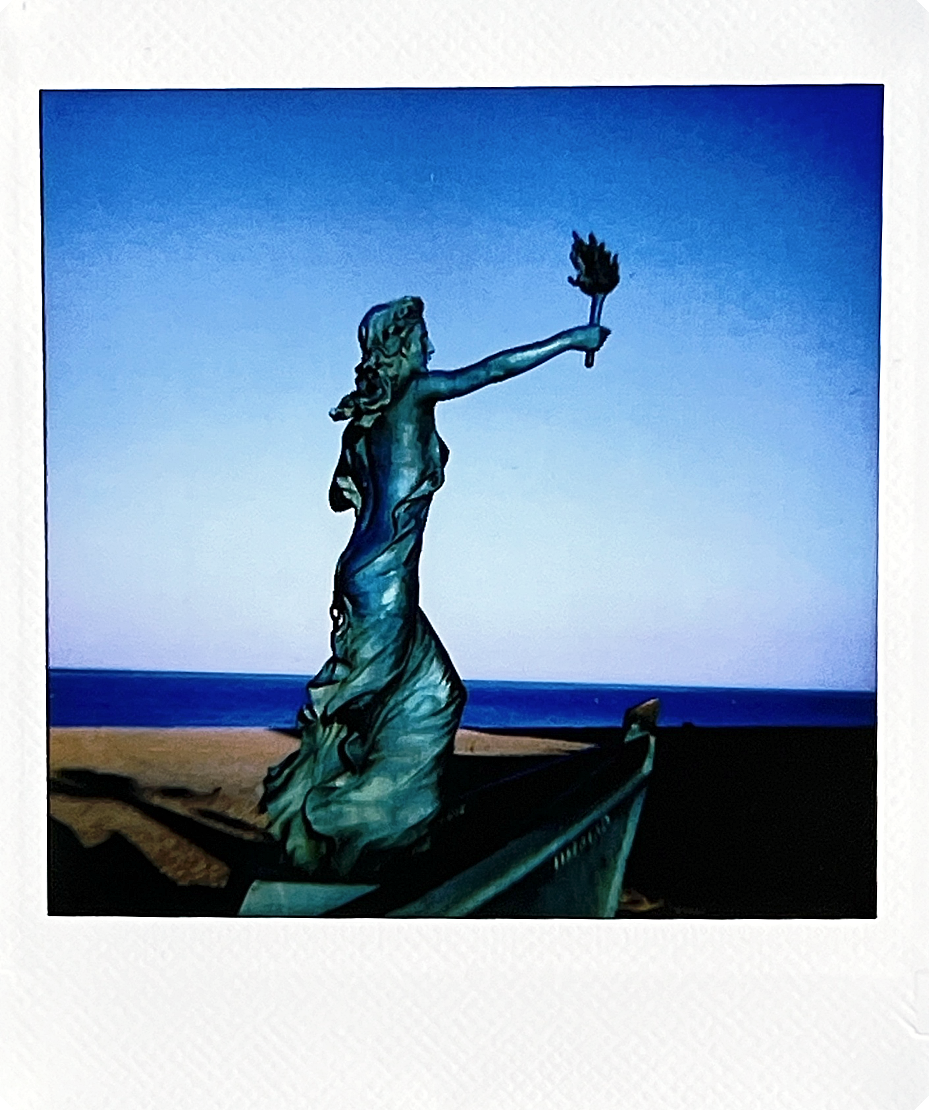
Libertad
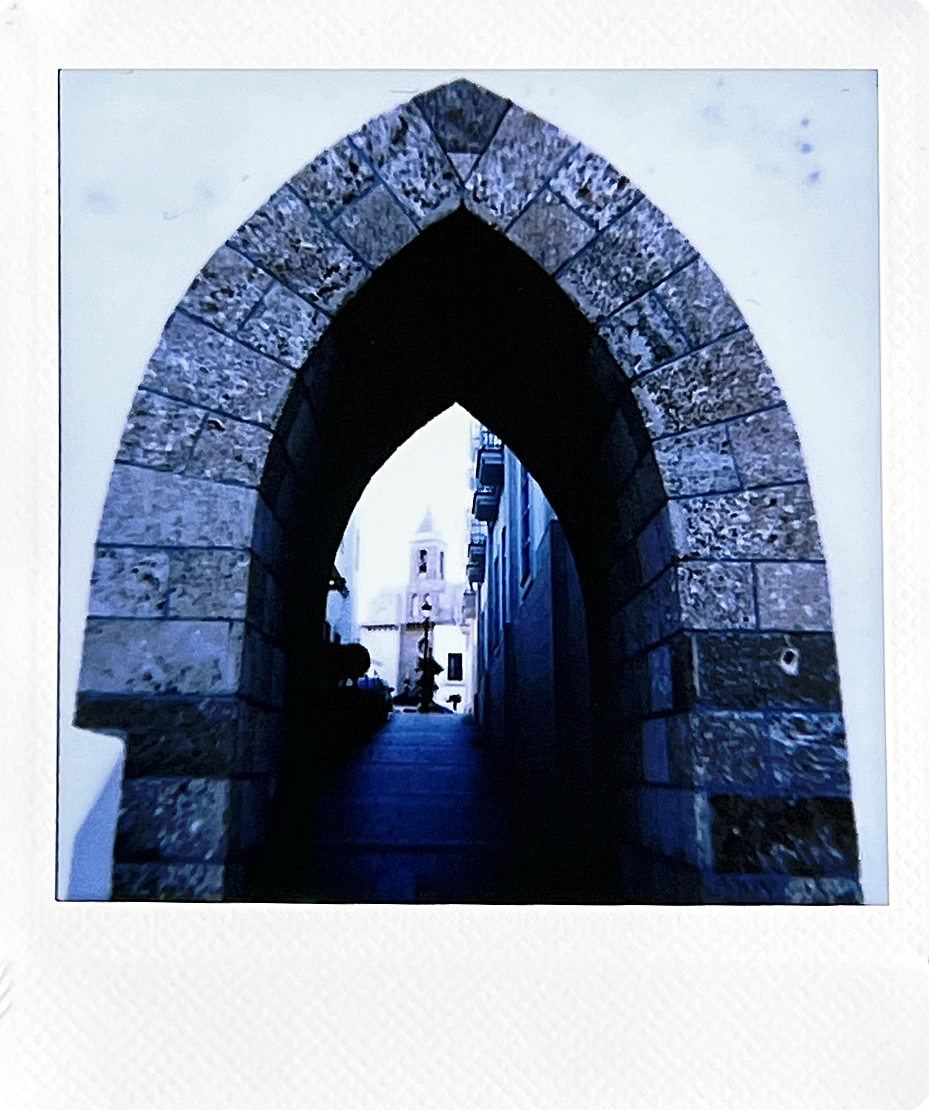
Archway
The Libertad statue isn’t far from the lighthouse in Rota. It took about five minutes to walk from the painting to the status. I wanted to capture more of the woman’s face, but her face was in the shadow and I knew I wouldn’t get much detail so I opted to shoot the side of the statue in the sun. It’s interesting how much the elements affect this statue. Click on this link to see a look of the statue less than two years ago (photo credit to Bill Bowman). Overall, I’m happy with this photo though. It has some good coloring in both the statue and the sky. I wish there would have been more (or any) clouds in the sky, but I still like this photo.

Pink Flowers
So besides shadows, reflections, etc., I am a big fan of capturing photos of flowers. Now, why? I don’t know. I’m not big on receiving flowers, because they’ll just die and it seems like a waste. But taking a photo of them? Chef’s kiss
I prefer to take macro photos of flowers as I like showcasing the details of the flowers. However, macro photography isn’t necessarily a thing with Instax cameras. (Although, shameless plug, I tried to a type of macro photography with my Instax SQ6. Click the link to check out the YouTube video.)
The biggest thing I would change about this photo is the composition. I would have liked to get a bit closer to the flowers so they filled the entire frame instead of having like that line of green in the top portion of the photo.
Double Exposure
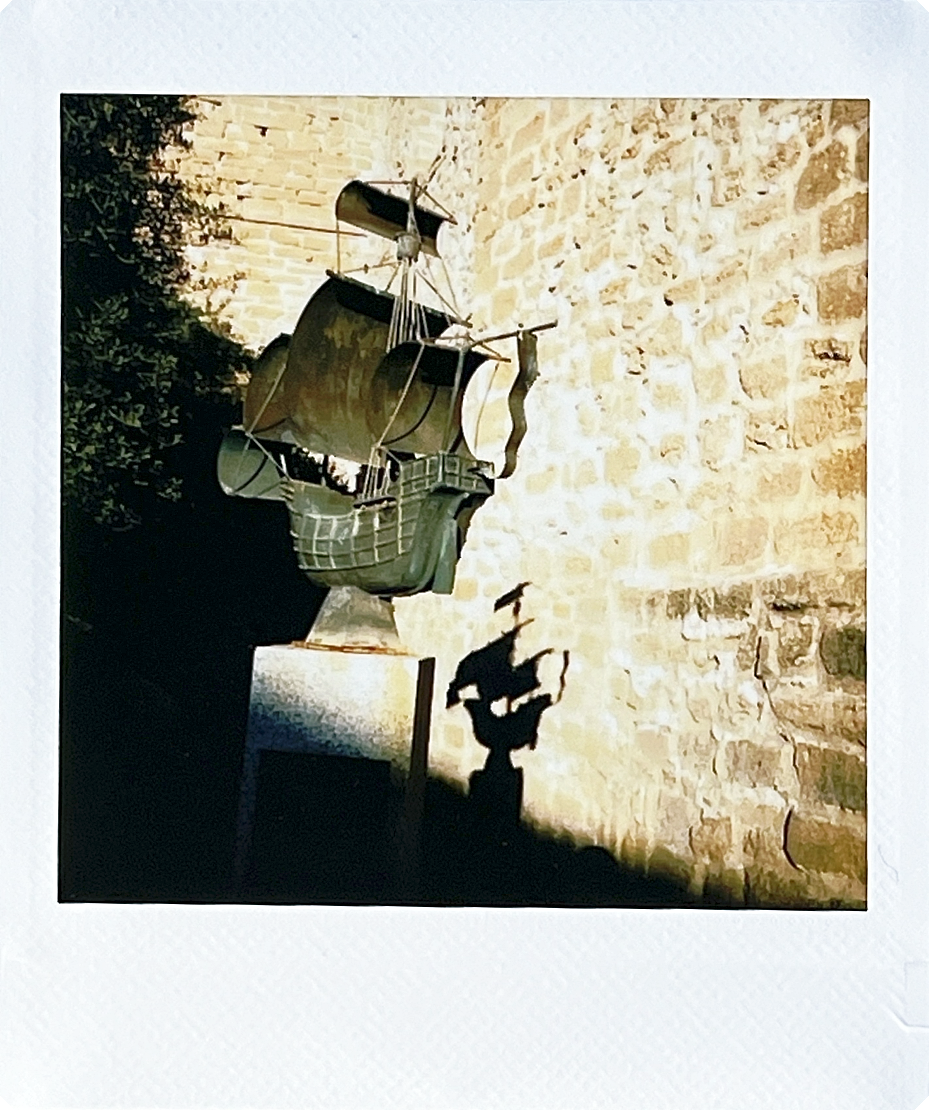
Once I attempted my double exposure, I cut left through a side street and started walking. I started heading towards what looked like some type of castle or fortress. As I walked around the building, I came across this statue of a ship.
I stopped and took this photo for a couple of different reasons. The biggest being that with the location of the sun, there was a nicely defined shadow of the statue. I also like the shadow line of demarcation based on the angle.
When I initially took the photo, it was a bit overexposed. I initially was just going to leave it like it was because I was just going to take one shot of each image. However, the more I thought about it, the more I was like why? The camera I’m using is literally meant to take multiple pictures and I select the image I like best.
Flower Pots
Alright, so I’ve got one photo left and I’m not 100% what I want to take a photo of. I keep just walking around to look and see what I can find. I initially was trying to find this archway that I kept seeing signs for. However, it was getting hot and I was still going to have to walk all the back so at this point, I was just looking for something that looked interesting.
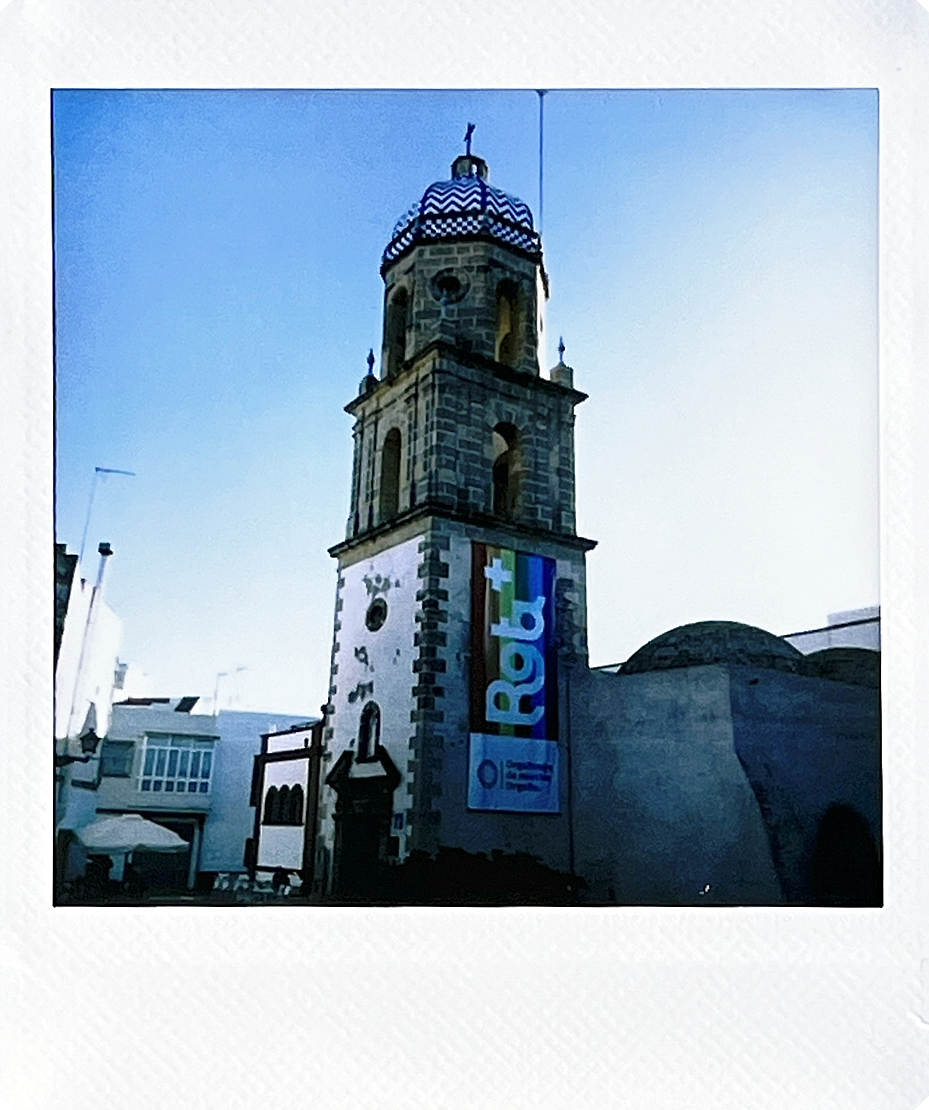
Lo and behold, I came across this tower. This tower is attached to one of the popular markets in the area. What I learned when taking this photo is that I need to leave more space near the place where the photo and frame meets. When I framed this photo and looked through the LCD screen, the skinny pole(?) near the top of the tower was fully in the photo. However, when I printed it, the very top of it was cut off.
Overall, I’m not mad at this photo though. Yes, I would have liked to see more detail in the tower, but I like the fact that the sky isn’t completely blown out.
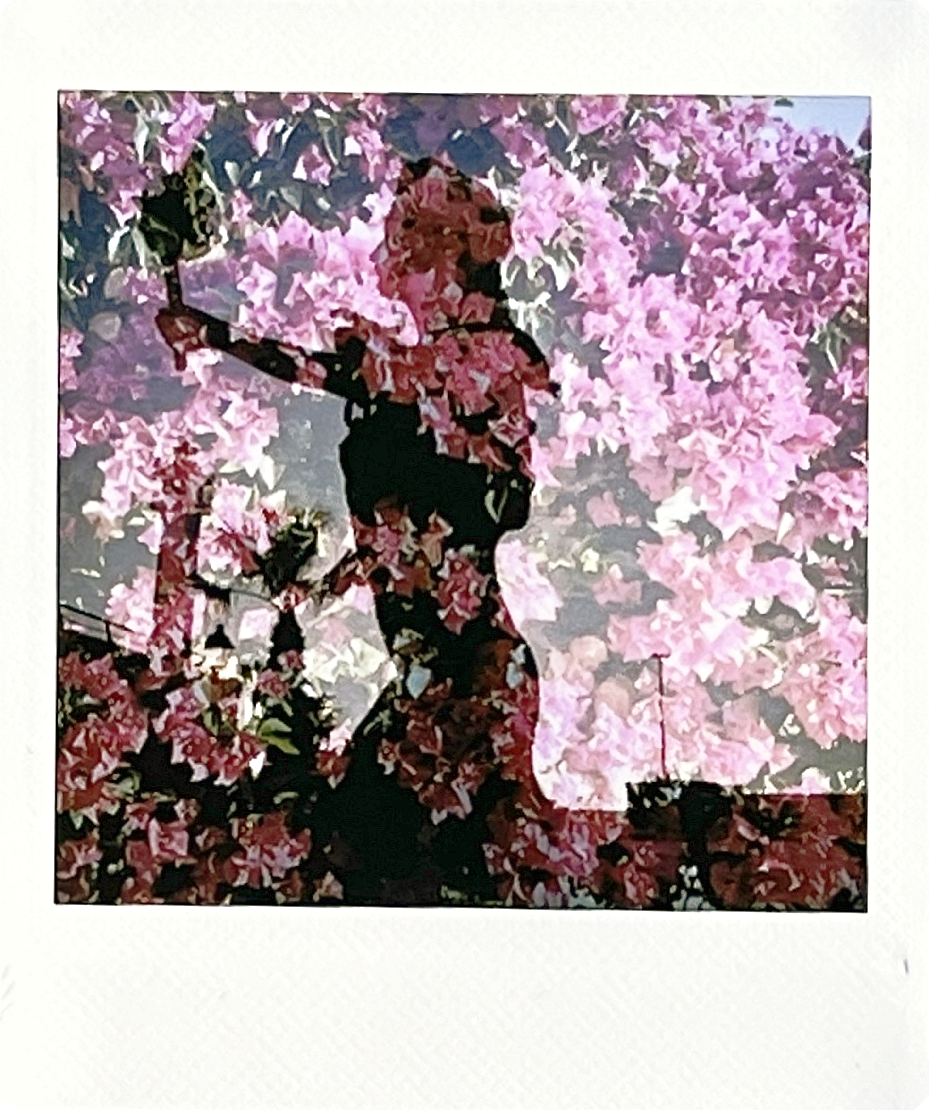
Next up, I tried my hand at some double exposure. Now I don’t really do much double exposure photography. In fact, this is probably the first time I’ve actually attempted it now that I think about it. As you can tell (or maybe not lol), I need a lot of work on my double exposure work. I think where I messed up here is that my darker subject (first image) wasn’t large enough. I should have chosen a different subject or gotten closer to the subject I chose.
I got the first image by taking a photo of Libertad with the sun behind it (to give me the shadow look) and then I found some flowers and took a picture of those for the second photo. The more I look at the photo, the better I think it looks, but I still need some practice with this technique. I do like that I can see pretty much all of Libertad’s silhouette and the full background of flowers.
Homenaje a los Descubridores de América
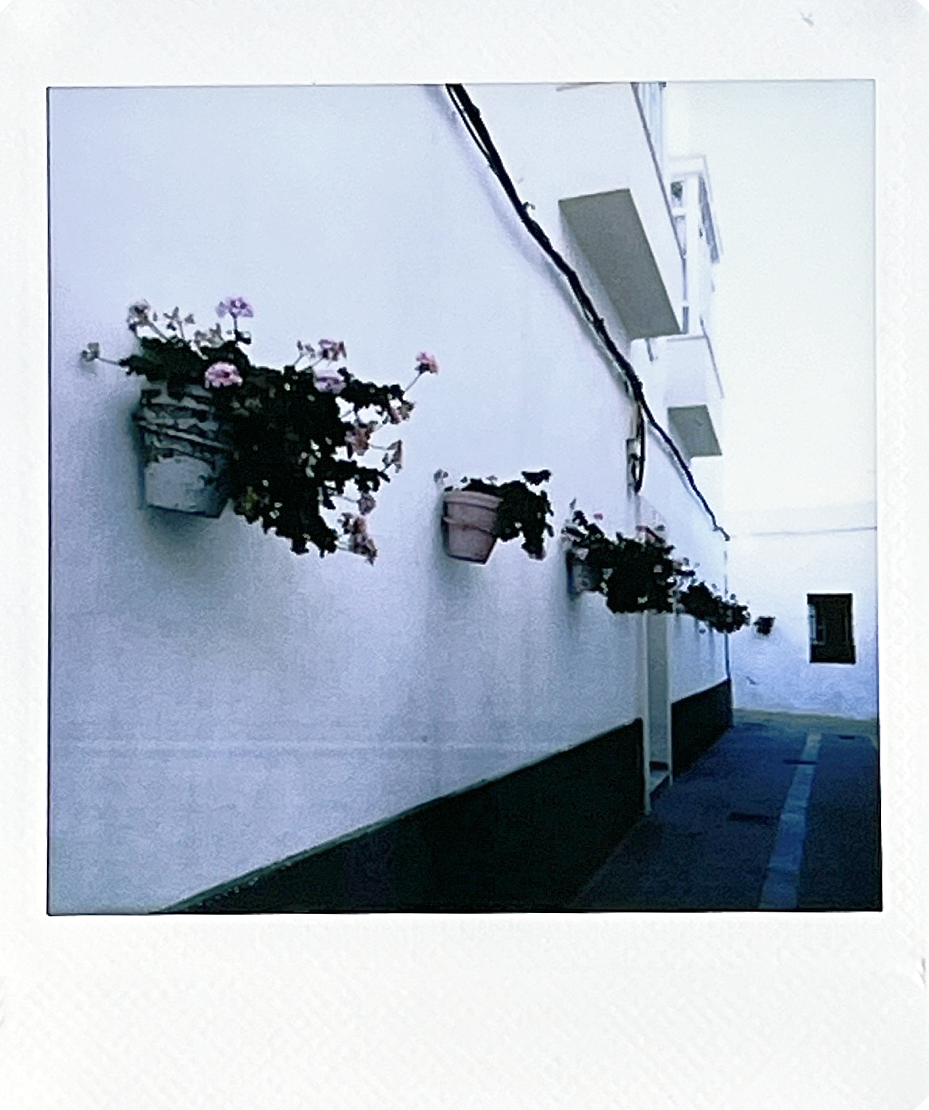
My next photo wasn’t too far away from the statue. It was another side street. The reason I had stopped to take this photo is because of the symmetry. You can’t see it in this photo, there were actually another wall with flower pots like in the photo on the other side of the street. However, the reason you are only seeing one wall is because the other wall was missing some flower pots. To me, the image would no longer be symmetrical.
My biggest gripe with this photo is the lack of detail and color. This is mostly due this alleyway being in the shadow. If I had used exposure compensation, I may have been able to capture more of the greens and pinks of the flowers and leaves. I also think the white wall would have been whiter. However, as you can see in the right upper corner, I may have blown out more of that portion of the photo if I used exposure compensation.
Torre del Convento de la Merced
Finally Thoughts
It was so nice to get out and just go shooting. I’m so glad that I was able to get this camera. It was easy to use and has the potential to take some great instant photos. As always, I have to remember that this is an instant camera and it won’t produce images like a mirrorless/DSLR camera. However, I love the ability to physically have photos in my hand. Now, I’ve just gotta figure out how I want to display these photos. Normally, I just put them in a photo album, but I think some of the photos I take should be displayed. Maybe I’ll find some type of hanging frame or go back to scrapbooking. What do you guys think?
Until next time!

Let’s Welcome a New Camera!
Welcome the Instax SQ20 to the family! Let’s talk specs, user experience, and more!

Look at my new camera!
So I did a thing! I added a new instant camera to my collection. Welcome the Instax SQ20!
For those of you that don’t know, the Instax SQ20 is somewhat like an older square version of the Instax Mini EVO. One of the biggest differences between the two (besides film size) is that the EVO has bluetooth capability while the SQ20 doesn’t. But not a deal breaker for me. Now you may be thinking Tcha, what’s the big deal about this? Like, do you really need a whole blog post about it? It’s my blog so I’ll do what I want.
So you may be wondering what’s so great about this camera. So glad you asked! First, this is what I would consider a hybrid camera. It’s a mix between a digital camera and an instant camera. Let’s dive in.
LOOKS AND FEELS
The SQ20 has a square-ish round body. What I mean by that is the overall body is square, but it has rounded corners. The camera is of course made out of plastic. The plastic is slick. I do wish the plastic was a bit textured so it wasn’t as slick, but the body has a feature that helps with that (I’ll talk about it further down.) It’s smaller and thinner than something like the Instax Wide 300. At the time of writing this post, I don’t have my Mini 11 with me, but I would say it’s probably comparable in size (just a bit thinner).
Front of Camera
On the front of the camera, you have the flash/charging/self-timer light, left and right shutter buttons, lens, zoom ring, and selfie mirror. Like with most Instax cameras, the film ejection slot is at the top of the camera.
Back of Camera
The back of the camera shows the LCD screen, all the buttons to operate the camera, and the film door lock. (Let me know if I need to update this blog to list out all the buttons on the back of the camera.)
Sides of Camera
On both sides of the camera, you have the strap hooks. On the left side (if you’re looking at the back of the camera), there is a door that contains the microUSB charging port, reset button, and microSD card slot.
Colors
This camera comes in two colors: matte black and beige. I ended up getting the beige version.
Here are two of my favorite features about this camera’s body.
Shutter buttons: This camera has shutter buttons on the left and right side so no matter if you’re a righty or lefty, you’ll be able to easily press the button and take a photo.
Thumb rests: So you remember the slick plastic I mentioned earlier? Here is how Instax combats that with this camera. The left and right sides of the back of camera have these thumb rests. They allow you to hold camera without feeling like it’s going to slip out of your hands.
FEATURES
The camera has a 1/5-inch sensor with a fixed focal length of 33.4 mm and an aperture of F2.4. The shutter speed ranges from 1/7500 to 1/2 (auto selected) and a max of 10 seconds when in bulb mode. The ISO ranges from 100 to 1600 (auto). There is also the option to use exposure compensation with a range of -2.0 EV to +2.0 EV (with increments of 1/3 EV). There are three flash options: auto, compulsory flash, and suppressed flash. The flash has a range of 50 cm to 1.6 ft to 6.6 ft.
It has single autofocus while in photo mode and continuous autofocus while in movie mode. (Movie mode for an instant camera?!?! We’ll talk more about that lol.) It has a focus range of about four inches to infinity. There are six photo shooting modes: standard, double exposure, bulb mode, split, collage, and time shift. There is also a self-timer that can go off in two-second or 10-second intervals. Lastly, there are 21 different filters (18 for photos and three for movies) and the ability to adjust brightness and add vignette.
Battery/Charging
It takes about two to three hours to fully charge the SQ20 if you’re using a 0.5A USB port. One full charge will last you about 100 prints. It uses a microUSB charger. If Instax ever does an update of this camera (hint hint Fujifilm), hopefully they will go to a USB-C charger.
FILM AND PRINTING
This is kind of a given, but it uses the standard Instax square format film. That film is about 3.4 inches x 2.8 inches with the actual photo space being 2.4 inches x 2.4 inches (hence the squareness). It takes about 12 seconds for the image to print out of the camera and about 90 seconds for it to be almost fully developed. You can only print JPEG images from the camera (if you’re importing from a microSD card).
The camera can hold about 50 photos without a microSD card. If you add a microSD card, it can hold about 1000 photos per 1 GB. I have a bunch of larger capacity microSD cards (think 64GB and up), so I’ll probably try and find an 8 GB or 16 GB card and I shouldn’t have to change the card or delete any images for a while.
Finding Film
I don’t think the square format film is that hard to find. You can find it at most major retailers…Walmart, Target, Best Buy, etc. You can also find it online at websites like Amazon, B&H, and Adorama. I usually get my film from Amazon just because I can get it delivered right to my door and I usually get a discounted price because I order several packs. A double pack (20 photos) will normally run you between $20-$25. If you get one of the specialty films like Sunset or Rainbow, they can run about $15-$20 for a pack of 10.

Instax Square Film: Sunset, White Marble, Monochrome, White, Rainbow, Black, and Star-Illumination
Okay, so I’ve talked about all the technical stuff, let’s talk about the actual user experience. I took the SQ20 out for a spin this morning (03JUL24) and it was pretty easy to use. I was able to figure it out without having to use any type of manual. It’s pretty simple to use. Simple push the sliding button(?) to the photo icon (or movie if you want to record a video), compose my shot, and then press one of the two shutter buttons. Printing the photo is pretty straight forward as well. After I took the photo, I hit the print photo button, a message popped up essentially asking me to verify that was the photo I wanted to print, I selected okay, and it printed. The autofocus worked relatively well. I wish I had the option to move the focus point because sometimes it wouldn’t focus on what I wanted it to, but I don’t have any major complaints about the focusing. Most times it focused on what I needed it to focus on.
I was even able to figure out how to take a double exposure shot by just scrolling through the menu. Now, this could be because I’ve used the Mini EVO before so I have at least an idea about the menu system for Fujifilm, but I think even if you’ve never had an EVO or LiPlay, you could figure out how to use the camera.
Overall Thoughts
Overall, my initial thoughts are that I don’t regret getting this camera. It’s nice having the option not to immediately print photos while I’m out and about. This way I don’t have to worry about losing my prints. The camera is easy enough to use and takes some great instant photos. I can’t wait to play around with it more.
Stay tuned for my next post. I’ll share some of the photos from my first outing with the SQ20 and more about my experience.
Until next time!