Roger Williams Botanical Center with the Polaroid I-2
Check out some photos of the Roger Williams Botanical Center taken with the Polaroid I-2, Basquiat frames, and Black frames.
It’s so cold here in Newport right now. The high was like 30 degrees Fahrenheit today and the heat went out in my house. I was going to go to Mystic, CT today and shoot some film photography, but it was just too cold. I knew I would be miserable so I changed plans. I decided to go visit the Roger Williams Botanical Center. The great thing about this botanical center is that it is indoors so I wouldn’t freeze outside. The botanical center is in the Roger Williams Park. That park also has the zoo, a Japanese garden, and more.
I decided to shoot with my Polaroid I-2 and a pack of my Basquiat frame and black frame Polaroid I-Type film. I’m so sad I didn’t buy more of the Basquiat frames. I love the frame designs. If they ever come back in stock, I’m ordering a bunch.
Photo from Polaroid Newsroom Website
I’m trying to get over my aversion of shooting Polaroid film. I’ve been stocking up on film, but I haven’t been shooting with it. Polaroid film is a fickle mistress and she’s not cheap. I hate wasting film and shooting with Polaroid will likely lead to at least some film wasted. The Redditors of r/Polaroid basically reminded me I won’t get any better with shooting Polaroid…if I don’t shoot with Polaroid.
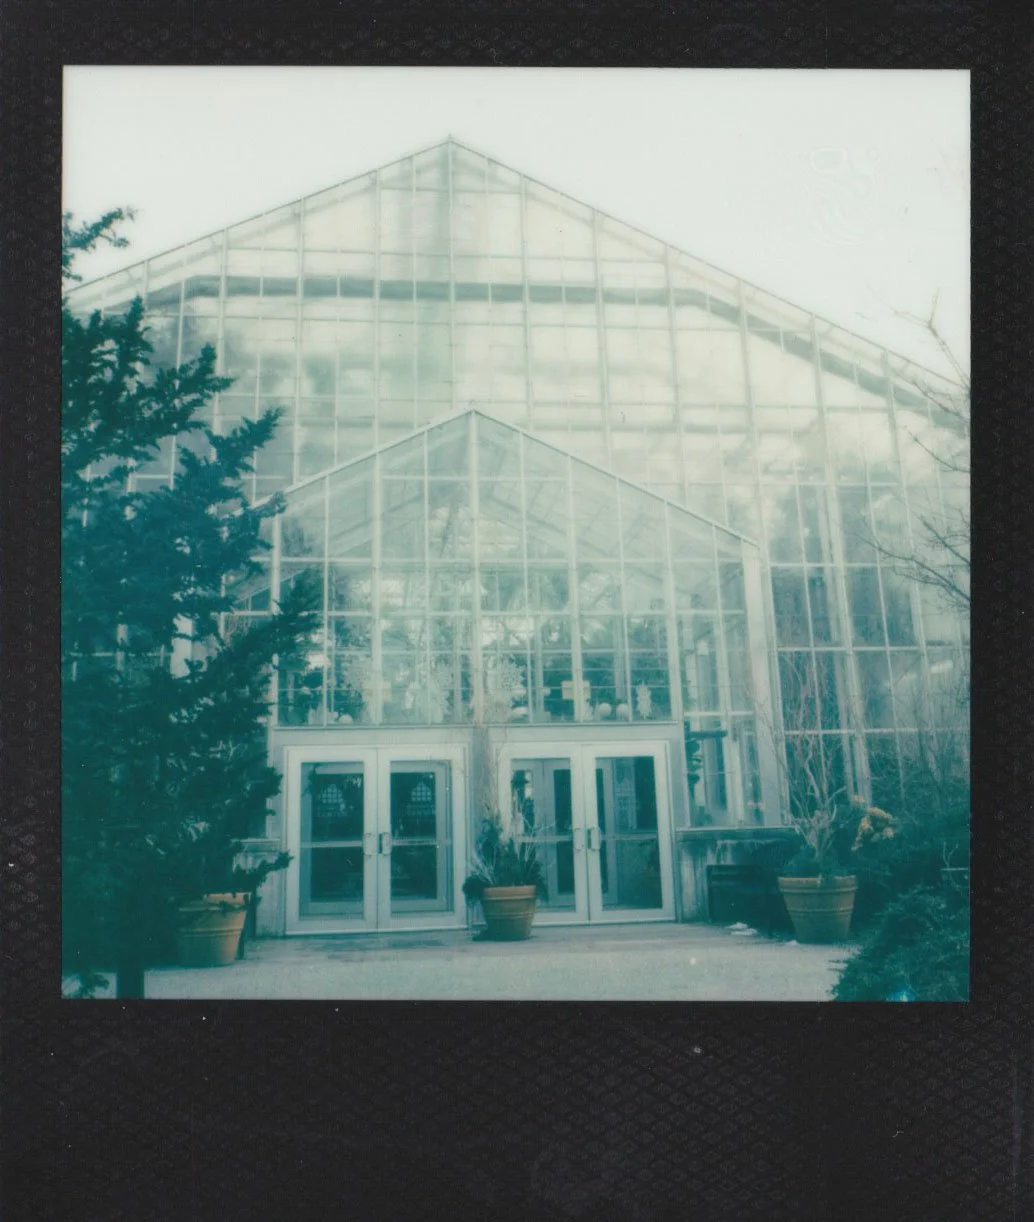
Roger Williams Botanical Center Entrance - Shot with I-2 and Black frame
This is a shot of the entrance to the Botanical Center. The photo was shot outside and started developing outside so that’s why it has more of a bluish-green tint to it. When I said Polaroid was a fickle mistress, this is what I meant. She is very susceptible to extreme temperatures…more so than Instax film. It was also pretty overcast today so that is part of the reason the sky is blown out. It was pretty much just a white out for the sky with the cloud coverage.


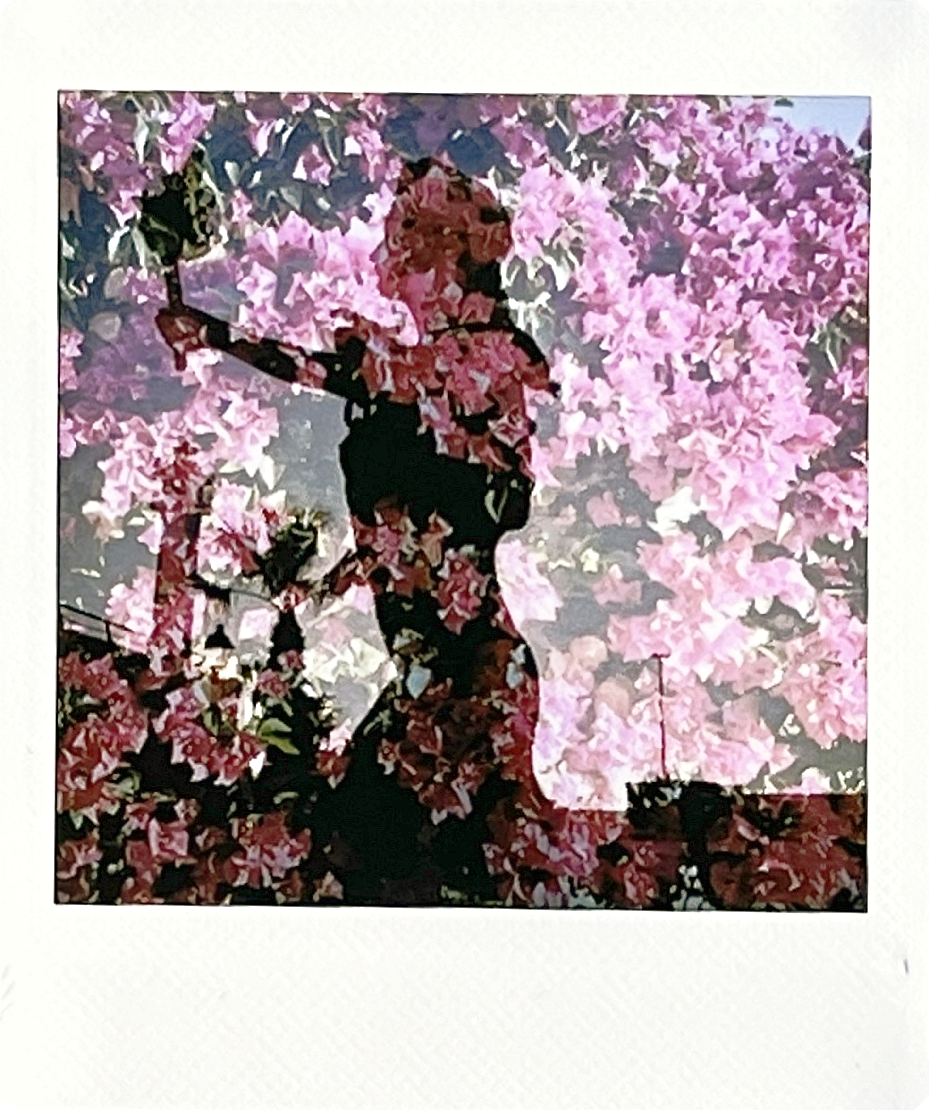
Here are some photos I took with the Black frame and my I-2. I like how the lady statue photo came out. I ended up using the flash for this one to better illuminate her. The photo that looks like it has white flowers should actually be more pink. I’m a bit disappointed that the camera focused more so on the back half of the photo instead the flowers in the front. I have mixed feelings about the last photo, the red flowers on the cactus. It’s not framed how I intended. I wanted to more of a mirror image on the side and then the bulk of the cactus in the middle. I’ve gotta learn how to better use the viewfinder for the I-2. There is a bit of parallax and I just haven’t taken the time to learn how to properly use it.


These are some of my favorite photos of the red plants at the Botanical Center. They are so much sharper in person. I actually really like how underexposed these photos are. The backgrounds are darker so I think it draws your eyes to the flower/plants. Plus, the Basquiat frames are so awesome.


Here are two different photos of the same flower. The Black frame is darker while the Basquiat frame is brighter. I think they both have their benefits, but I still lean towards the darker photo. I like the richness of the green in that photos. I do think the brighter photo of the flower and plants works well with the Basquiat frame with all of its yellow.

This was my attempt at a double exposure. The little green plants were the bottom layer and the bigger red and green plant was the upper layer. Like with parallax, I need to learn more about double exposure. I have that feature in a lot of my cameras, but I never really use it. It can create some really fun and creative images.

This is probably one of my favorite plants that I found at the Botanical Center. It looks like a little pineapple plant. I thought pineapples grew on trees, but I did a quick Google search, and it looks like they grew from a regular plant. I think this is such a cute little plant. I had a lot of fun at the Botanical Center. I did use this app called Lghtmtr on my phone to help me better choose my settings. It actually worked out pretty well. I’m going to keep using it until I get more comfortable with understanding my camera settings.
It was nice to get out of the house and take some photos not in the cold lol. I’ve done several shoots outside and it was just too cold. I definitely need to shoot with my Polaroids more if I want to improve. My dad got me a purple Polaroid Now 2 for Christmas, but it shoots in auto. I’m going to wait until I get more sun because it’s easier to get good shots with a non-manual Polaroid with more sun.
Frugal Film Project 2025 - January
First Frugal Film Project roll of the month takes us around downtown Newport, RI.
Alright, so welcome to my first official post chronicling my 2025 Frugal Film Project. Now, if you don’t know what the Frugal Film Project is, click here to be taken to my blog post explaining what it is and how I plan to participate.
For this year’s Frugal Film Project, I’m going to attempt to take photos in cities/towns I’ve never visited before. Disclaimer, I didn’t decide to do this theme until I had already taken my January roll of film. While the photos aren’t of a city I haven’t visited before, they are photos of a city so it still fits the theme (kinda).
I’m going to write a little something about each photo, but some may be more detailed than others. I also forgot to annotate the settings for these photos so I’ll make sure for February, I write them down so I can share that info with y’all (in case anyone is wondering). Okay, enough talk. Let’s look at these photos.
City: Newport, Rhode Island
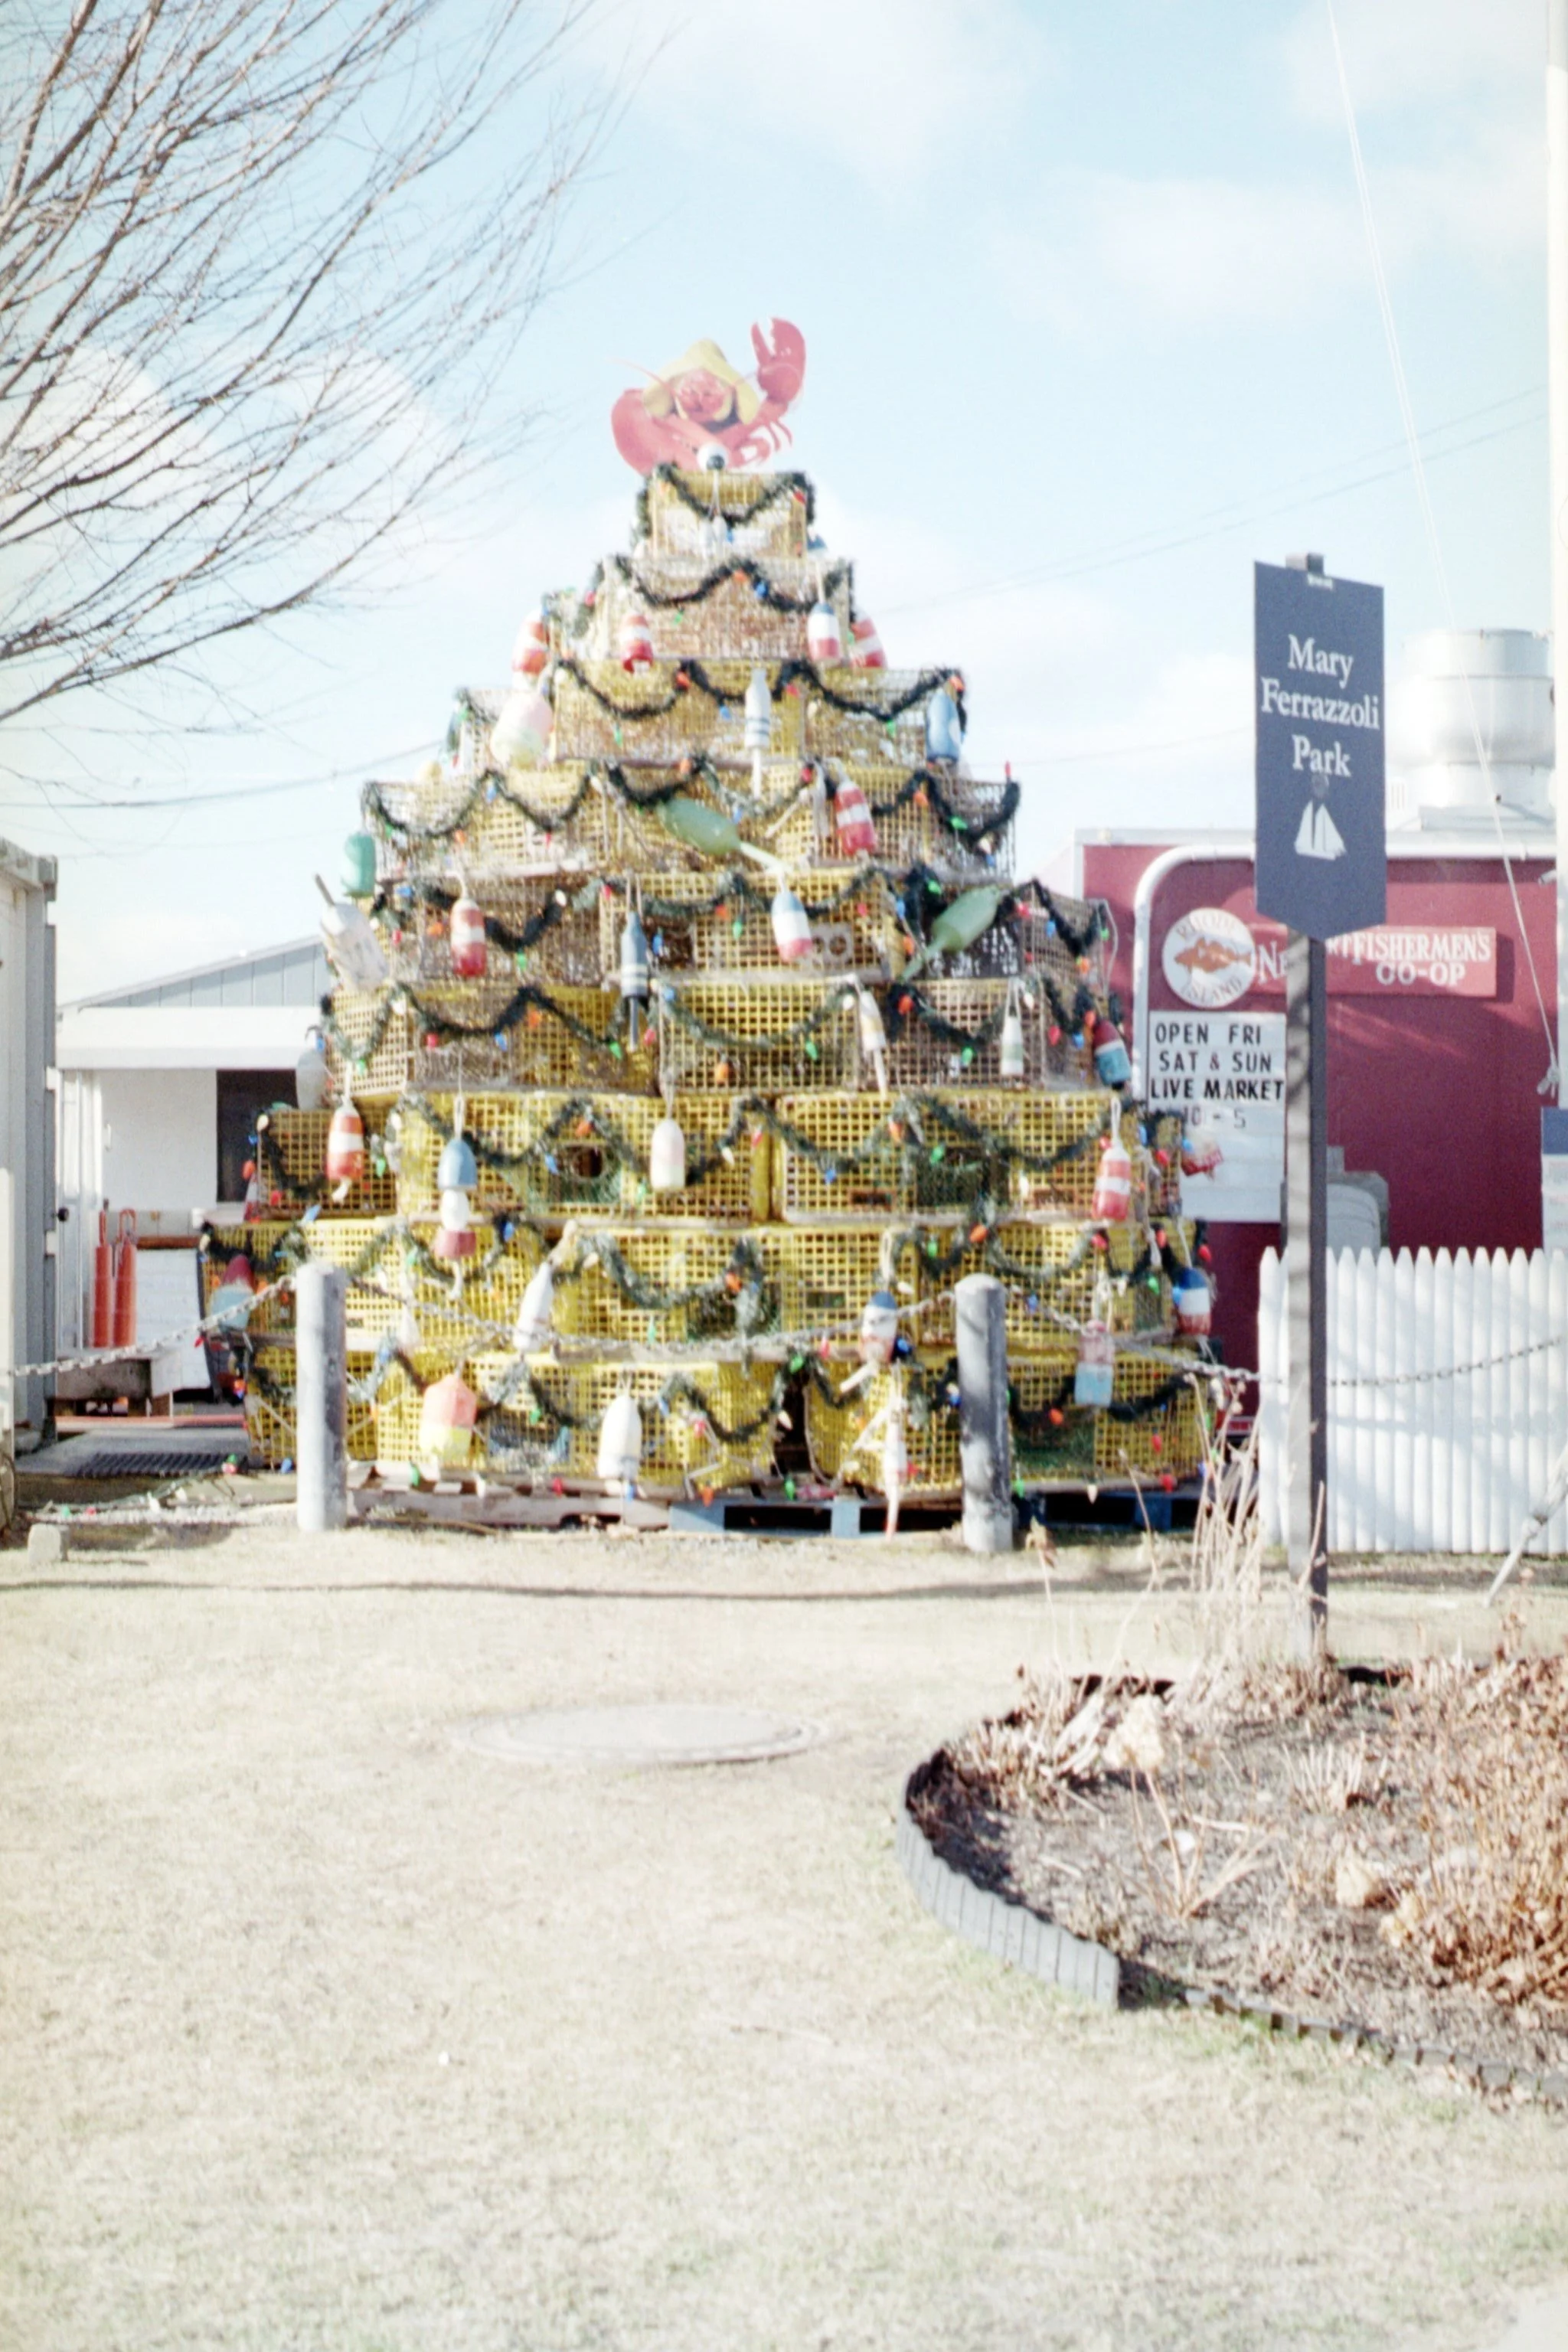
Lobster Crate Christmas Tree
The Christmas tree was my very first shot. For this shot, I just kinda guessed the exposure. Not because my camera can’t meter, but because I didn’t know how to use the metering system in the camera. I was so excited to be shooting with a film camera that I didn’t really take the time to see how to use the camera lol. After I took the first shot, I went to YouTube and looked at how to use the metering system for this camera lol. Overall, I think I did pretty good with just guesstimating the settings.
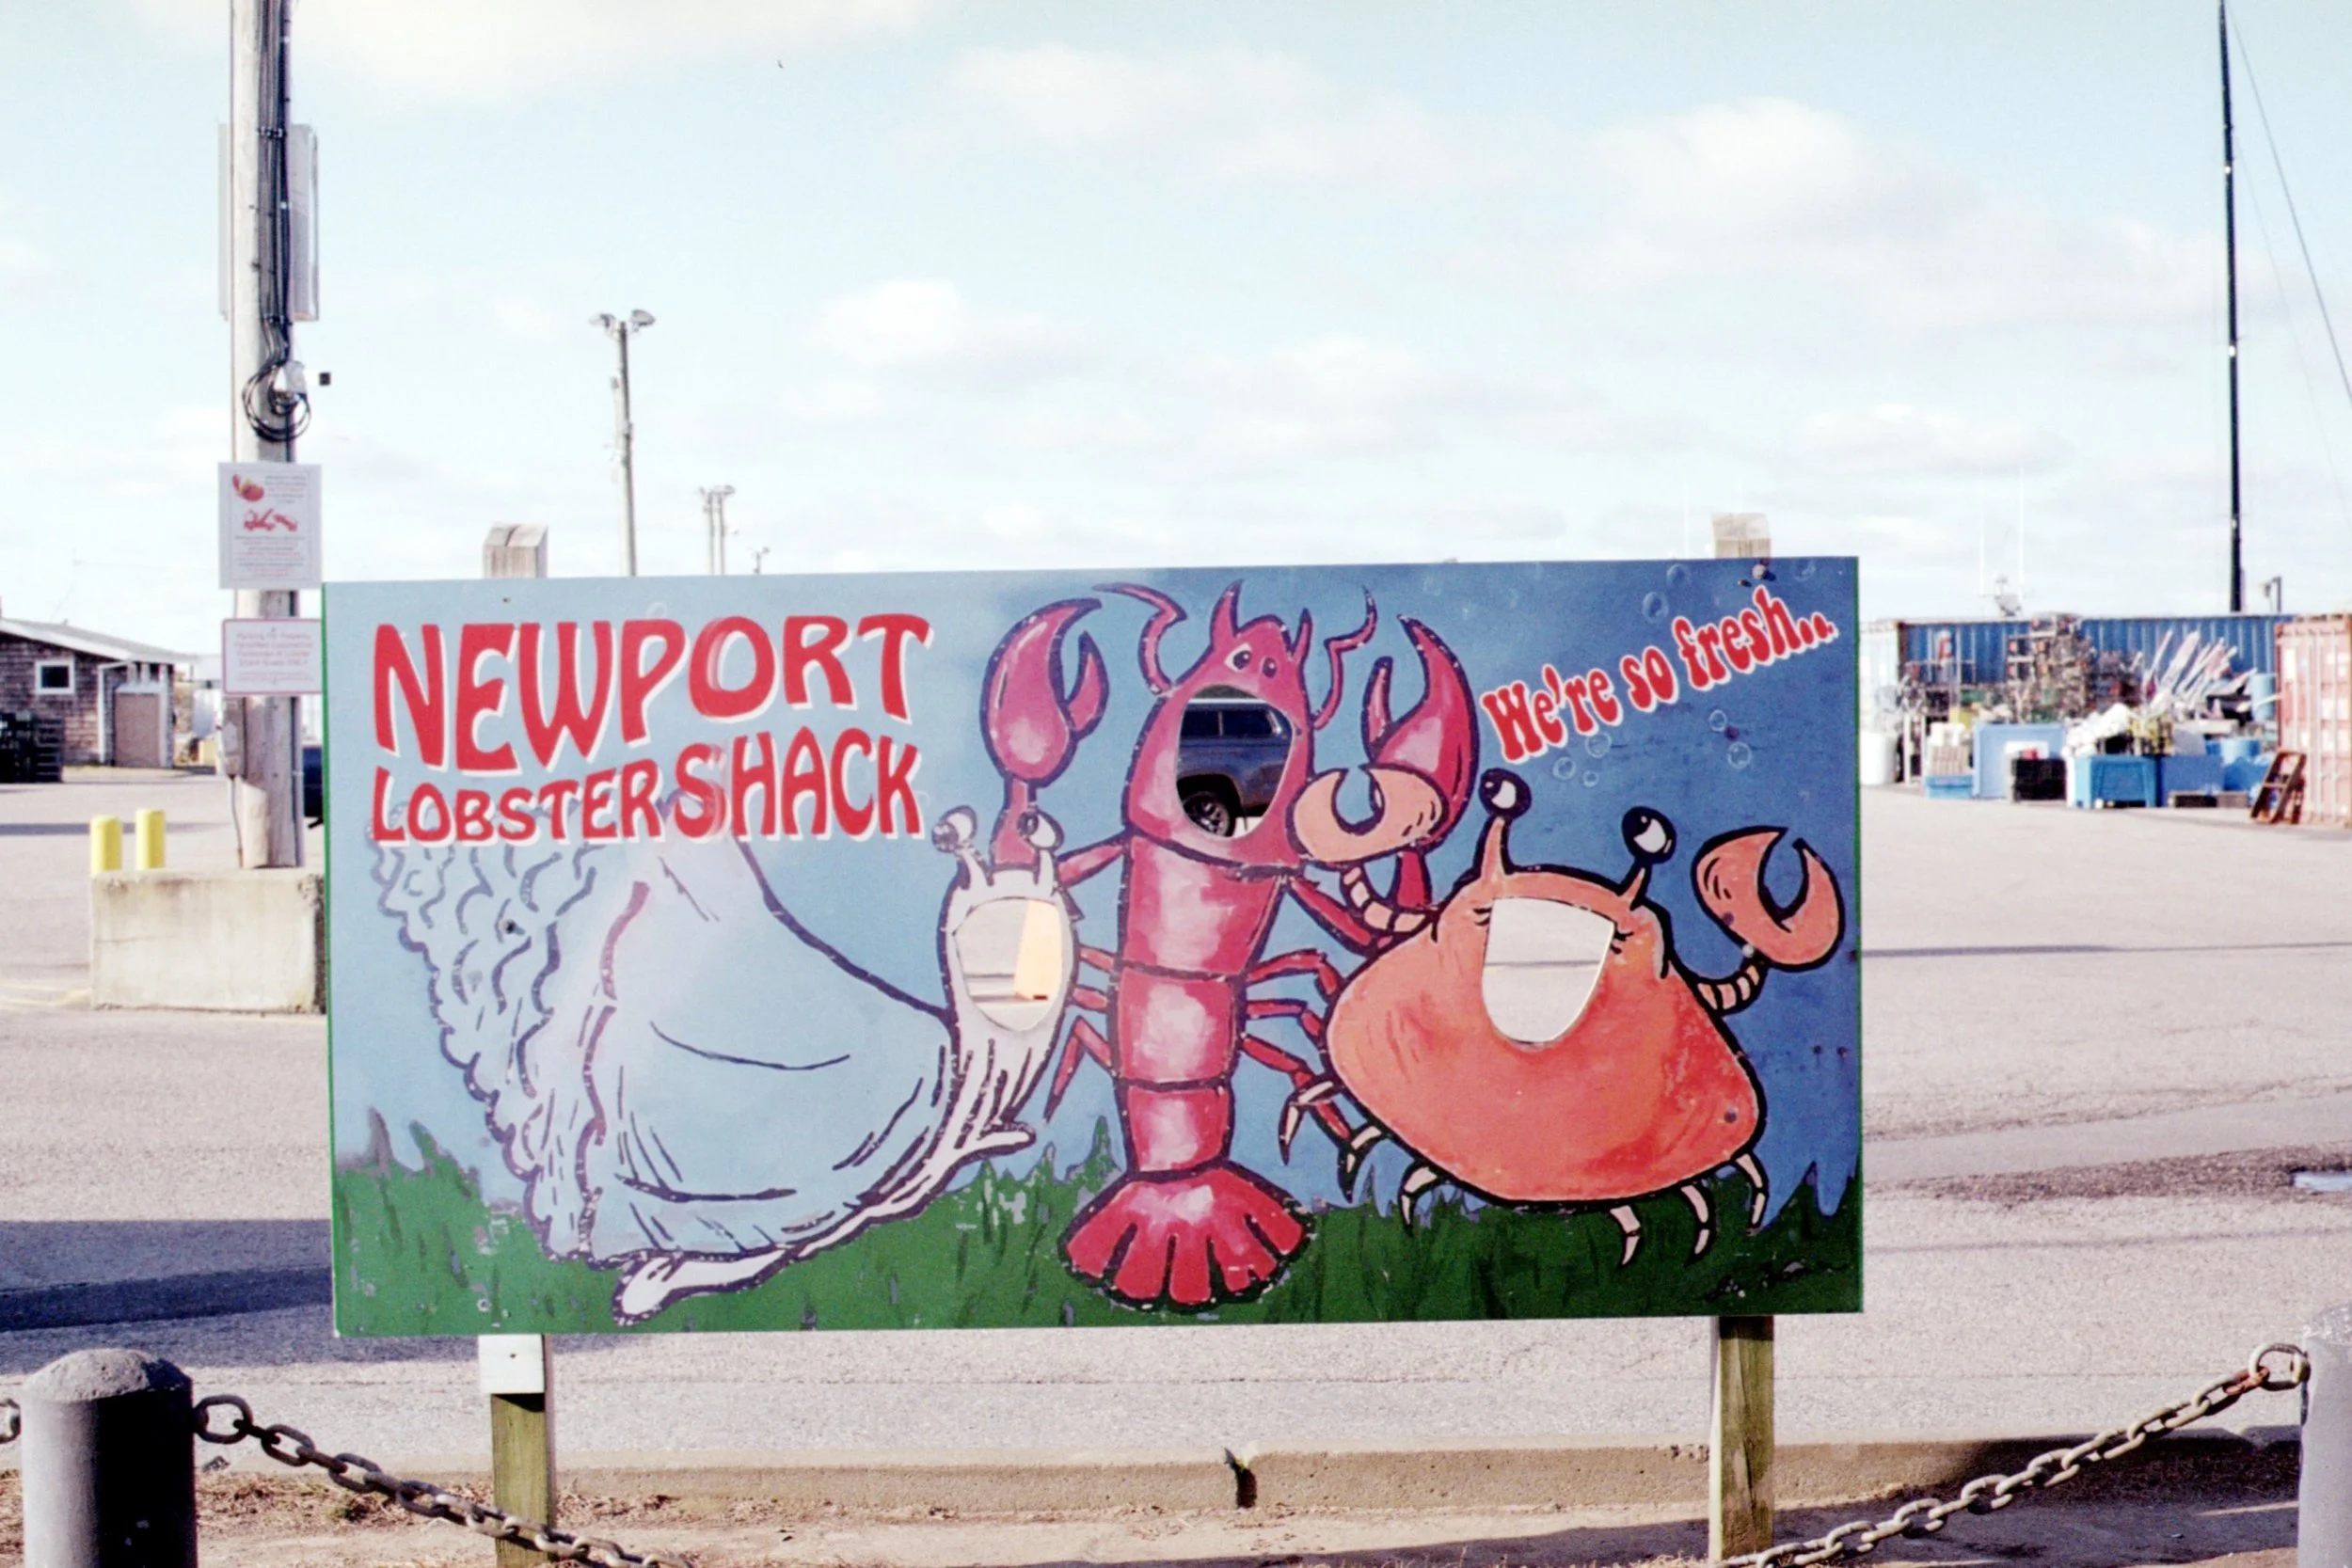
Newport Lobster Shack Sign
Alright, here is my first photo where I actually used the metering system. I’m actually pretty happy with this photo. If I was going to shoot it again, I’d probably shoot a tighter shot so the sign filled in more of the frame, but overall, I like it. I like that the sky isn’t too blown out and you can still differentiate between the sky and the clouds.
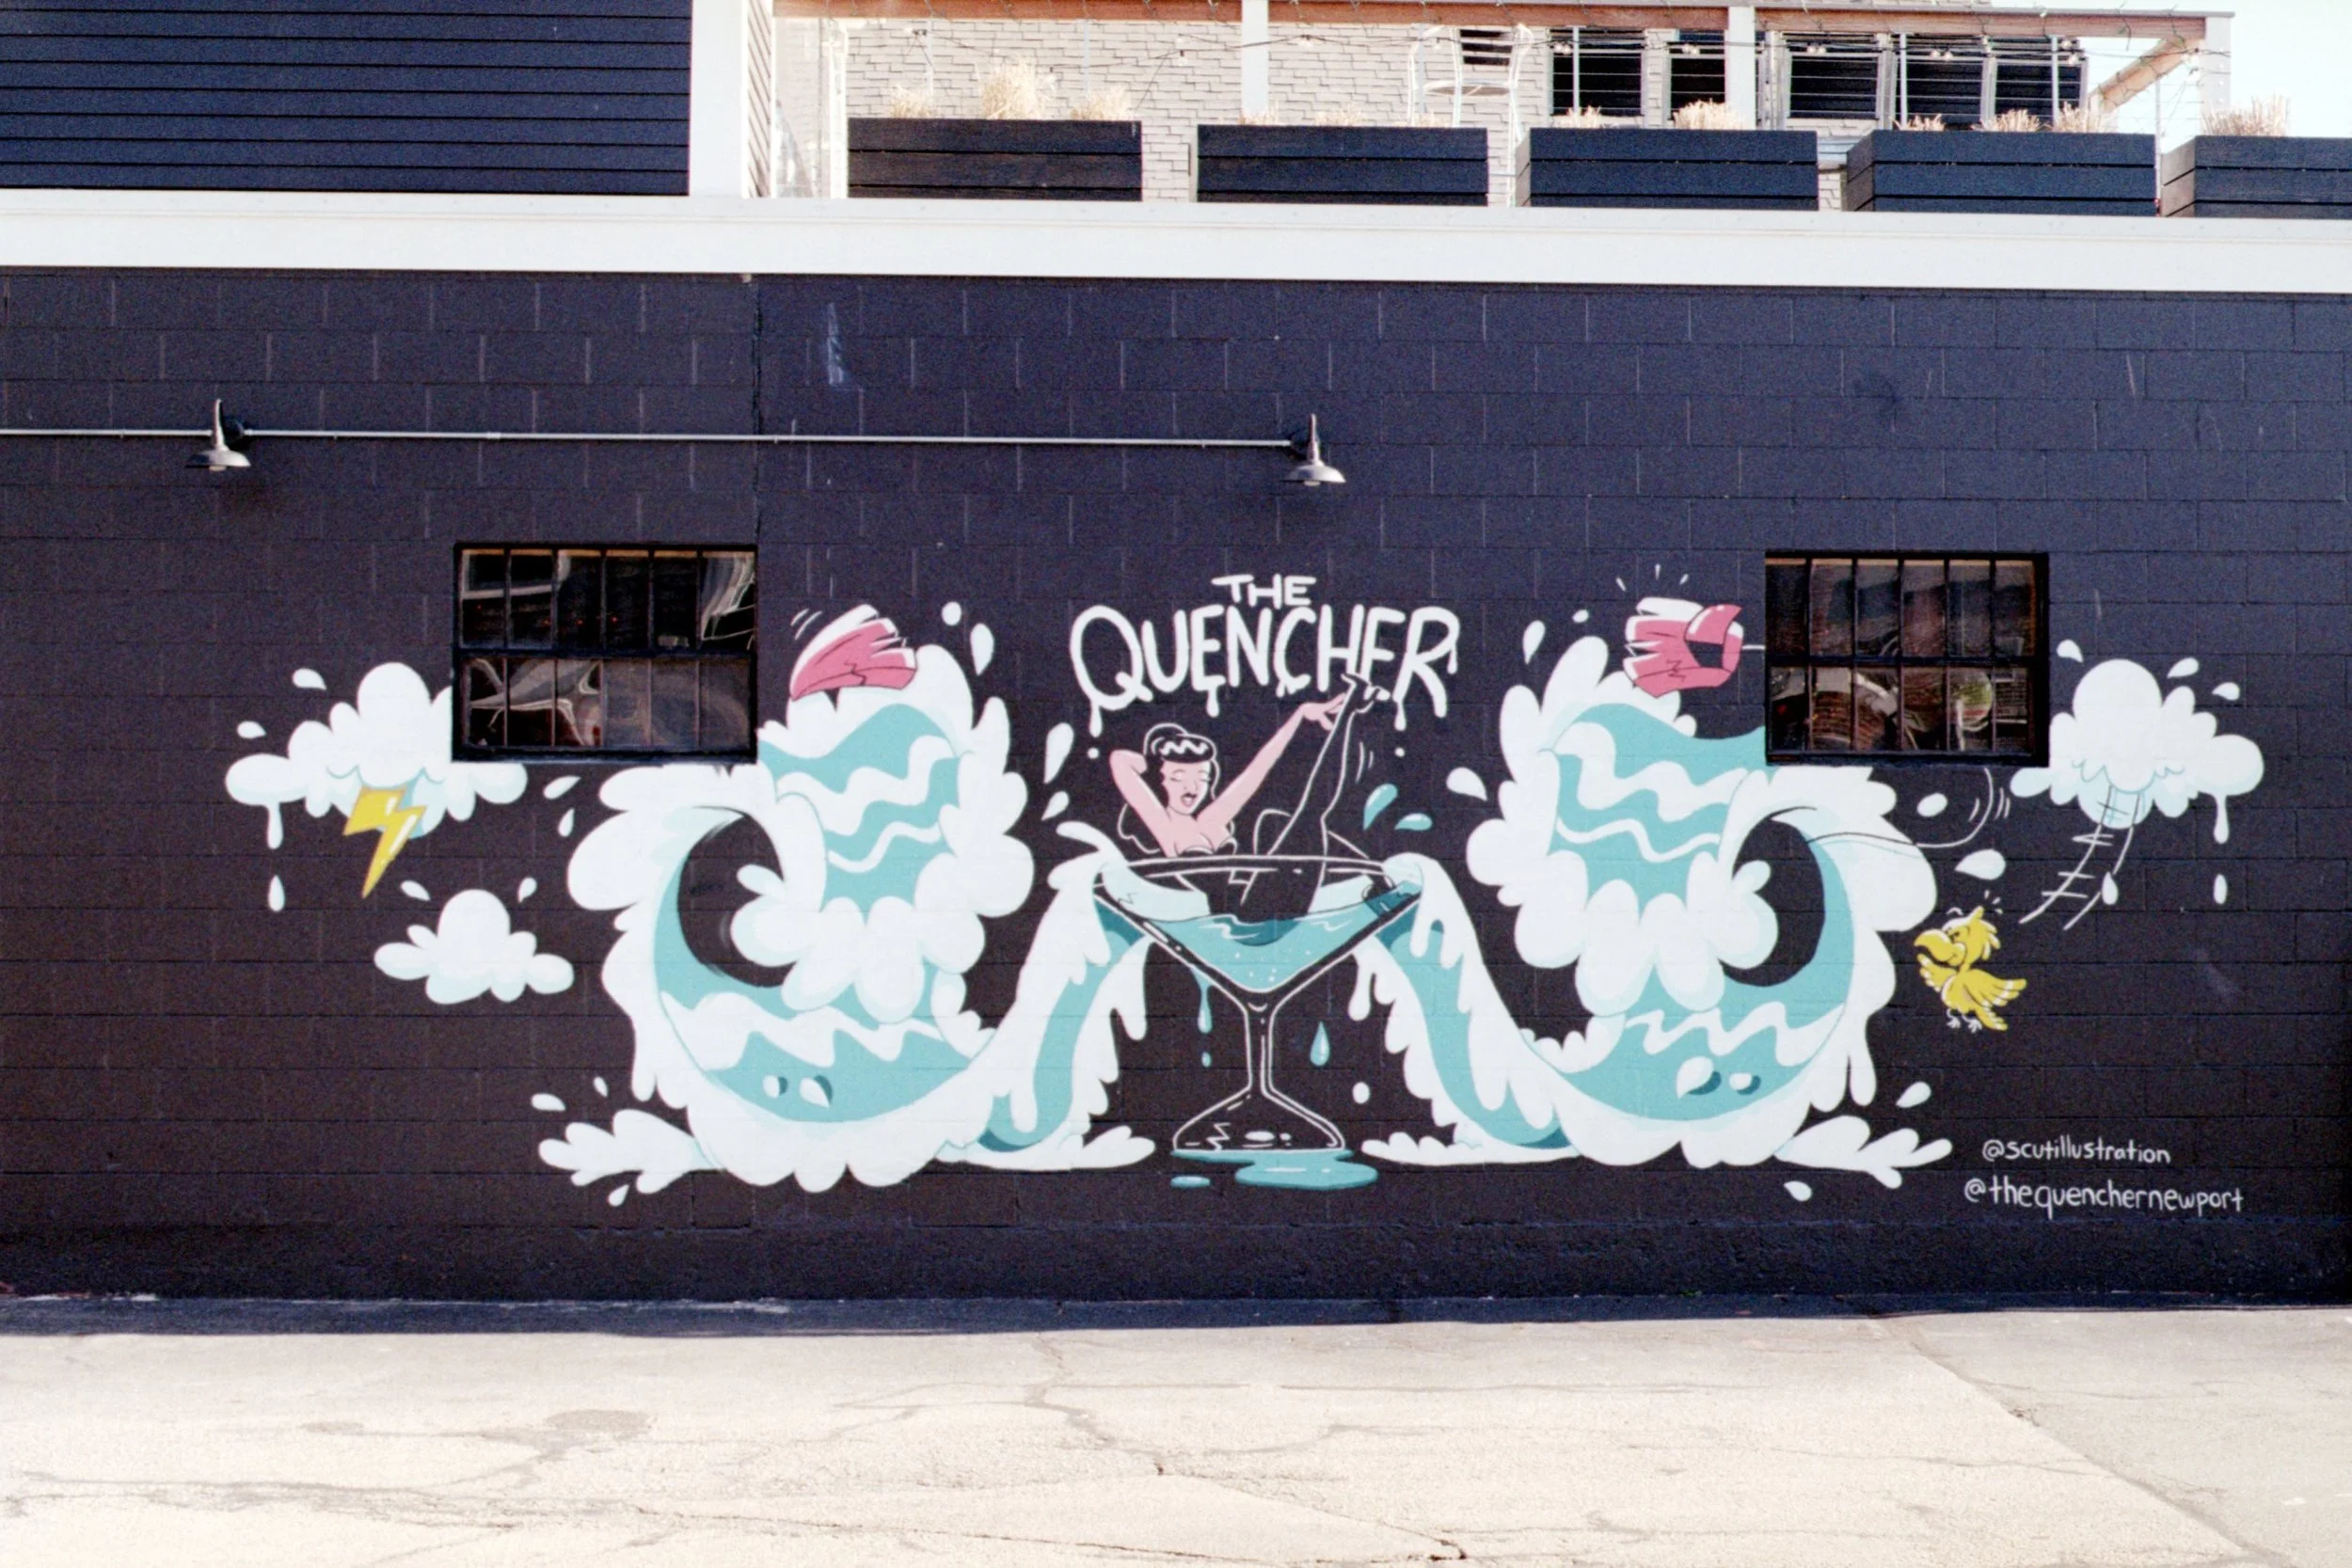
The Quencher Graffiti
I love graffiti so of course I had to capture one of my favorite pieces in Newport. This is on the side of a building near the seafood market and marina. I really liked how this photo turned out.
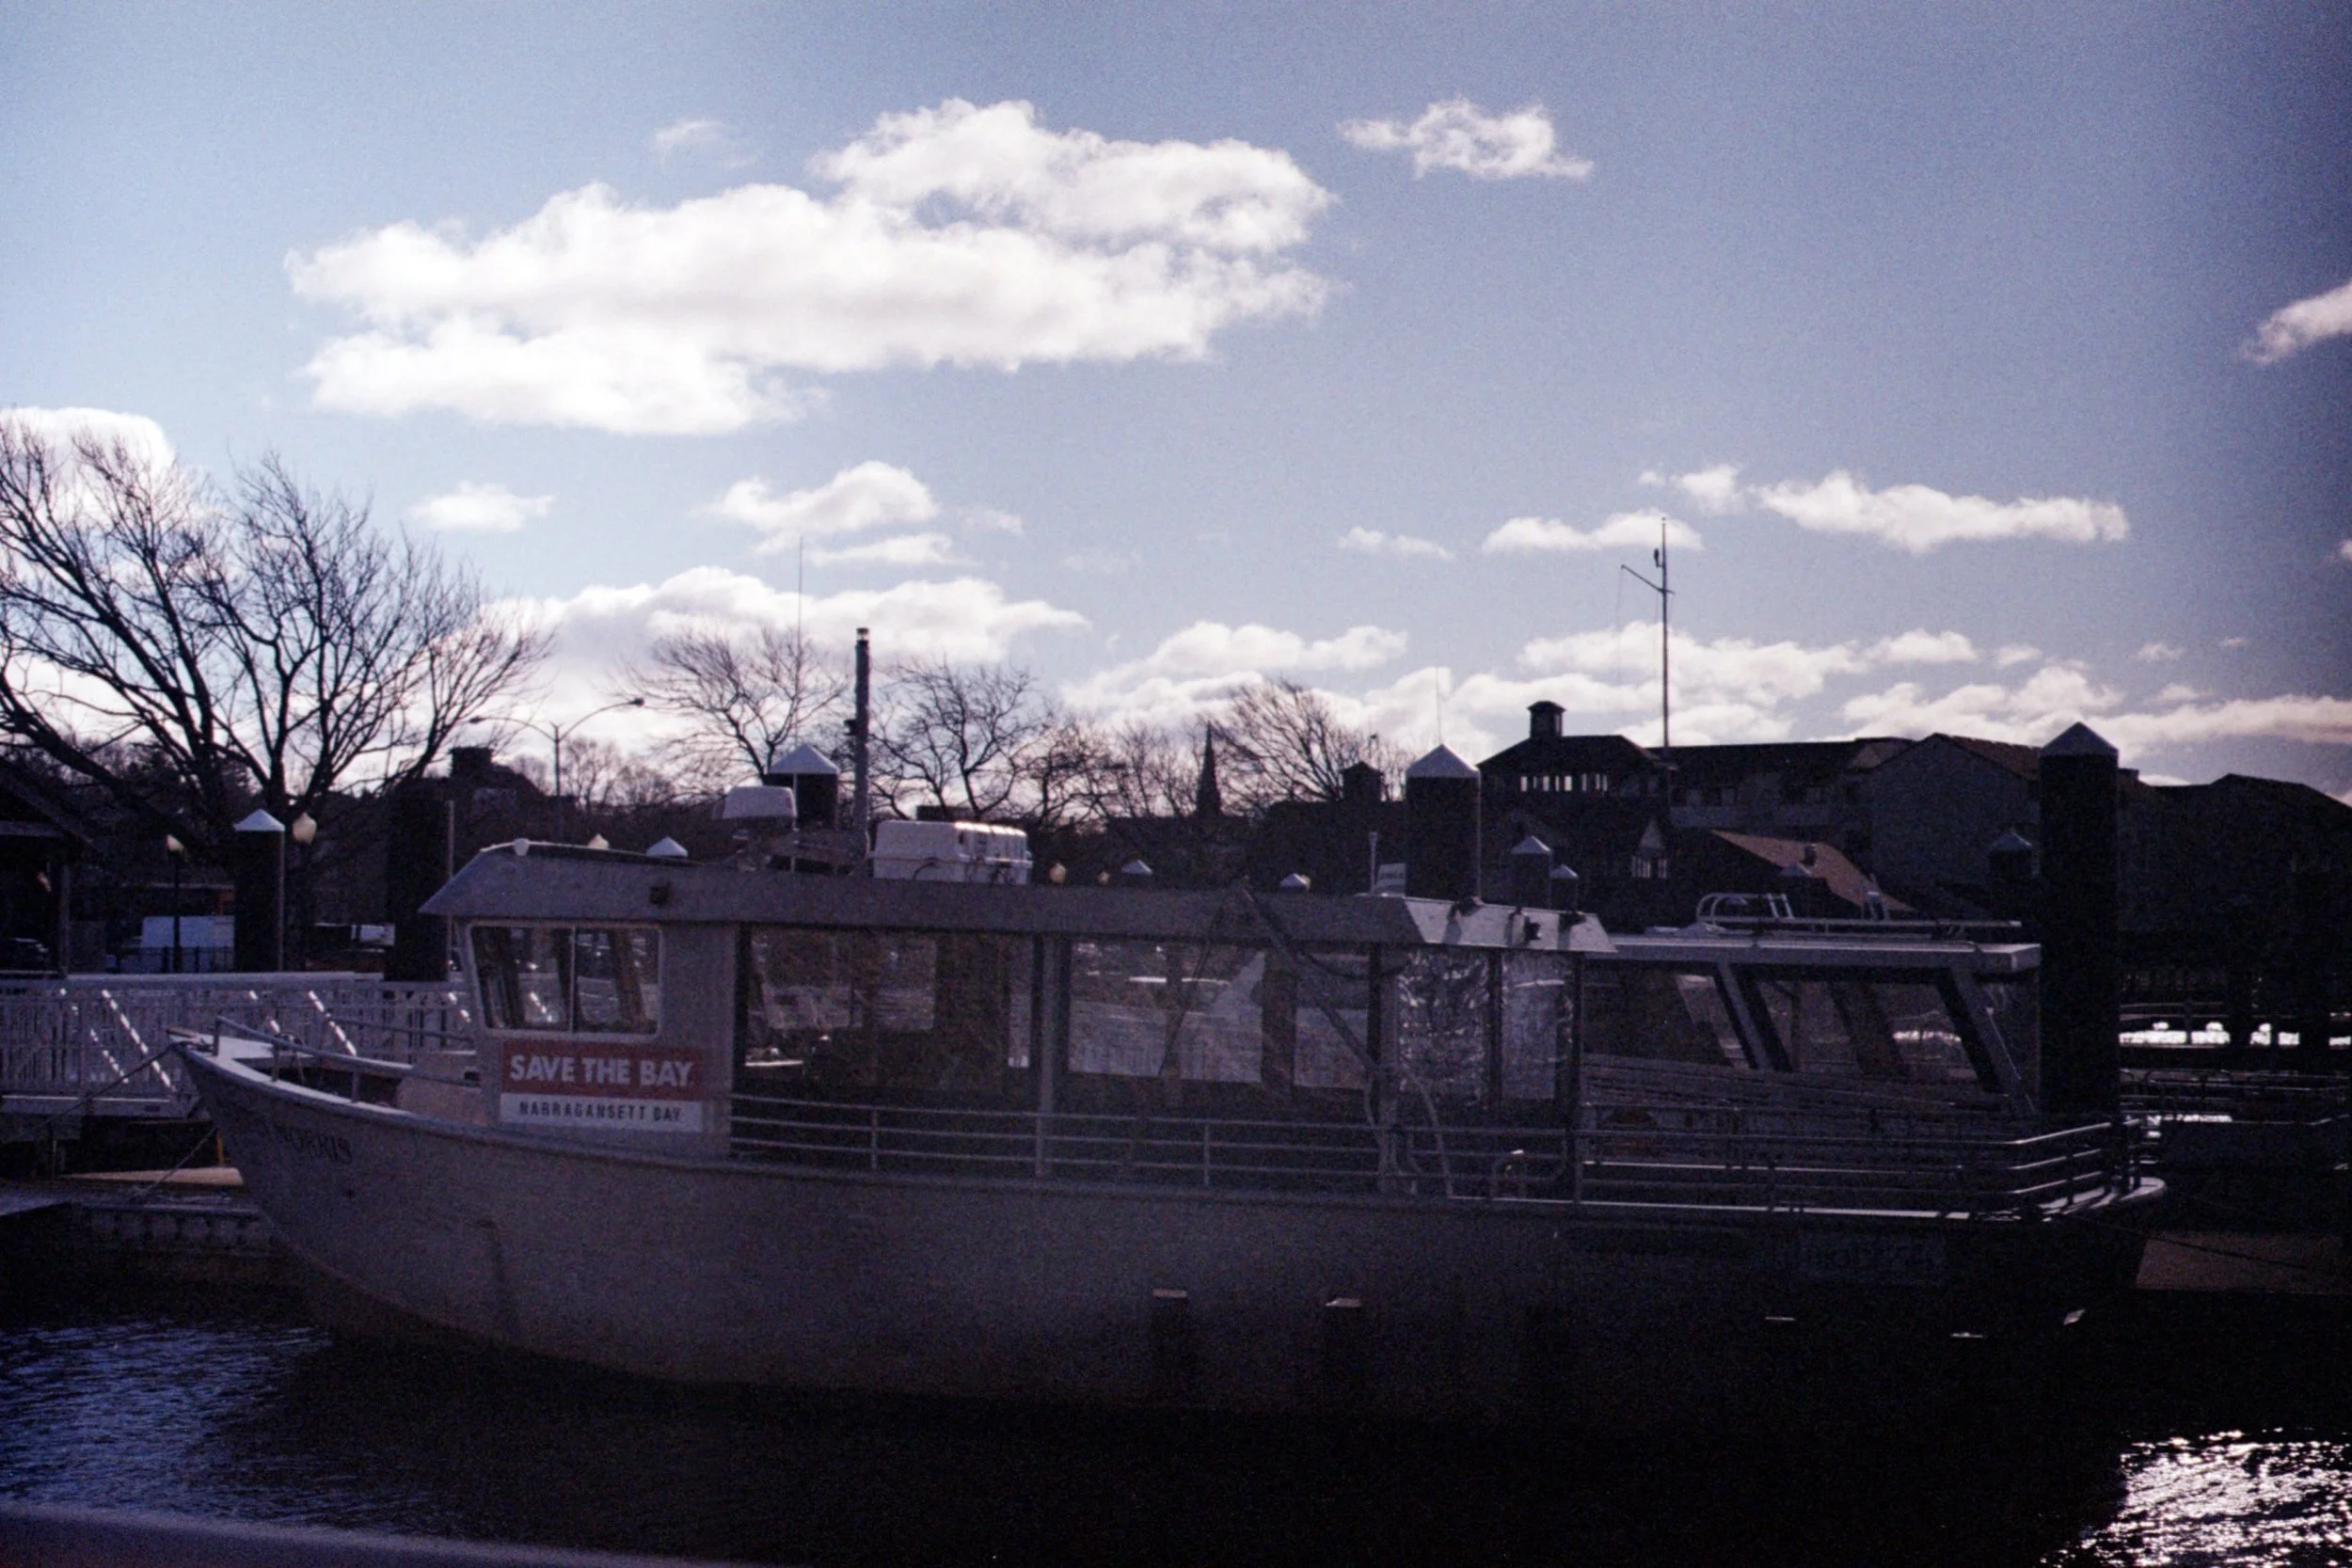
Save the Boat
I’m not super thrilled with this photo. It’s a bit too dark and washed out for my liking. This photo was more into the sun which is why you see so much shadow and why these is such a contrast between the clouds and the sky. I think this would have looked better in black and white.

Newport Marina
I’m not sure why the fall off of the light happened with this photo. I think I might be standing under a gazebo, but I don’t know why the right side would be as dark as it is. If the photo had consistent brighter lighting like on the left, I think this would have been a better photo.

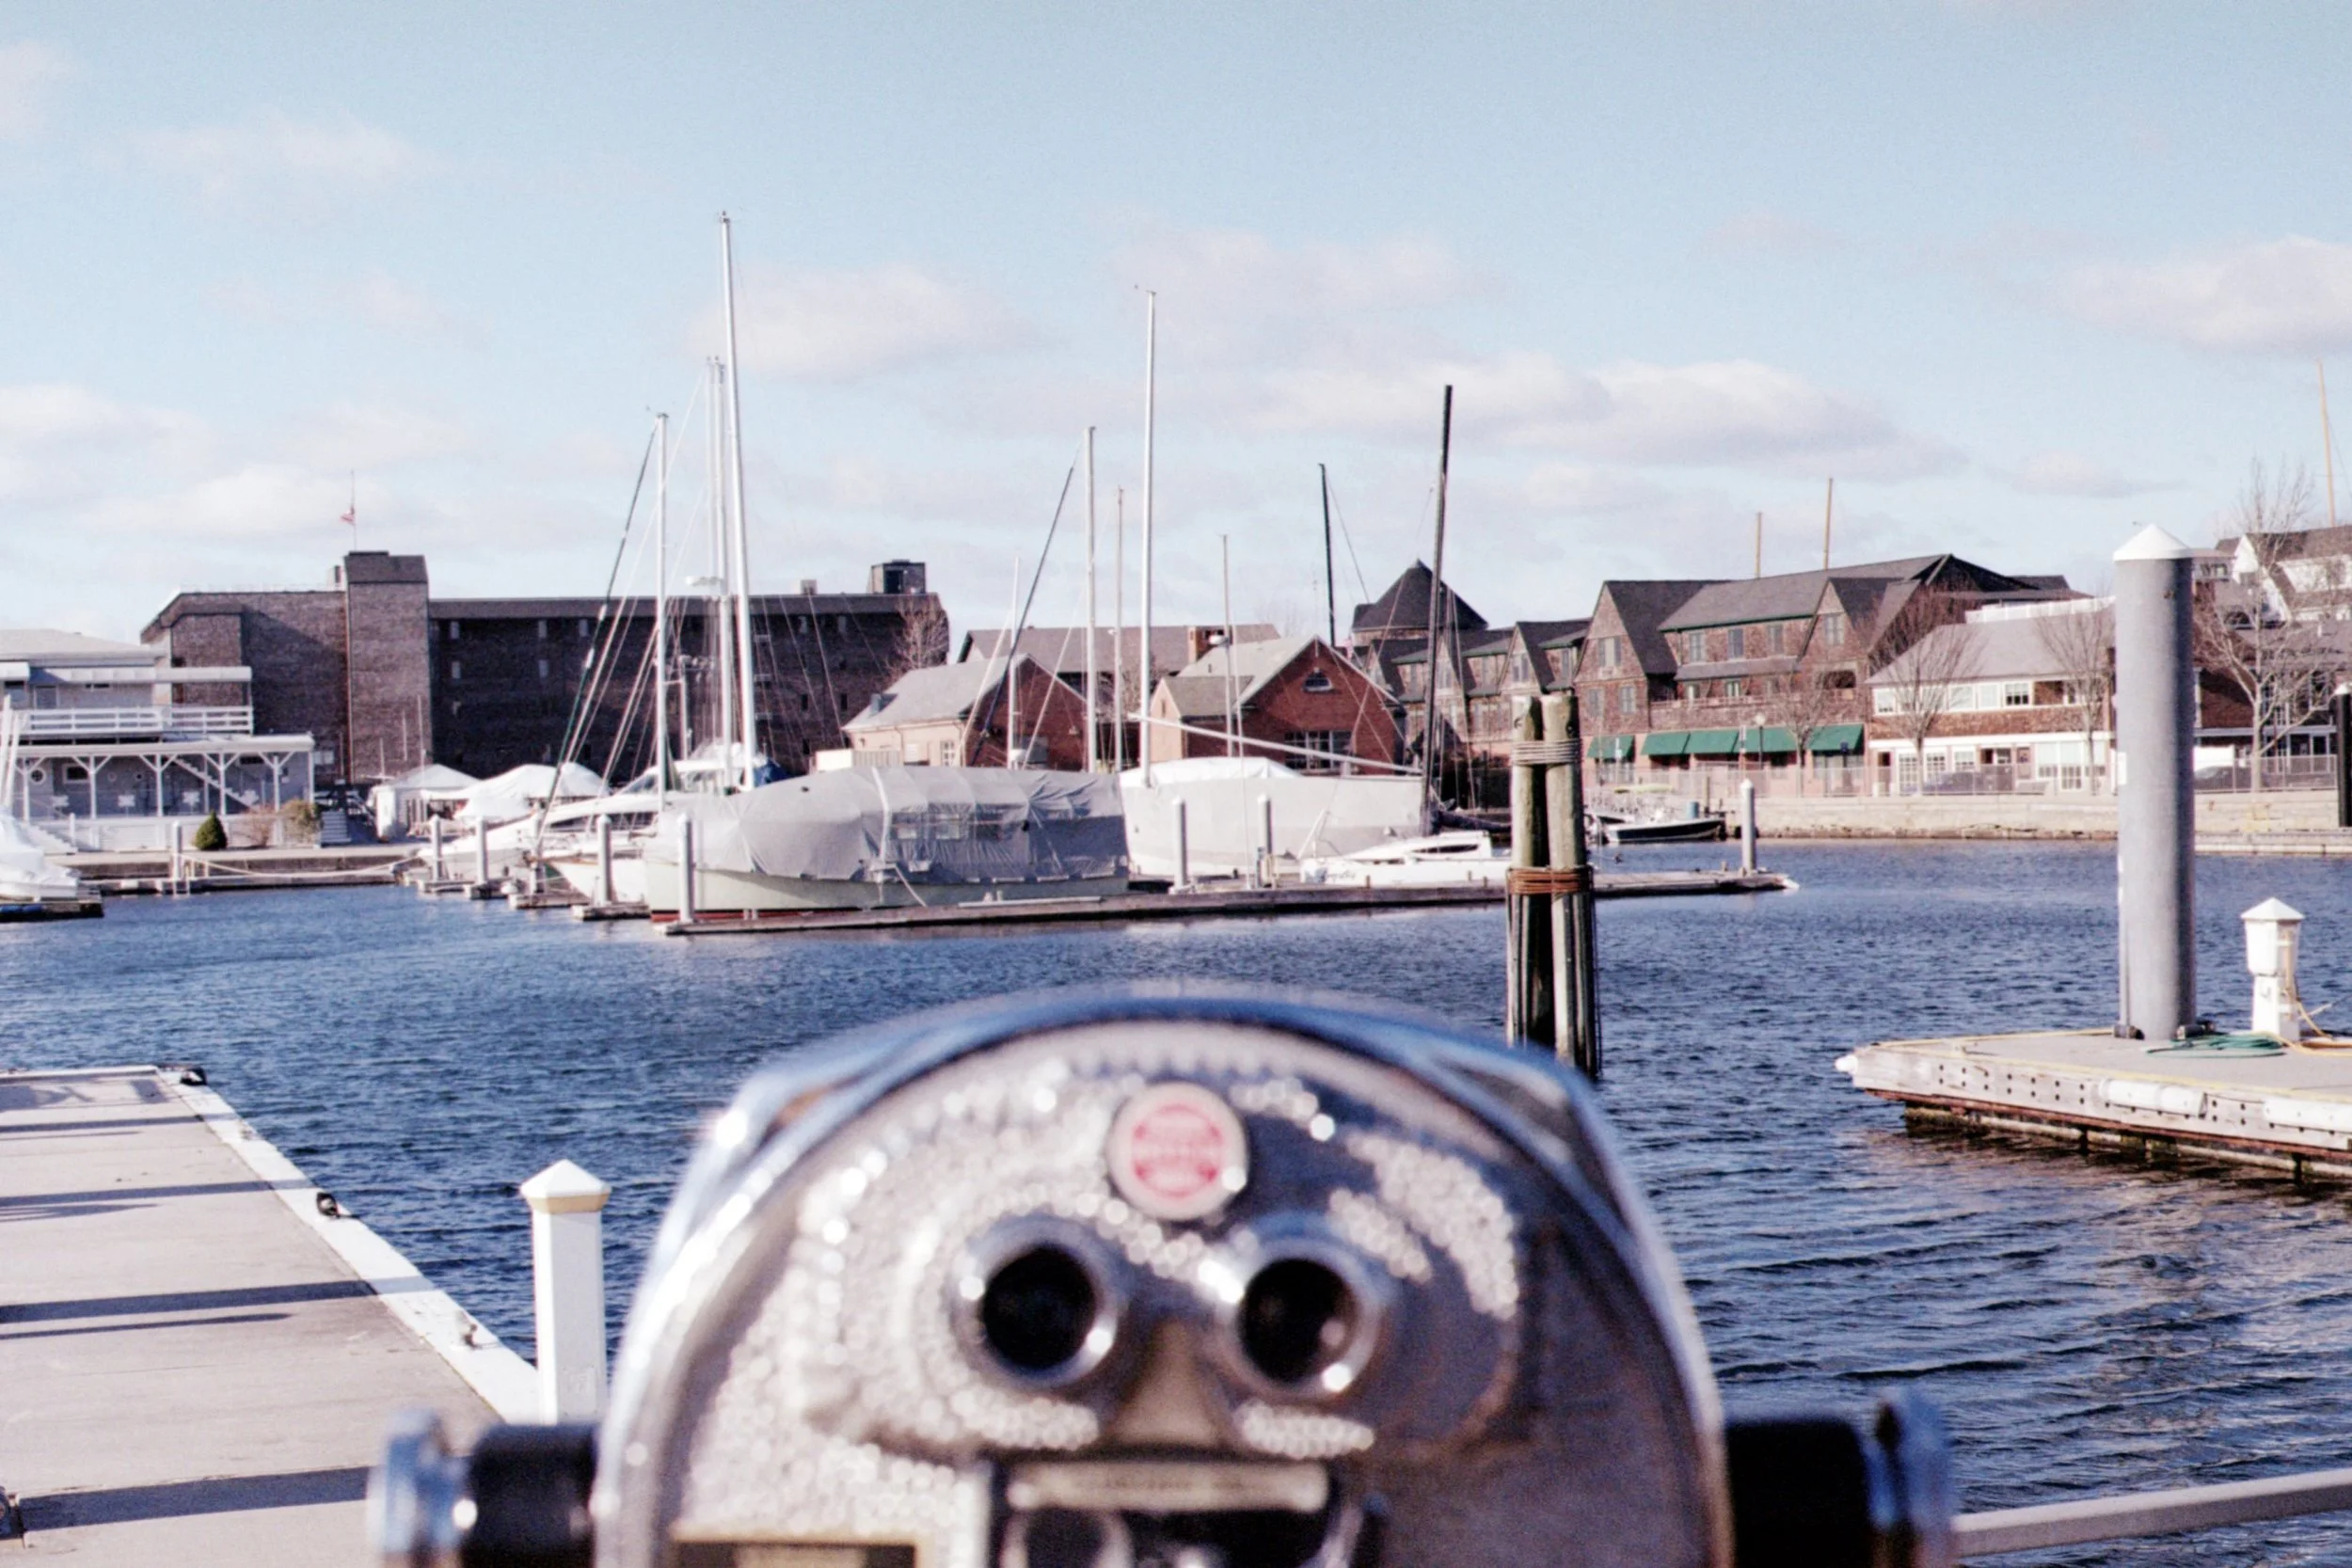
Newport Marina
This is my attempt at an artsy-ish photo. In the foreground, you can see a pair of those giant metal binoculars that you will sometimes also see on like tall buildings. The horizon looks a bit tilted, but this is still one of my favorite photos from this shoot.

Dolphins Structure
Here is the dolphins structure at the marina. I couldn’t find the name of it when I Googled it, but I thought it looked cool so I wanted to take a photo of it.
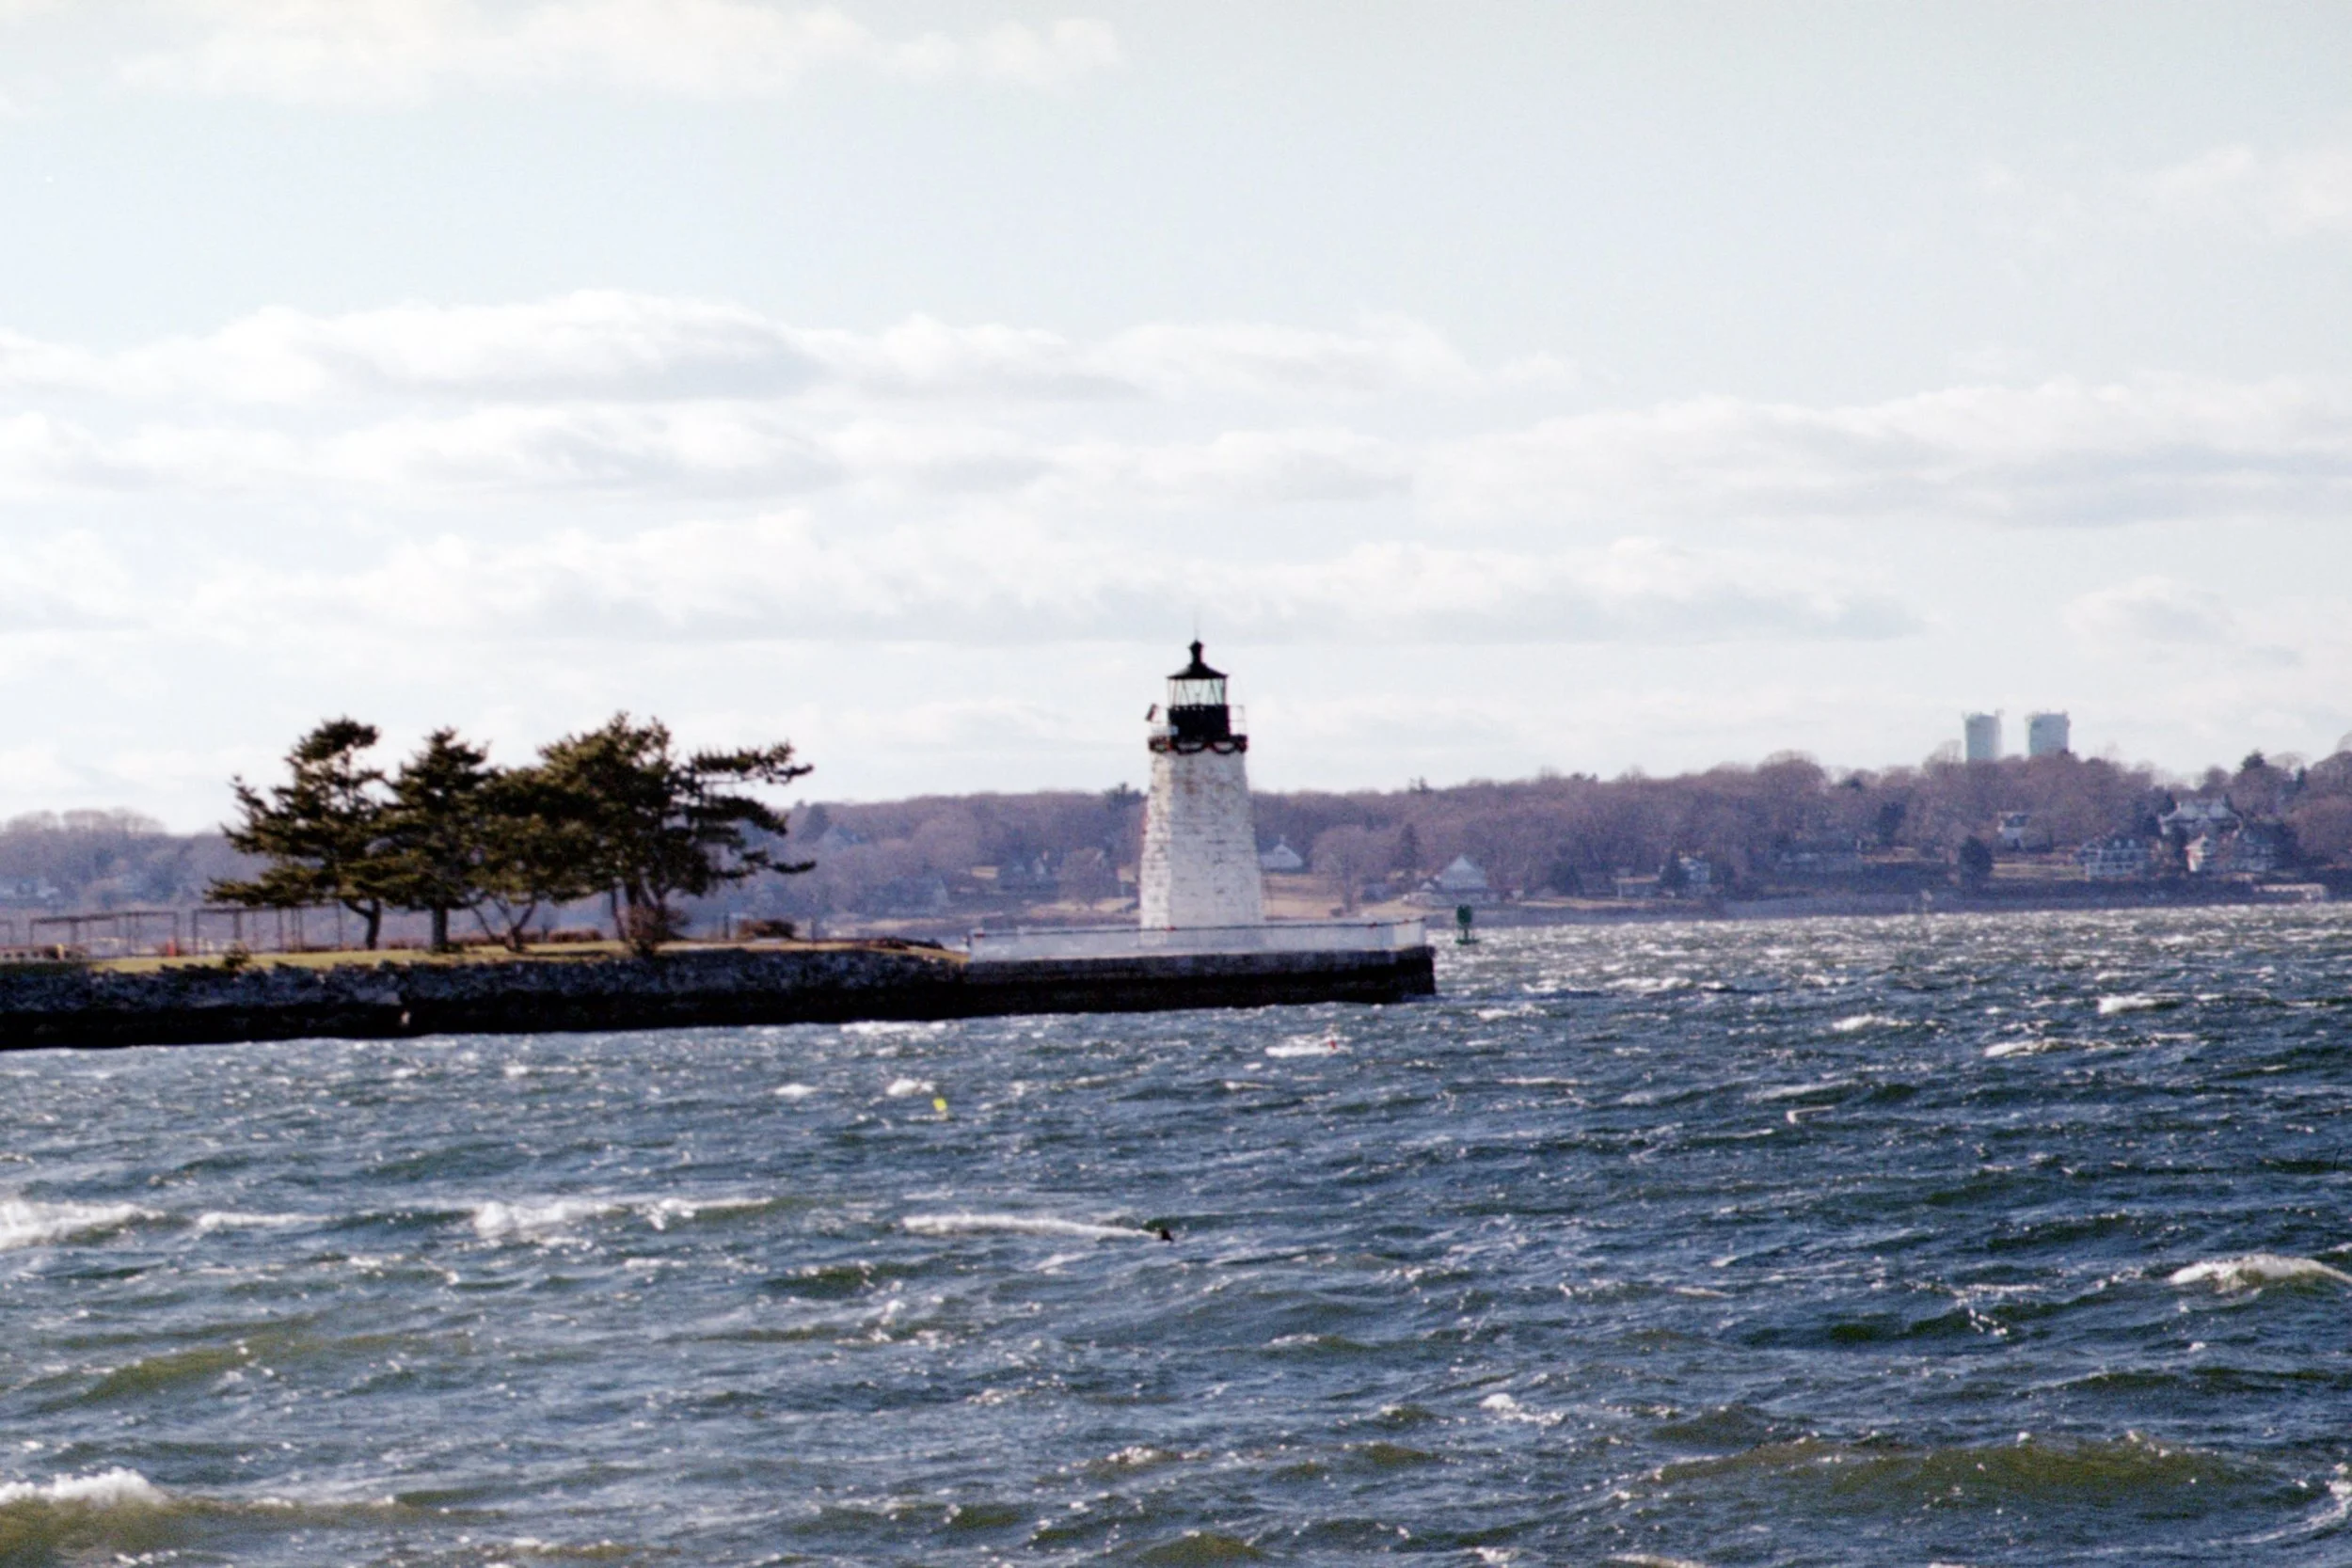
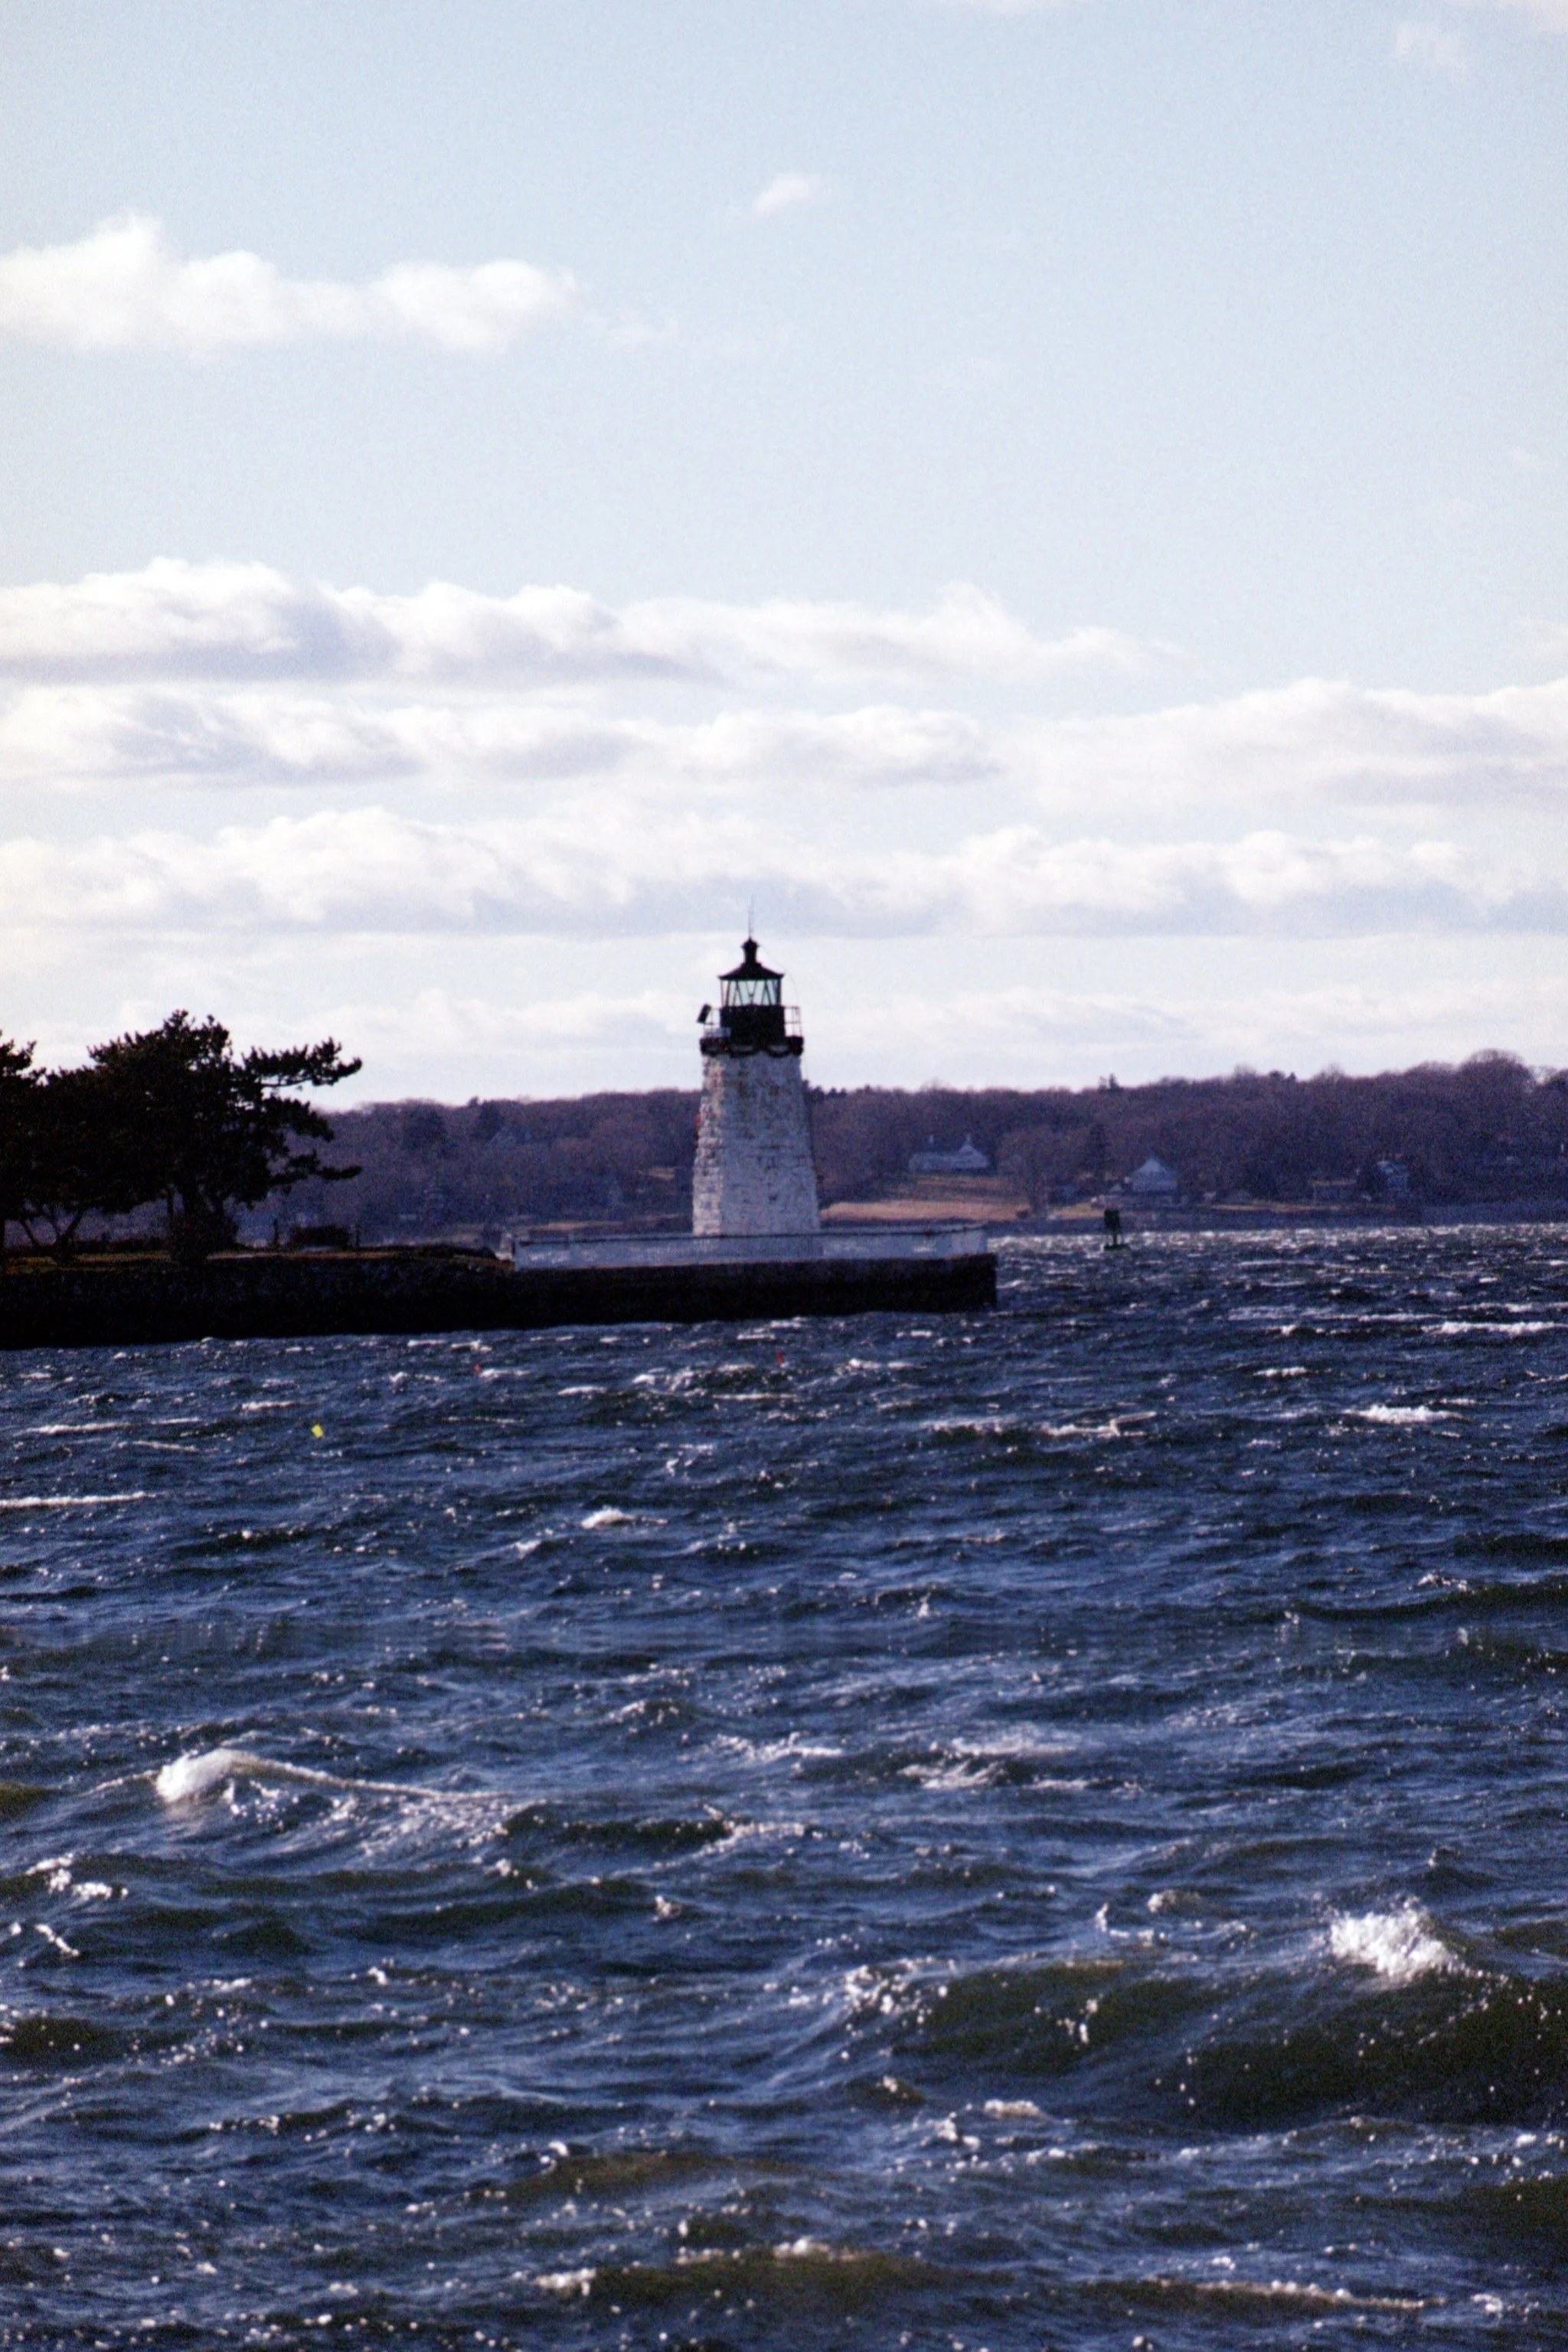
Goat Island Lighthouse
This is the lighthouse on Goat Island. It was cold and super windy on this day (you can tell by how choppy the water is) and I was on foot, so I didn’t really venture too close. Maybe when it warms up, I’ll take another photo (outside of the project). My only real complaint with this photo is that the horizon isn’t level. Besides that, I’m pretty happy with this photo.
Goat Island Lighthouse
Another photo of the Goat Island Lighthouse. I shot this one in vertical, a bit darker, and zoomed in. Again, the horizon is a bit wonky. Like I said, it was super windy and I’m pretty sure I was zoomed all the way out so I think I was being blown around a bit lol. I would have liked to just get a photo of the lighthouse without the trees on the island.
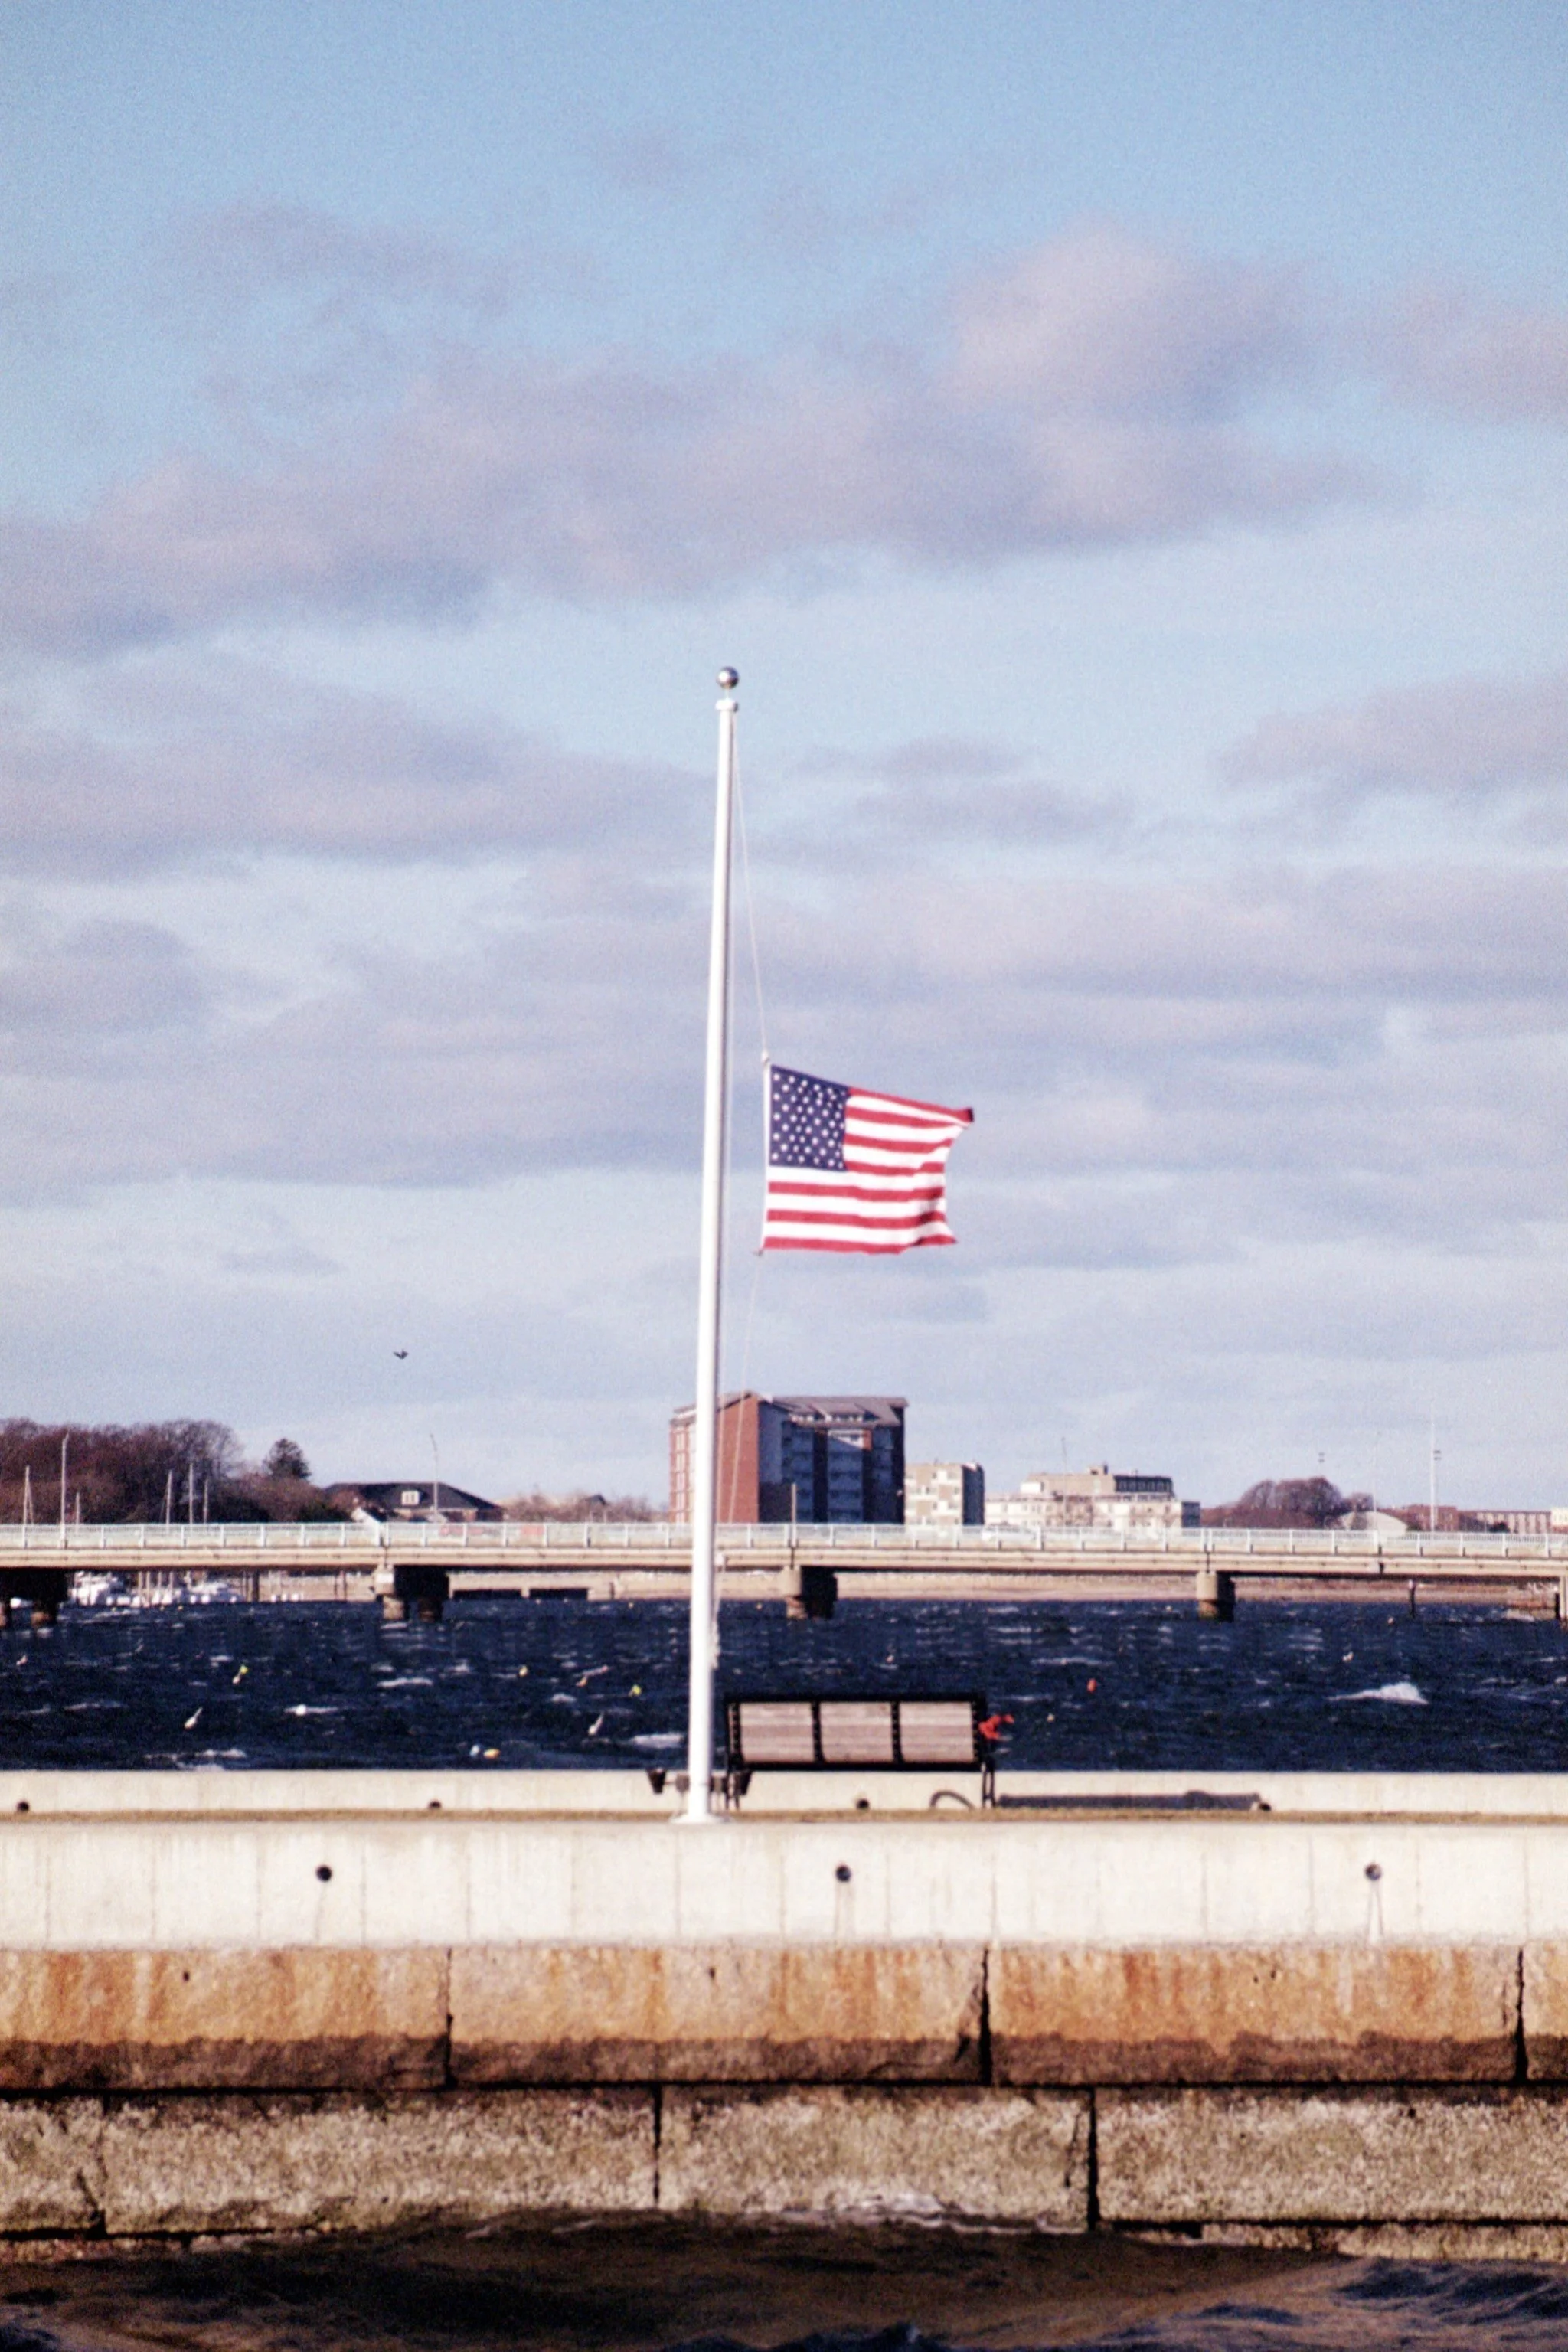
Flag at half mast in remembrance of President Jimmy Carter.
I like this photo as a bit of a snapshot in time. The flag is being flown at half mast in remembrance of President Jimmy Carter. He recently passed away. My only real gripe with this photo is that I wish I had composed it better so that the flag pole didn’t cut through the building in the background.

Goat Island Lighthouse and Jamestown Bridge
I like this photo, but I wish the water was a little bit more exposed. I like the composition of the photo.

Jamestown Bridge
Here is another photo of the Jamestown Bridge. Like with the previous photo, I wish the water was a bit lighter, but overall not bad. I’m glad I was able to get the two big towers…pillars…the two tallest pieces (don’t know what they’re called lol) in the photo.

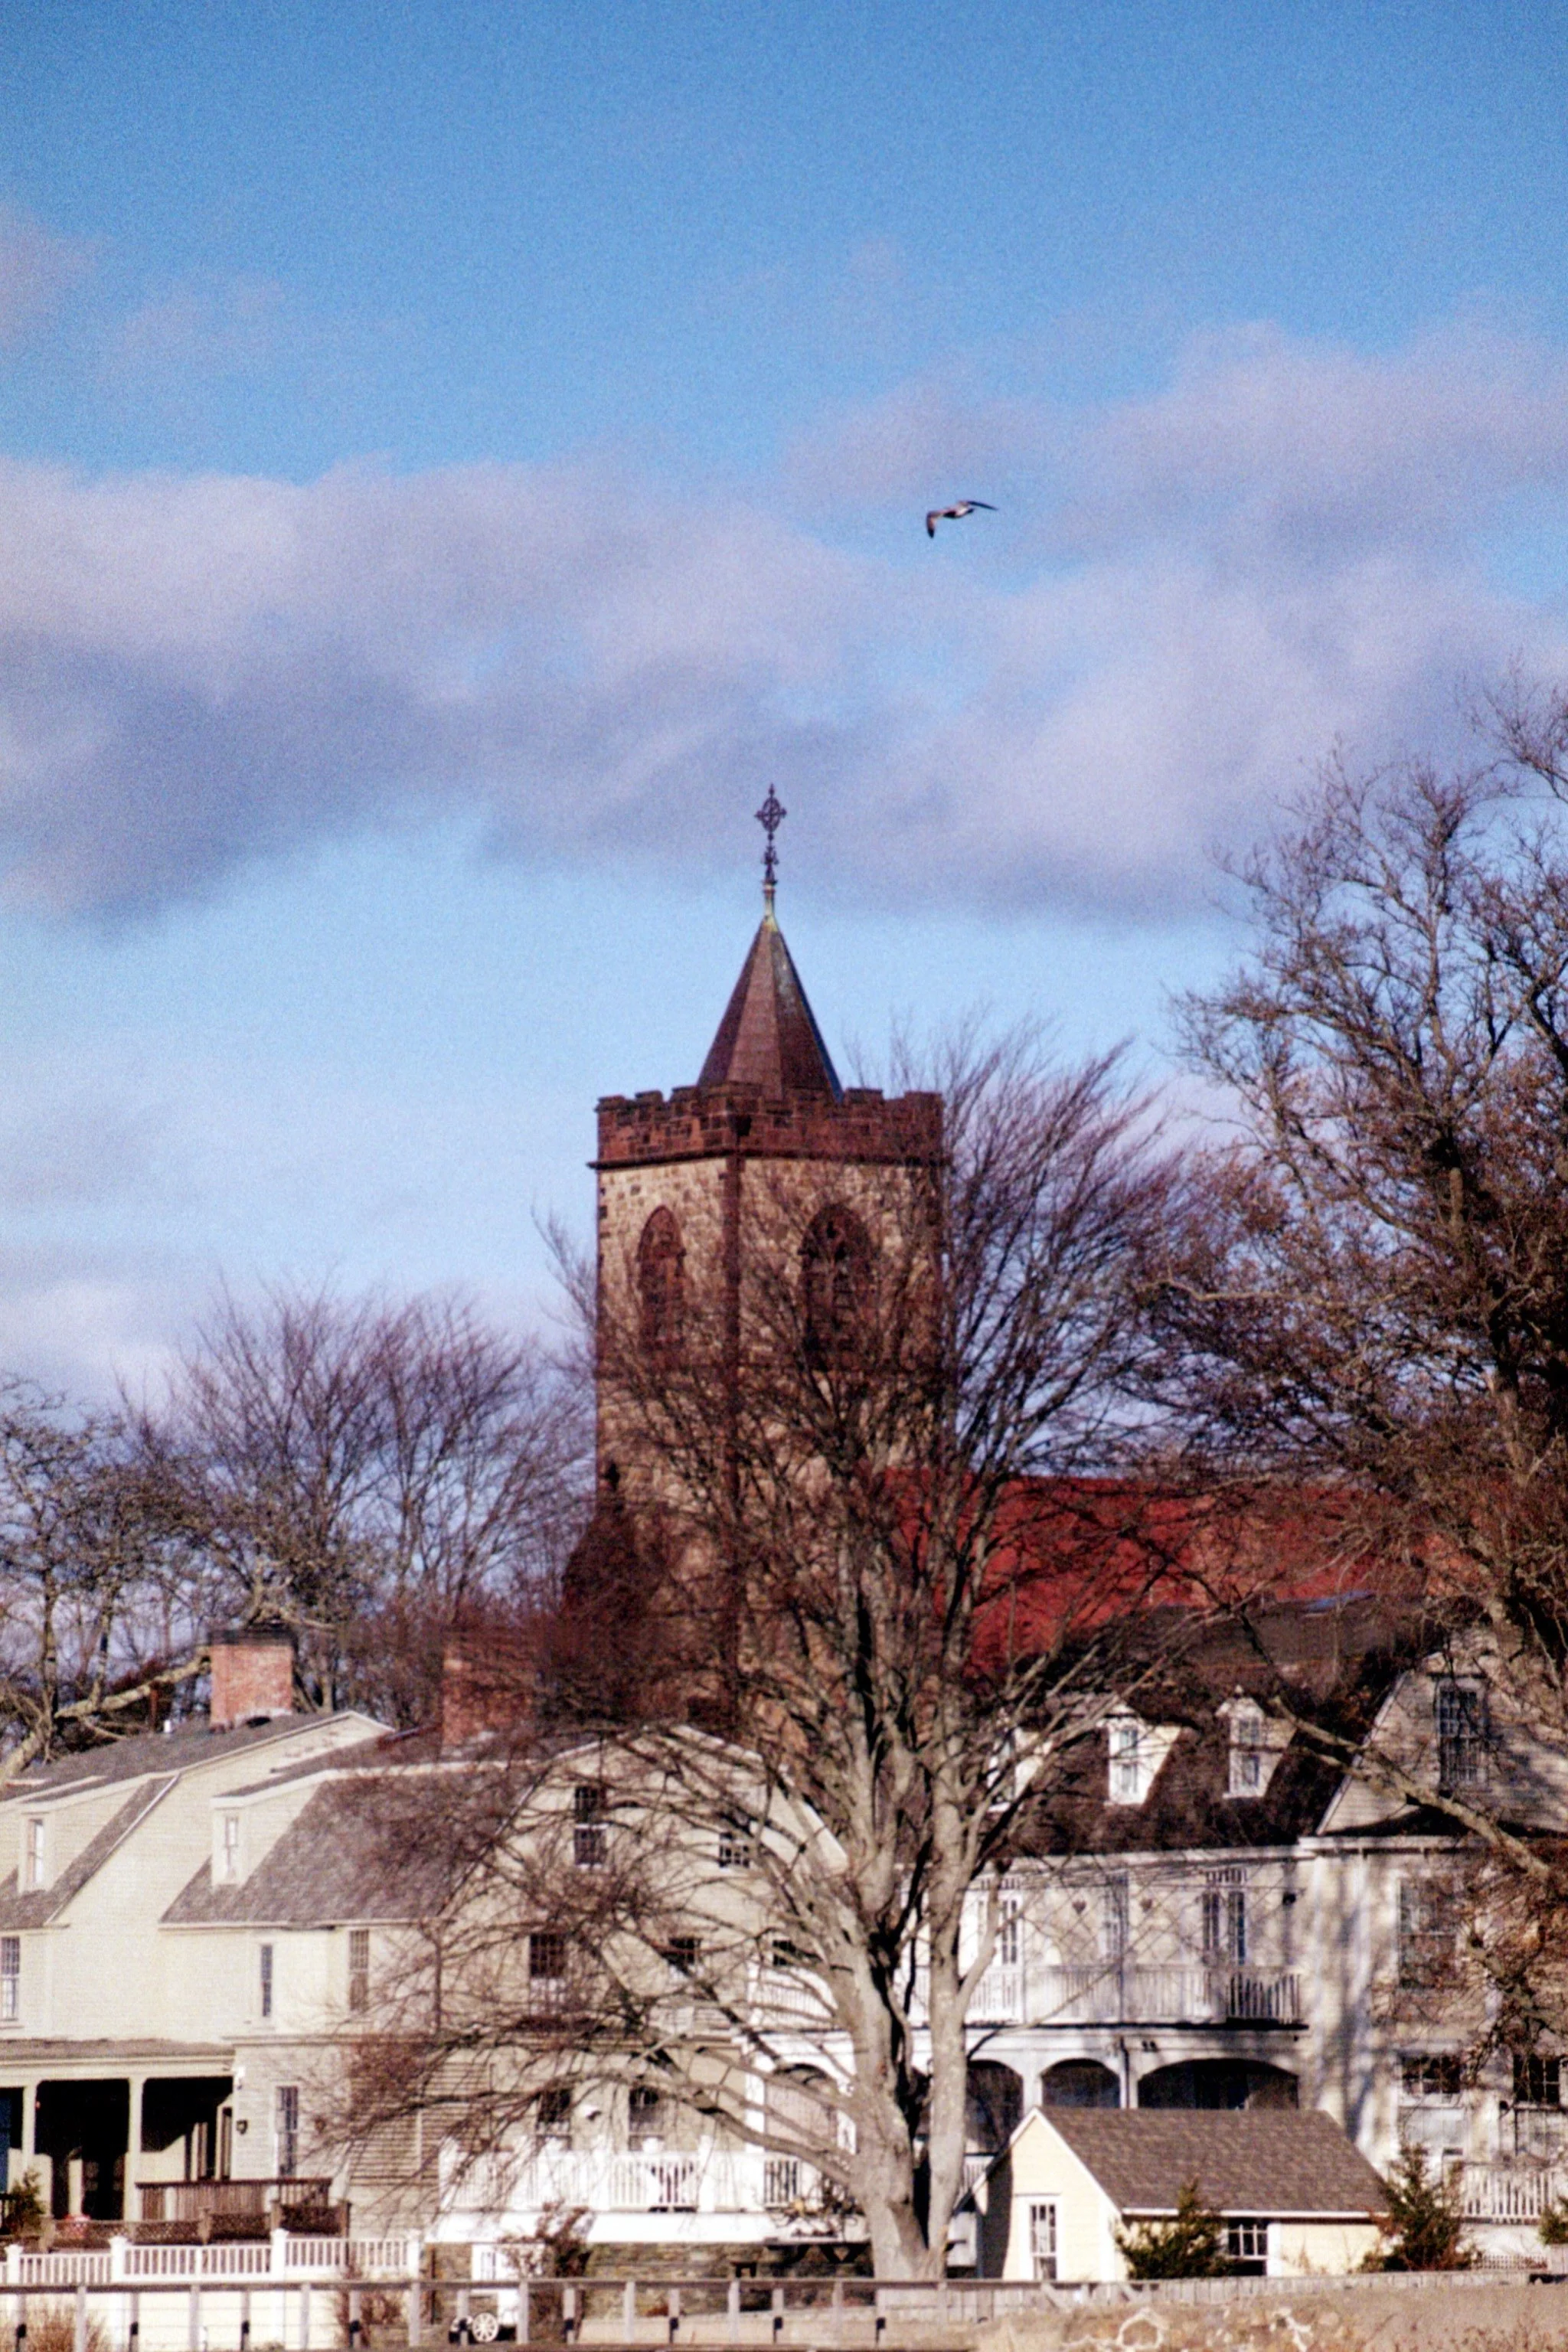
Church Tower
(Sorry this scan is a lower quality, the digital of it is corrupted and I had to use my phone to scan it.) I like the lighting of this photo and the fact that I was able to get a photo of the bird. I wish the light pole wasn’t in the photo.
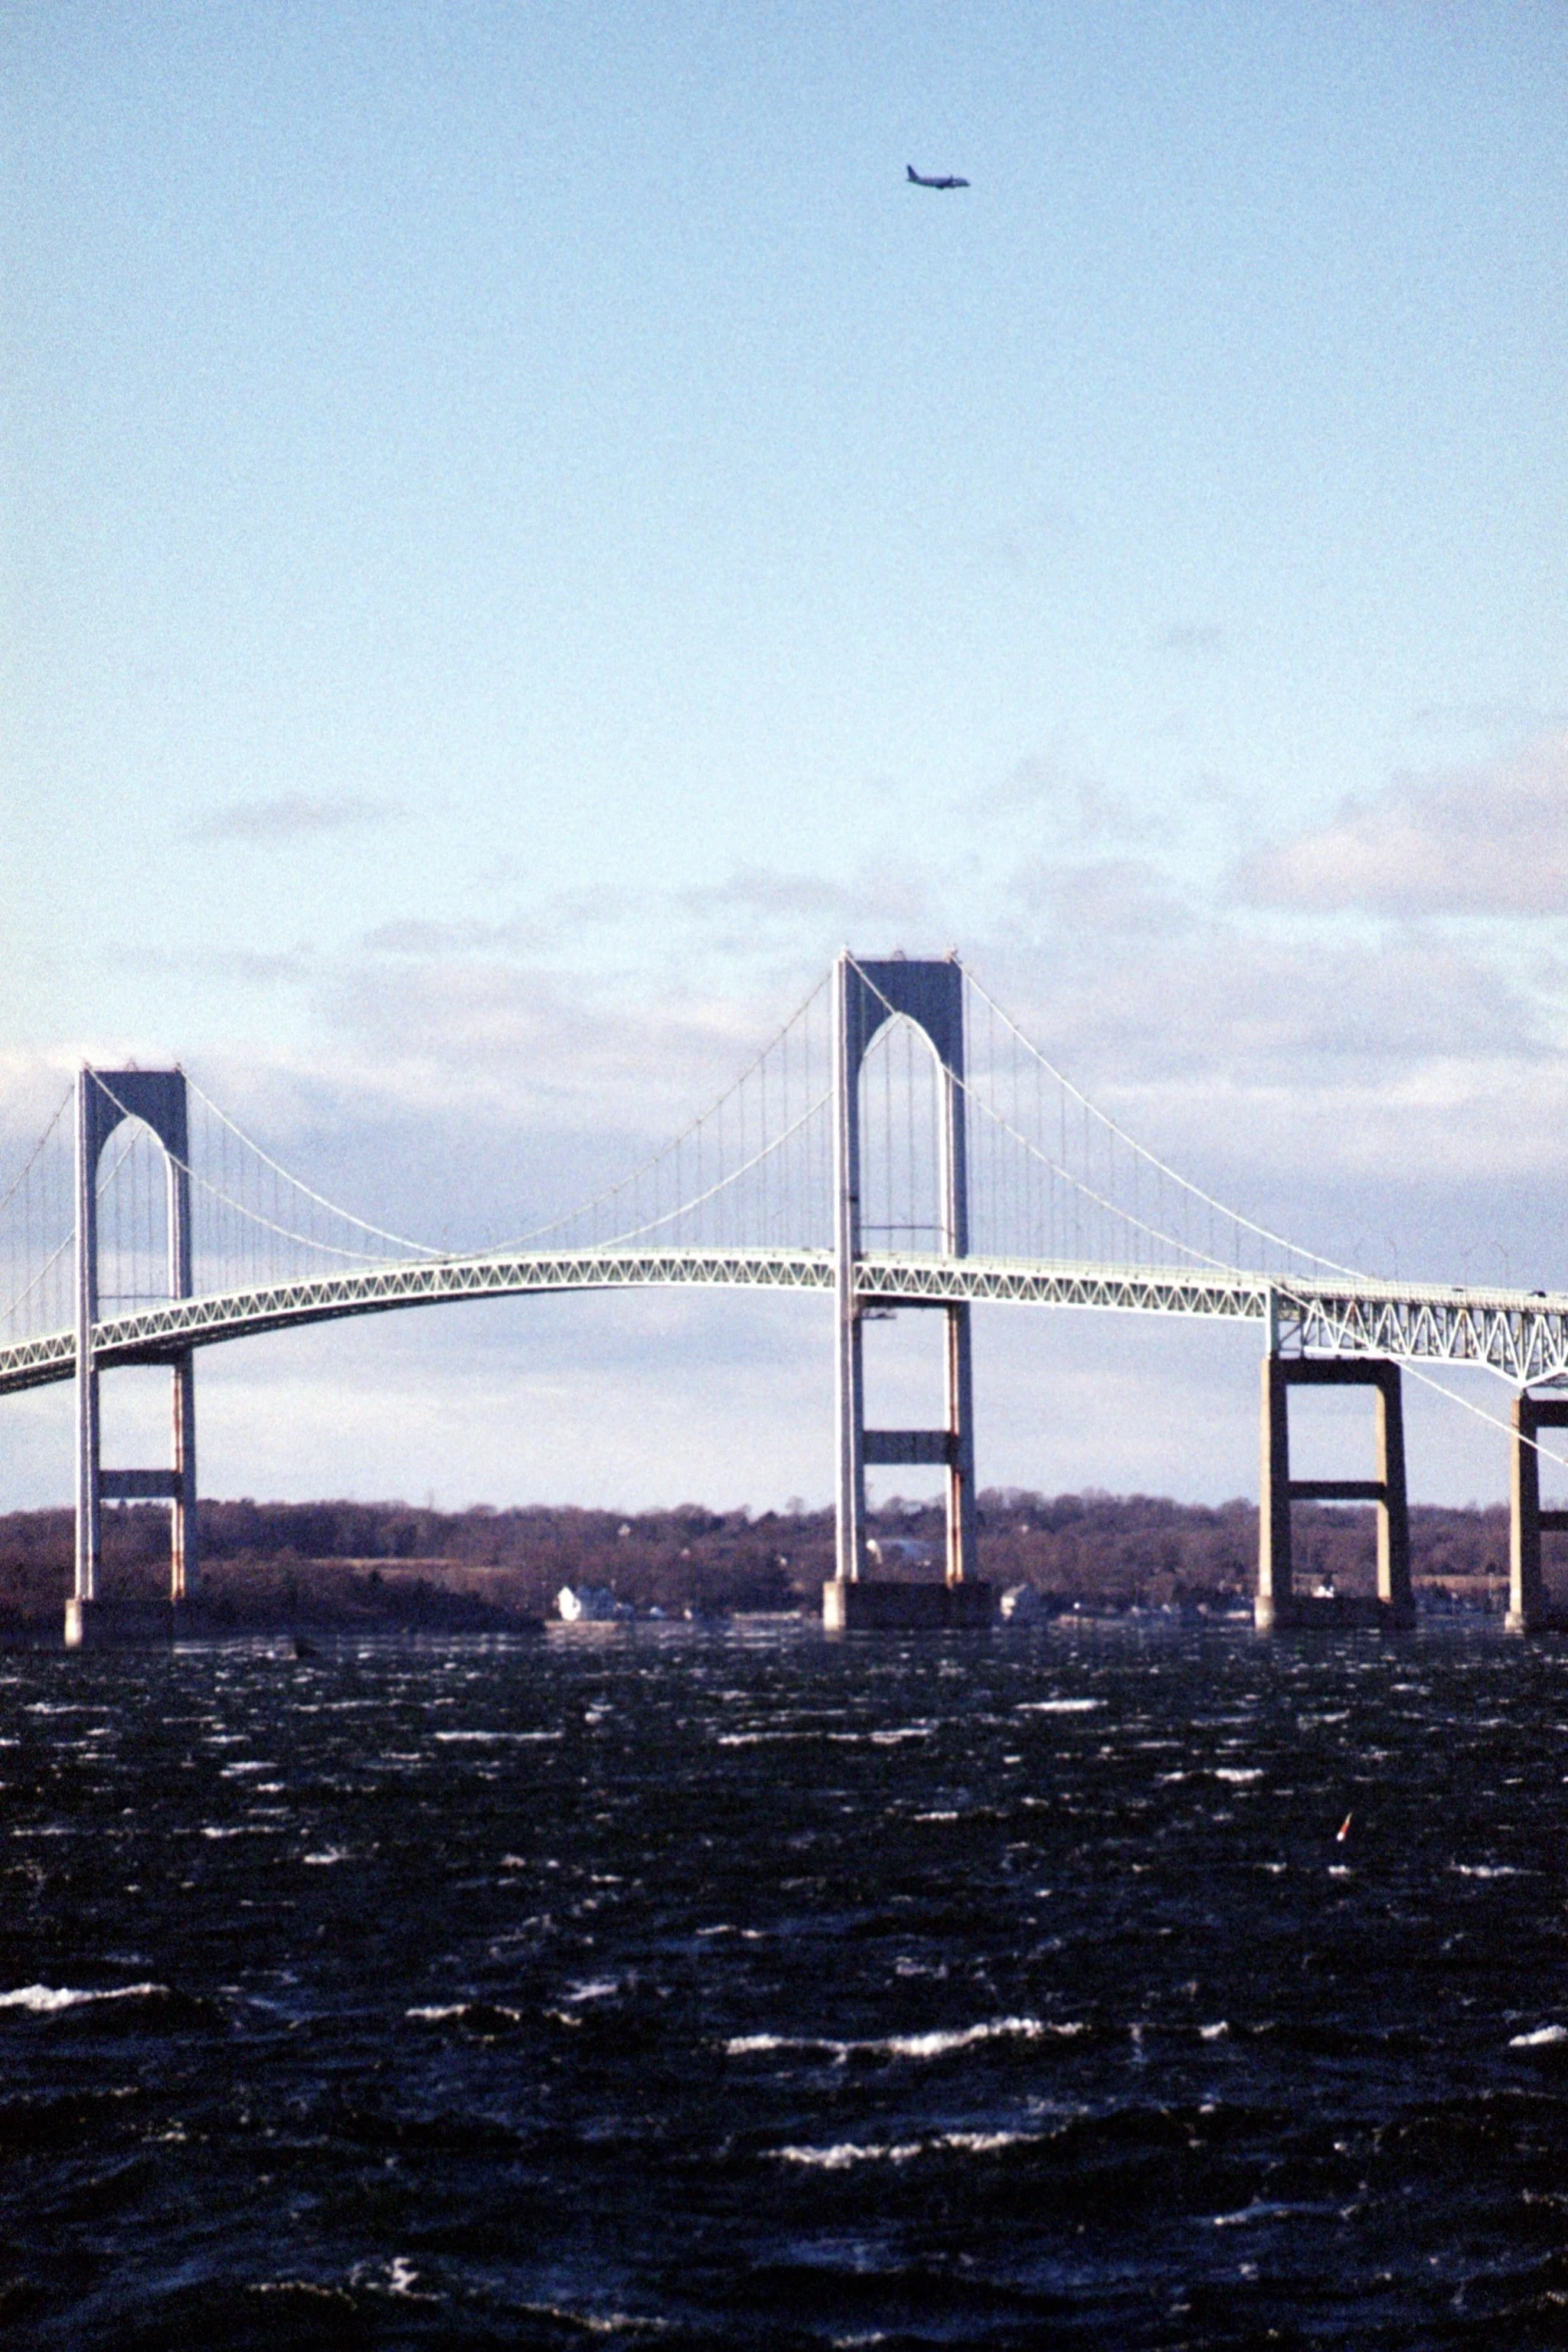
Jamestown Bridge
I like this photo because I was able to capture the plane flying over the bridge. If I could shoot it again, I’d probably expose it one more stop up and move the composition so that there was more sky and less water.
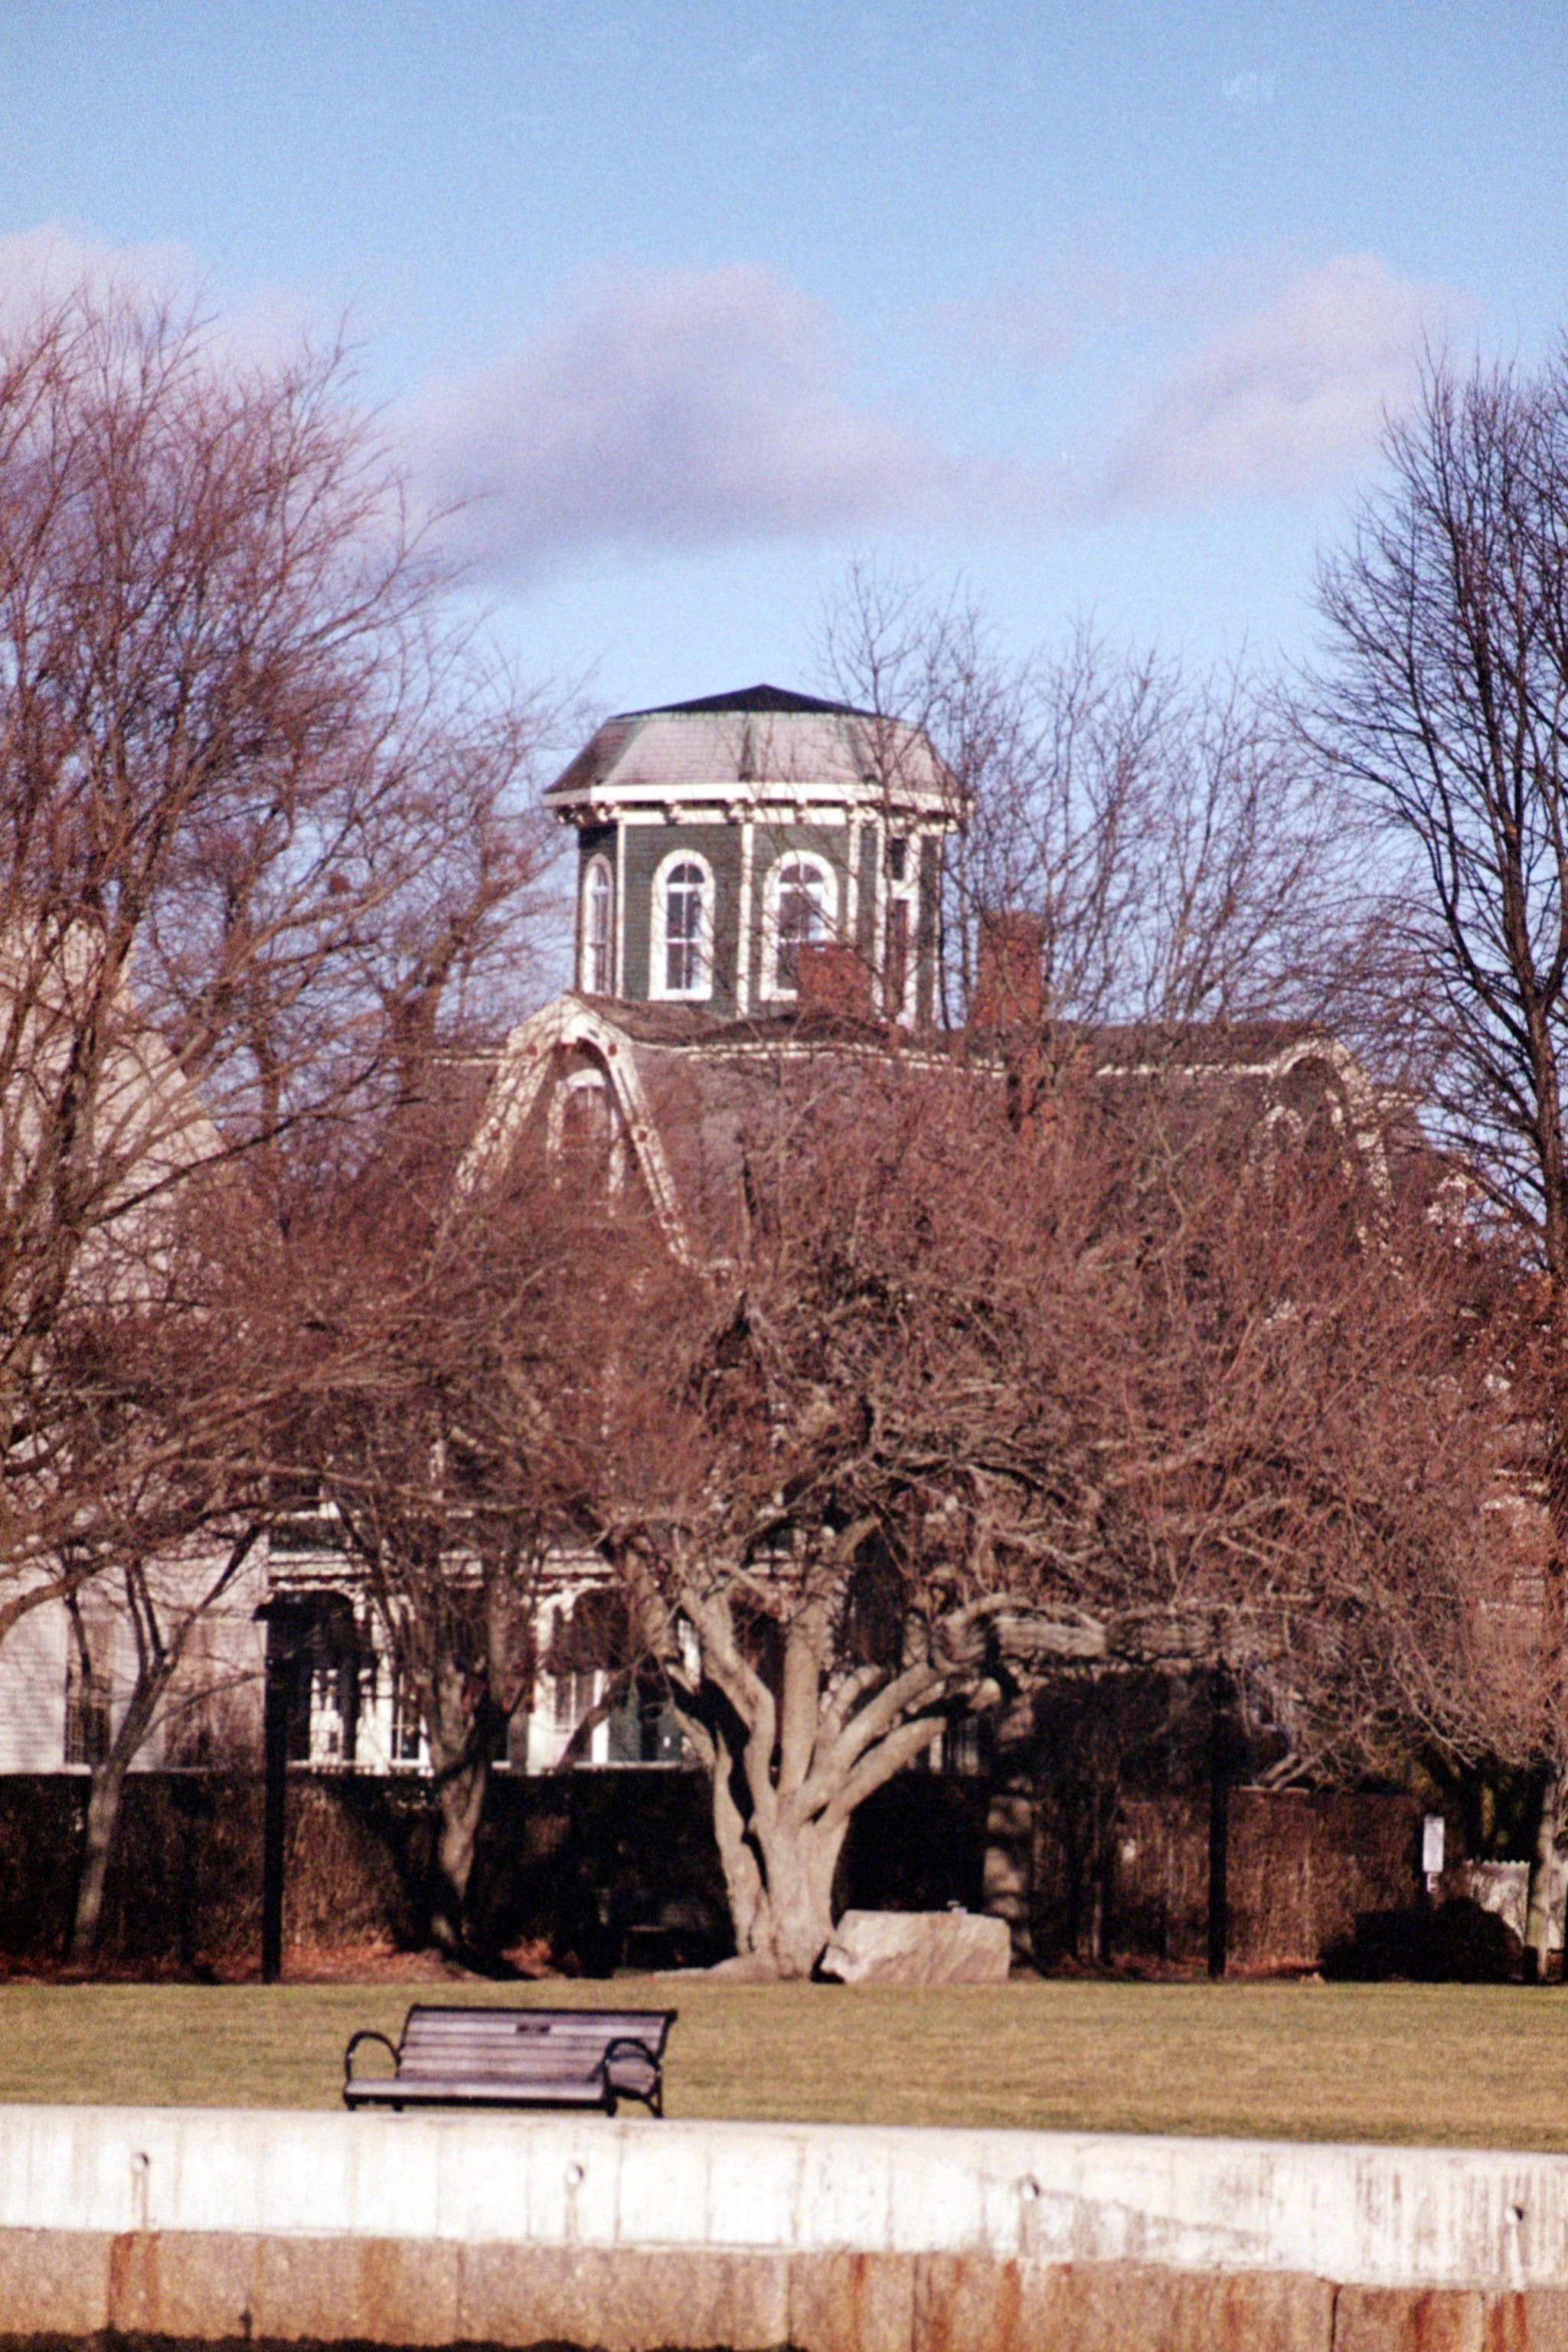
Home in Newport
So I like the exposure of this photo, but I am not a fan of all the trees blocking the house. I wish they were a bit smaller so you could see more of the house.
Church Tower.
Like the previous photo, I like the exposure, but I’m not a fan of the tree placements. If I had walked all the way to Goat Island, I could have maybe gotten a less obstructed view, but again, it was super cold and super windy. So I got the shot I could.
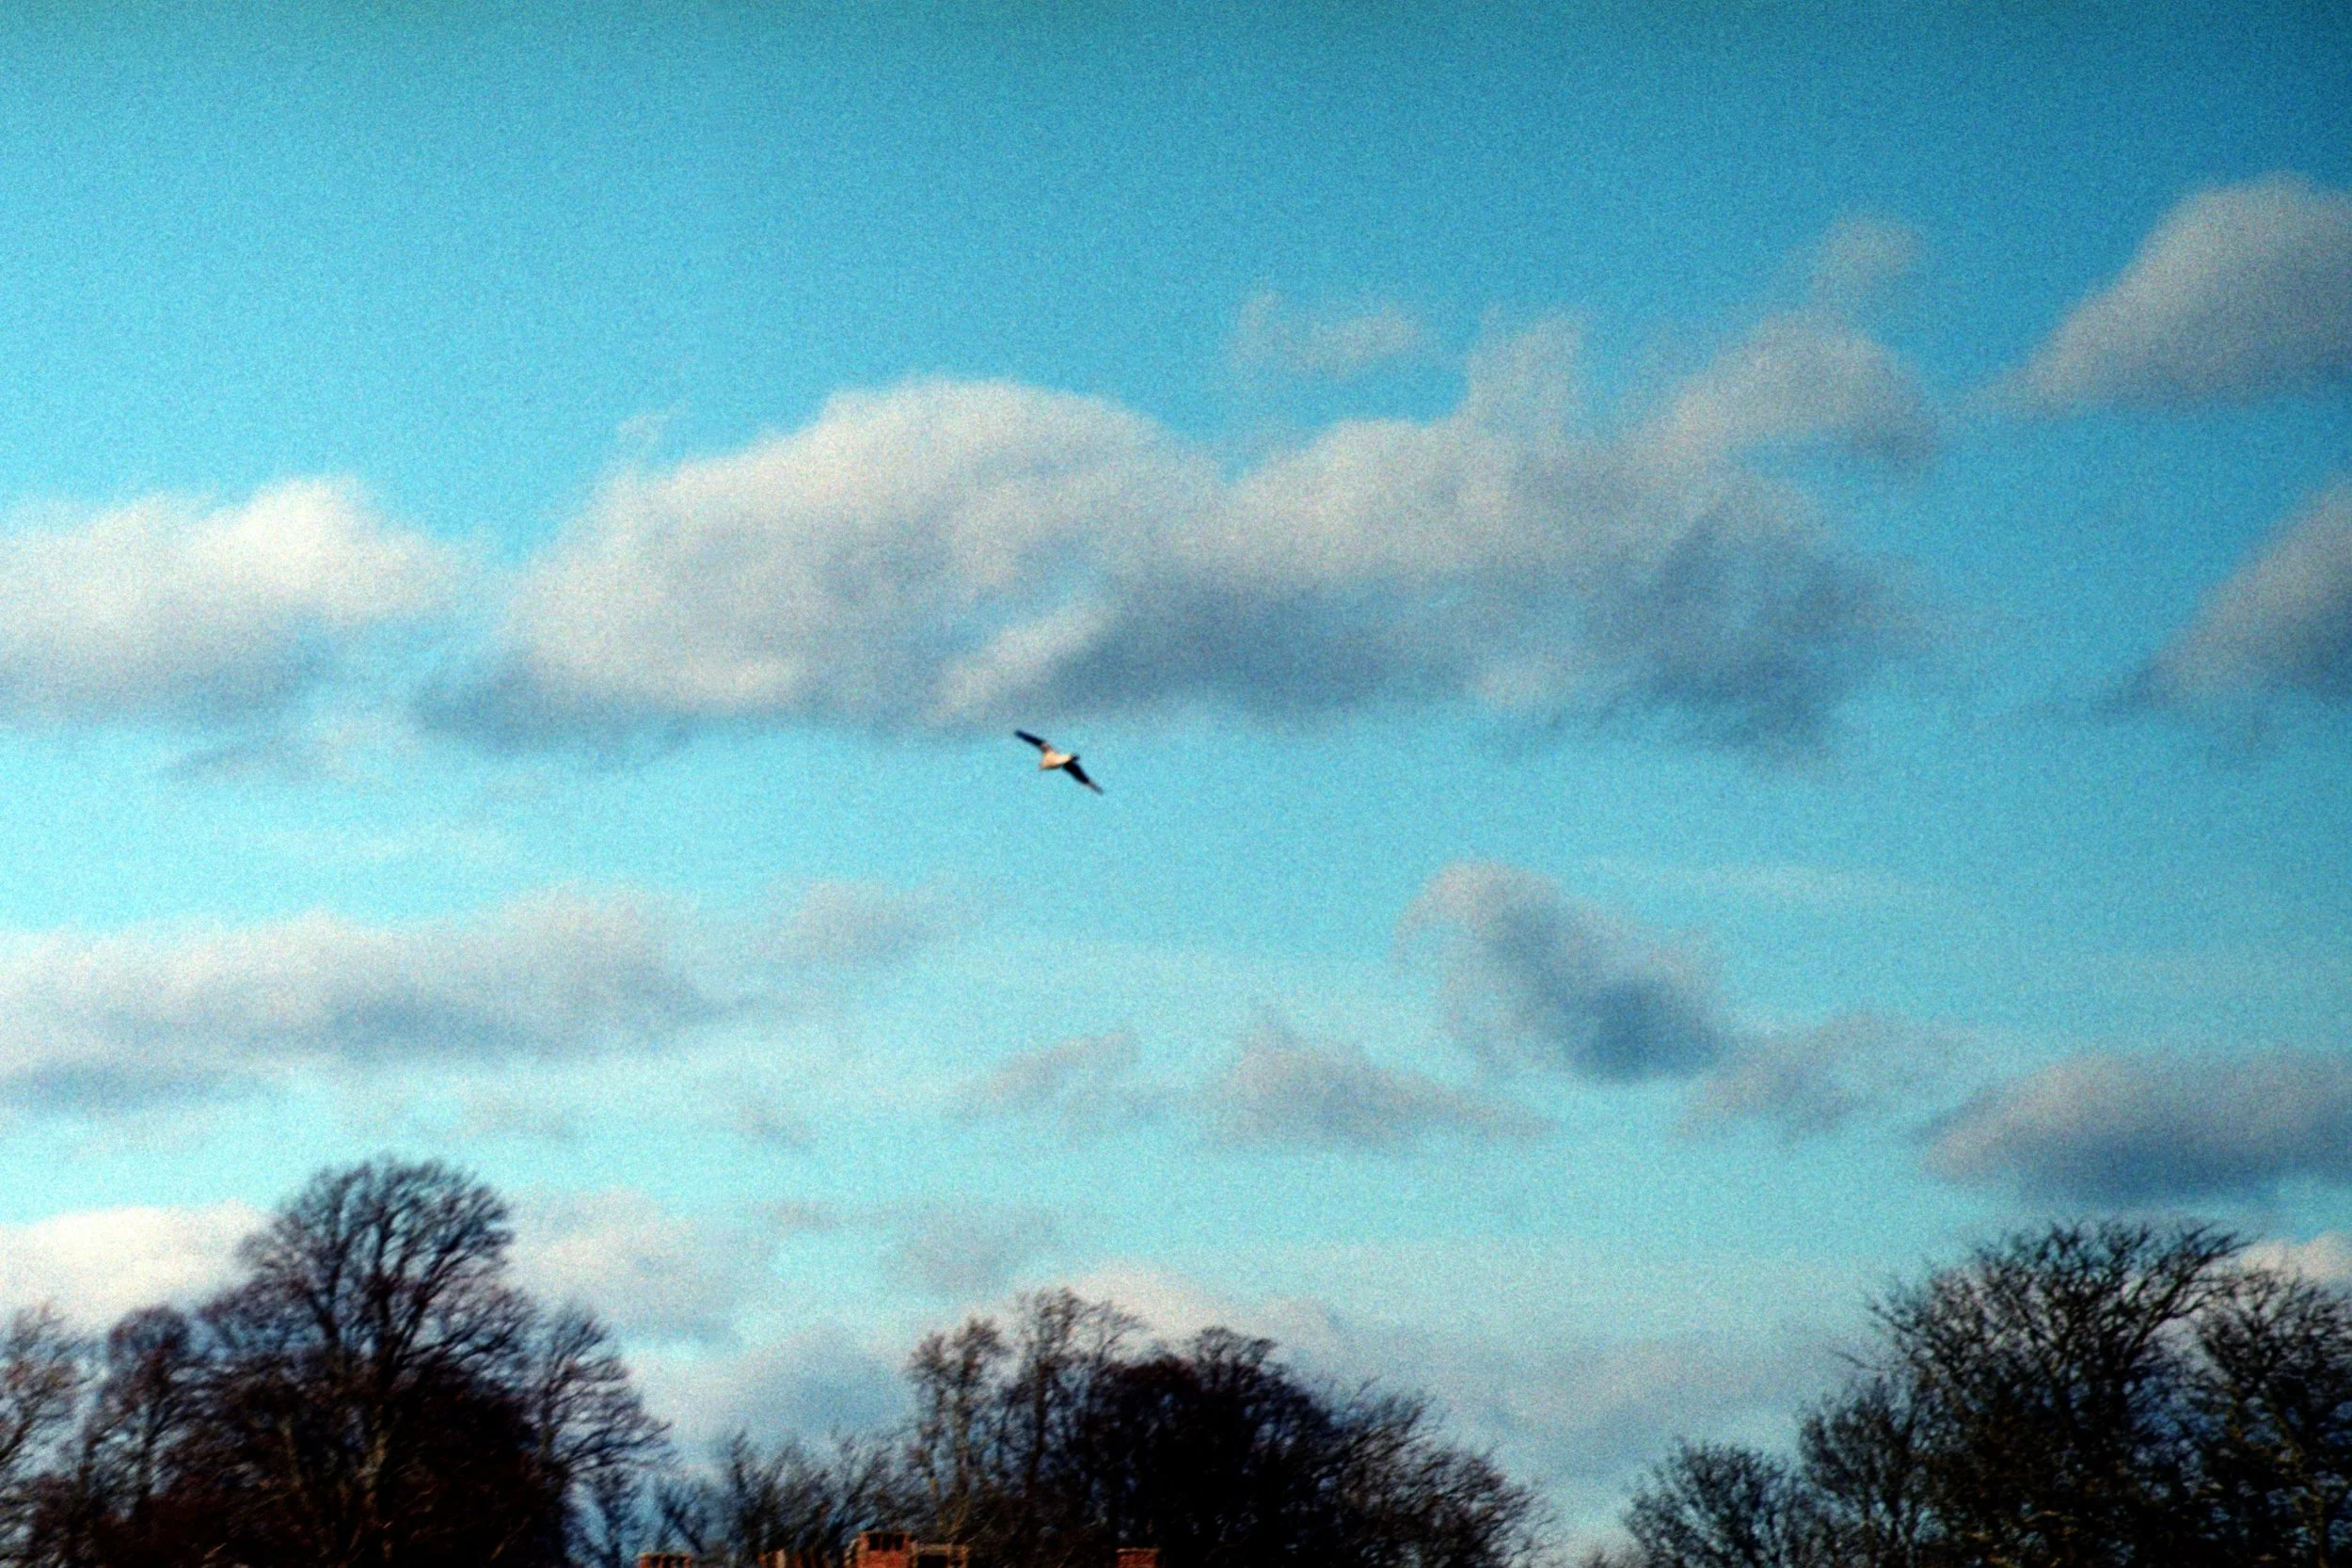
Bird Flying in the Clouds
I was surprised I was able to capture this photo. I like the composition of it in that you basically just see the bird, the sky, clouds, and tree tops. This also probably the bluest sky I captured. I’m curious if I had processed the film myself, would the sky still have been this color blue. This is another one of my favorite photos.
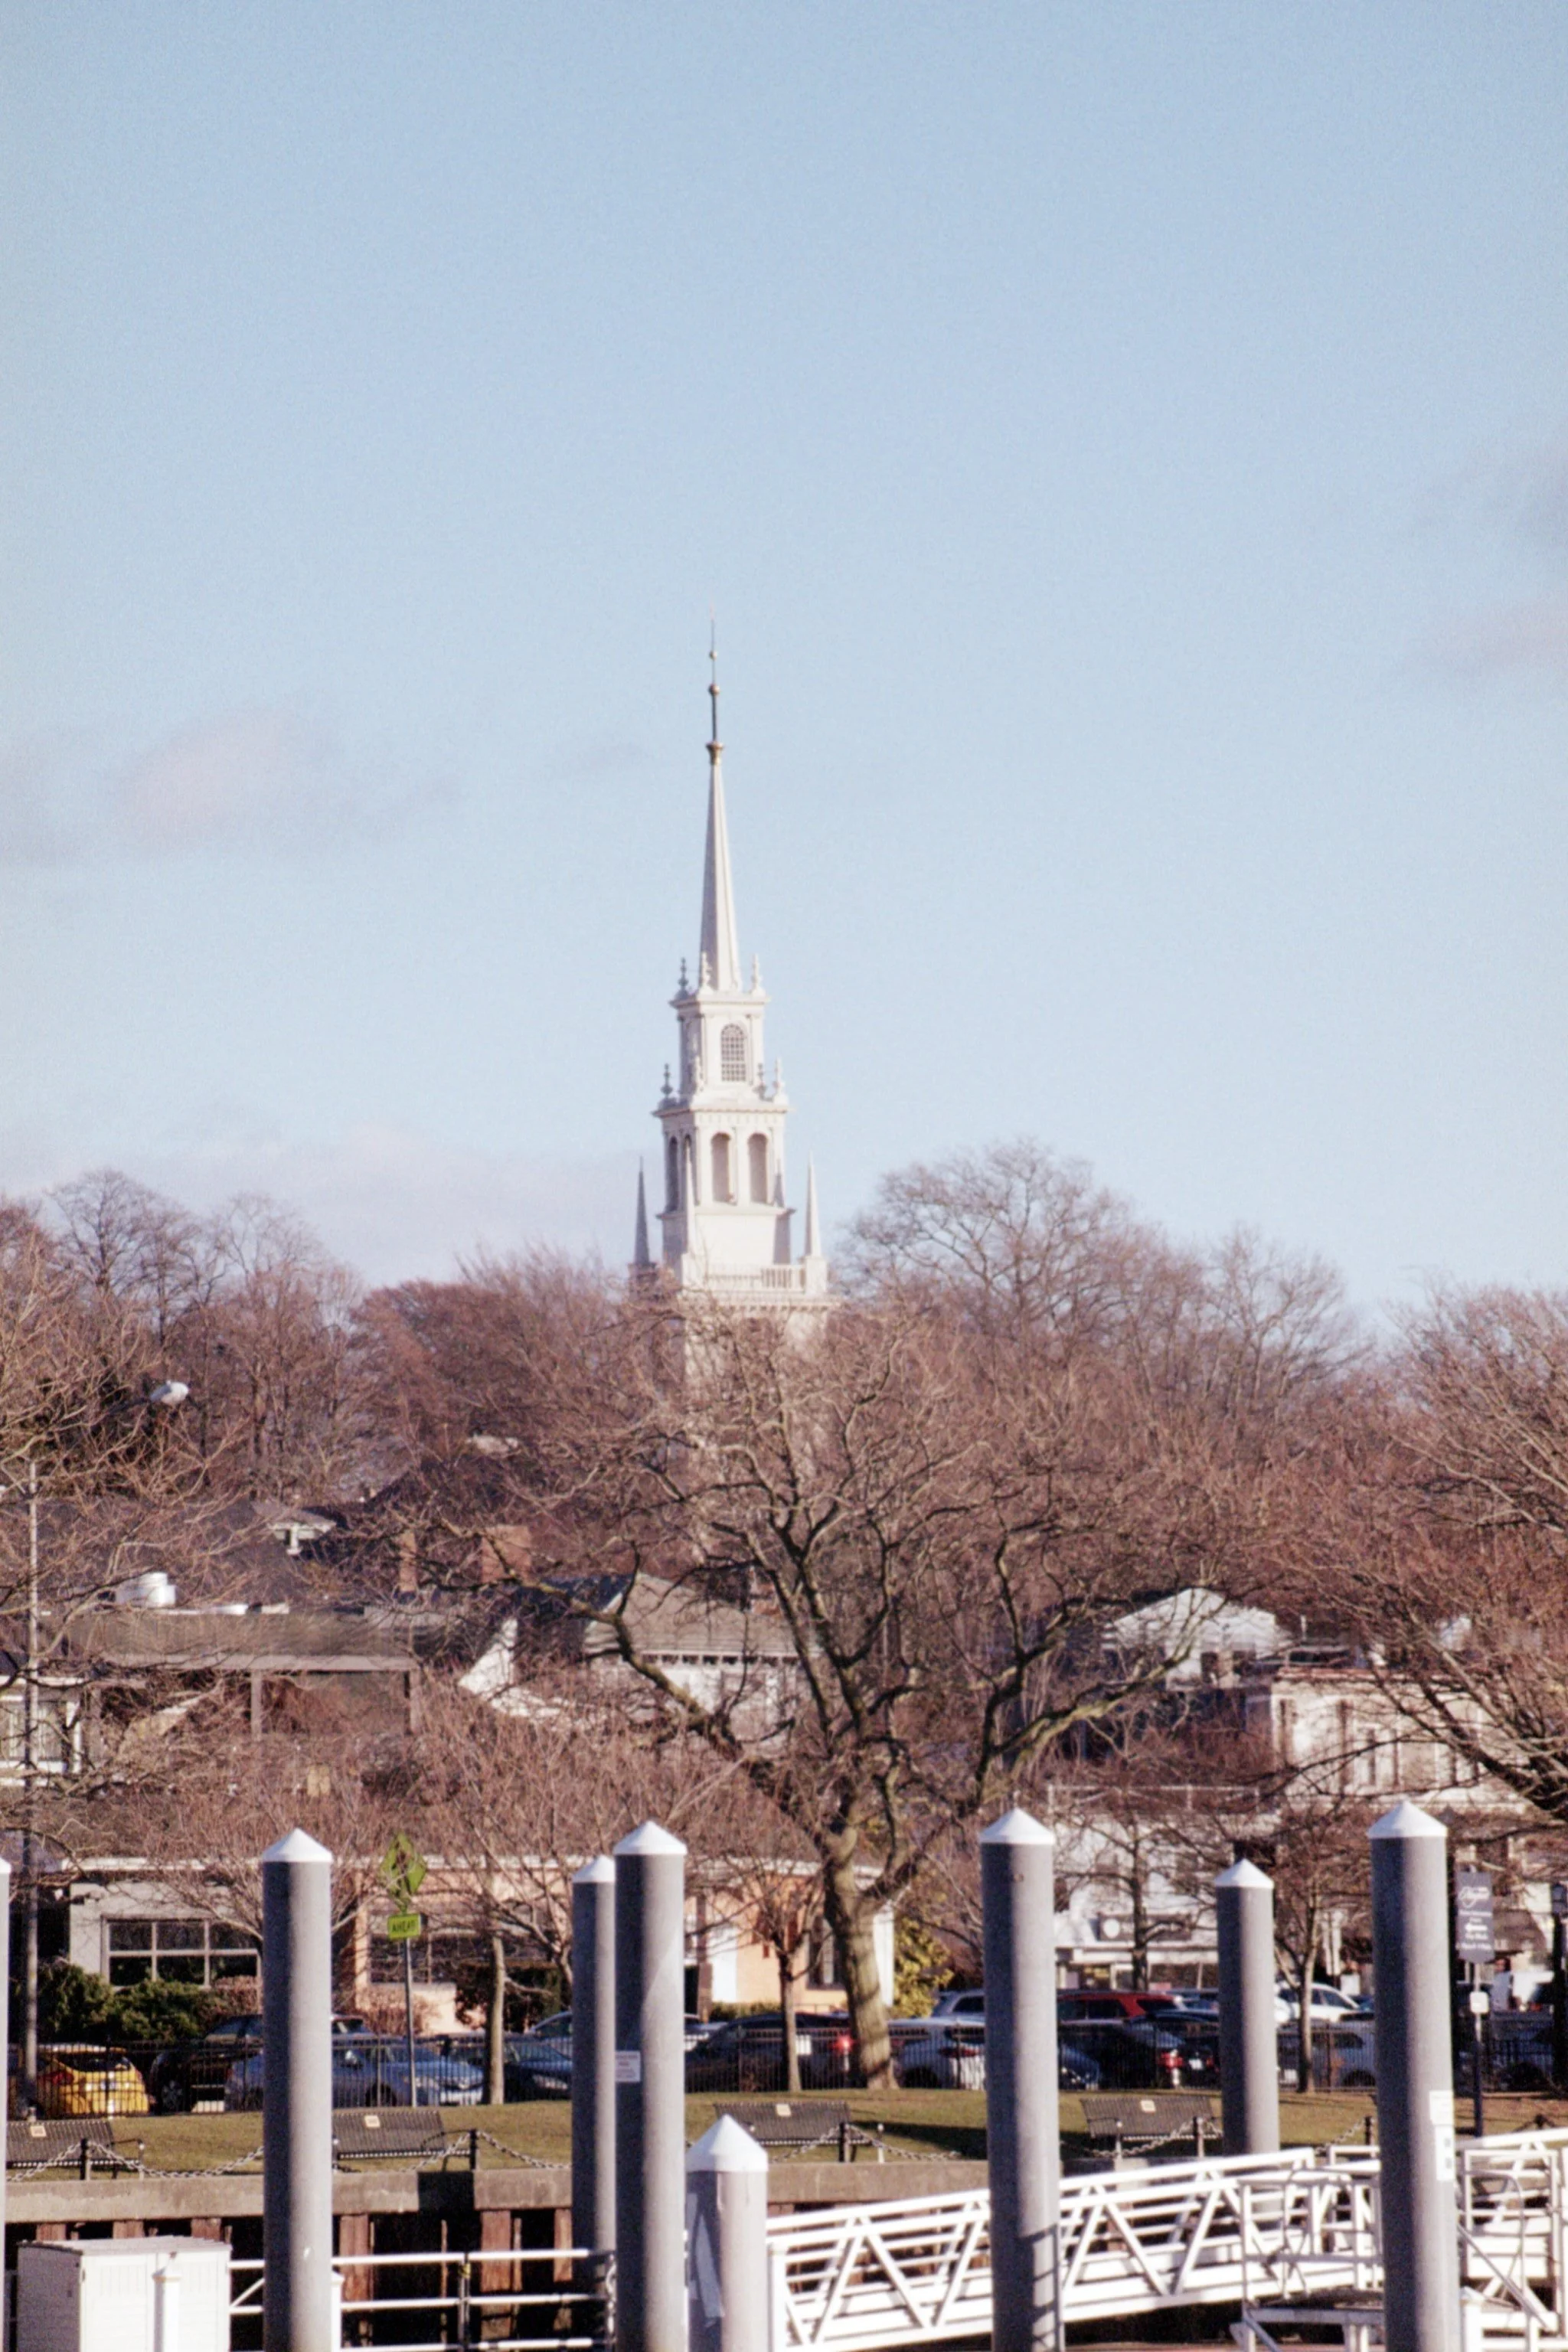
Church tower from the marina
I headed back to the marina and took a few more photos. This is one of them. I don’t know how I feel about the stanchions in the foreground. I think they are kinda fitting because they are vertical like the church tower. I probably would’ve cropped this photo if I was editing it in Photoshop or Lightroom.
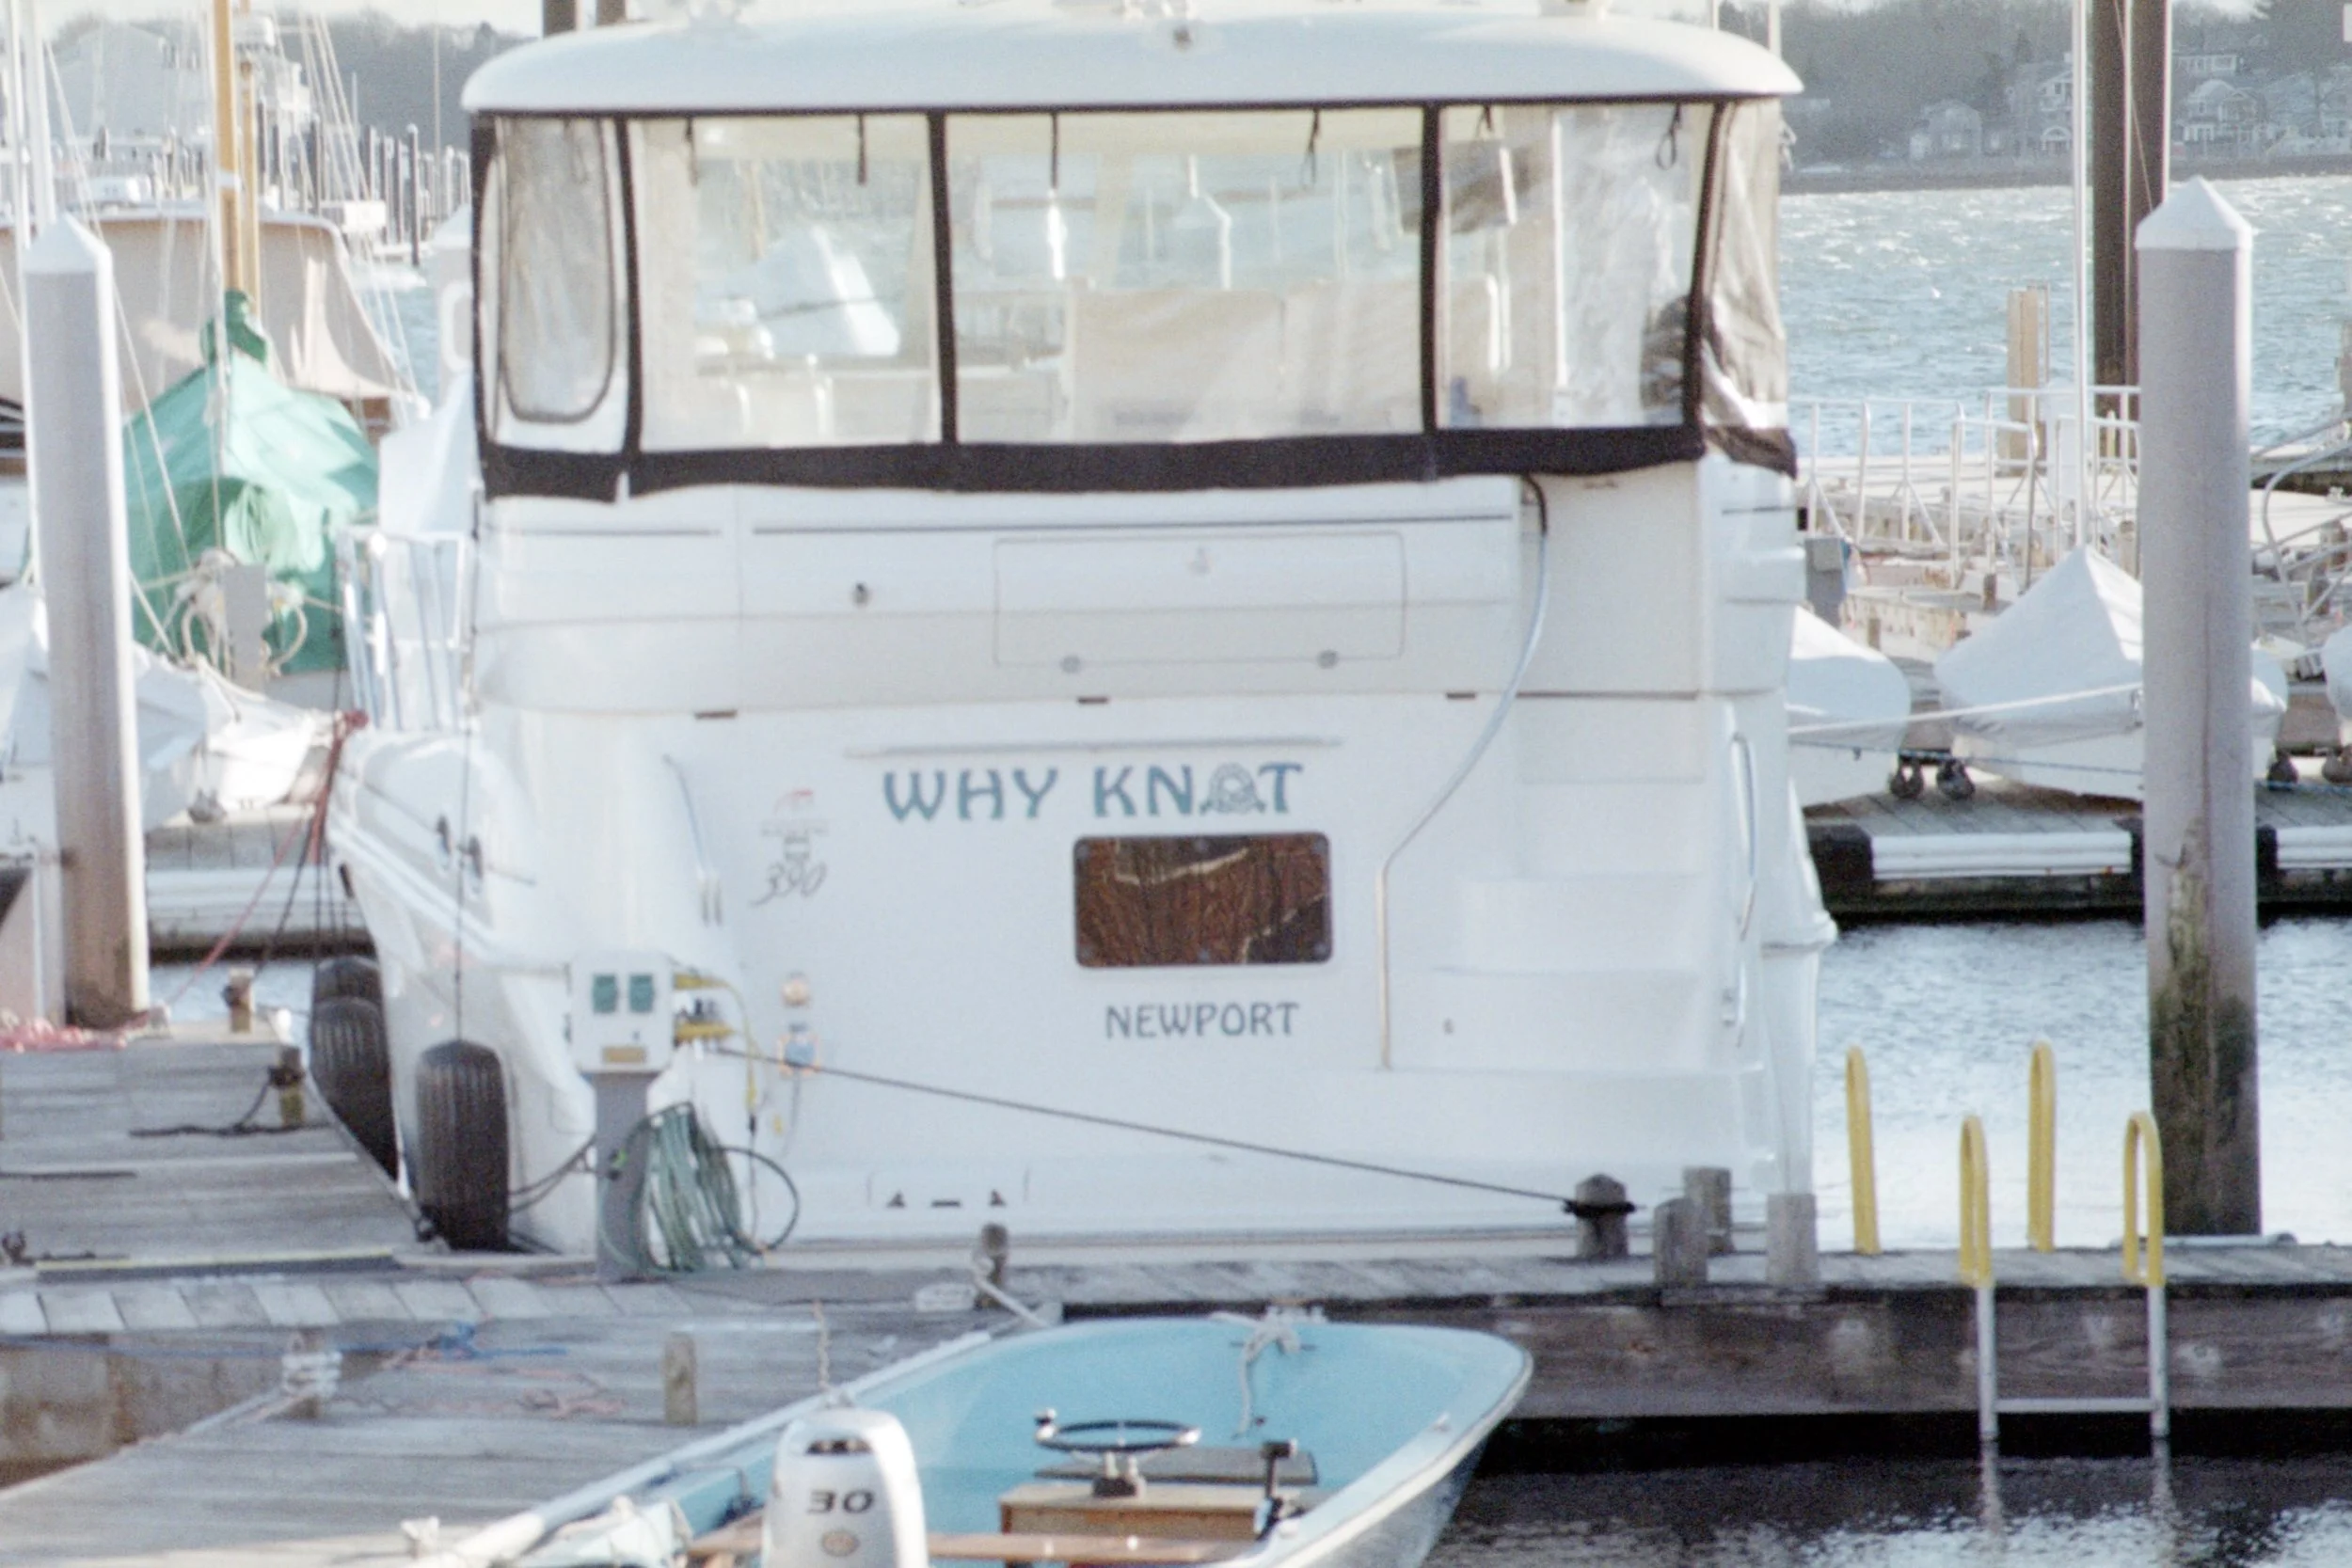
Why Knot Boat
I’m a dork, so I found this play on words hilarious. I wish the color was a little more vibrant, but I like the fact that the whites aren’t blown out and the photo overall is well exposed.

Harbor Shuttle and Ferry Landing Sign
I just liked how this sign looked. I’m pleasantly surprised for how it exposed. With the darkness of the roofing and wood, I thought the sky would be completely blown out. However, you can still differentiate between the sky and the clouds (not super drastic, but you can). Also, if you look on the left hand side of the photo, you’ll see a hint of one of the subjects of a photo I took earlier.
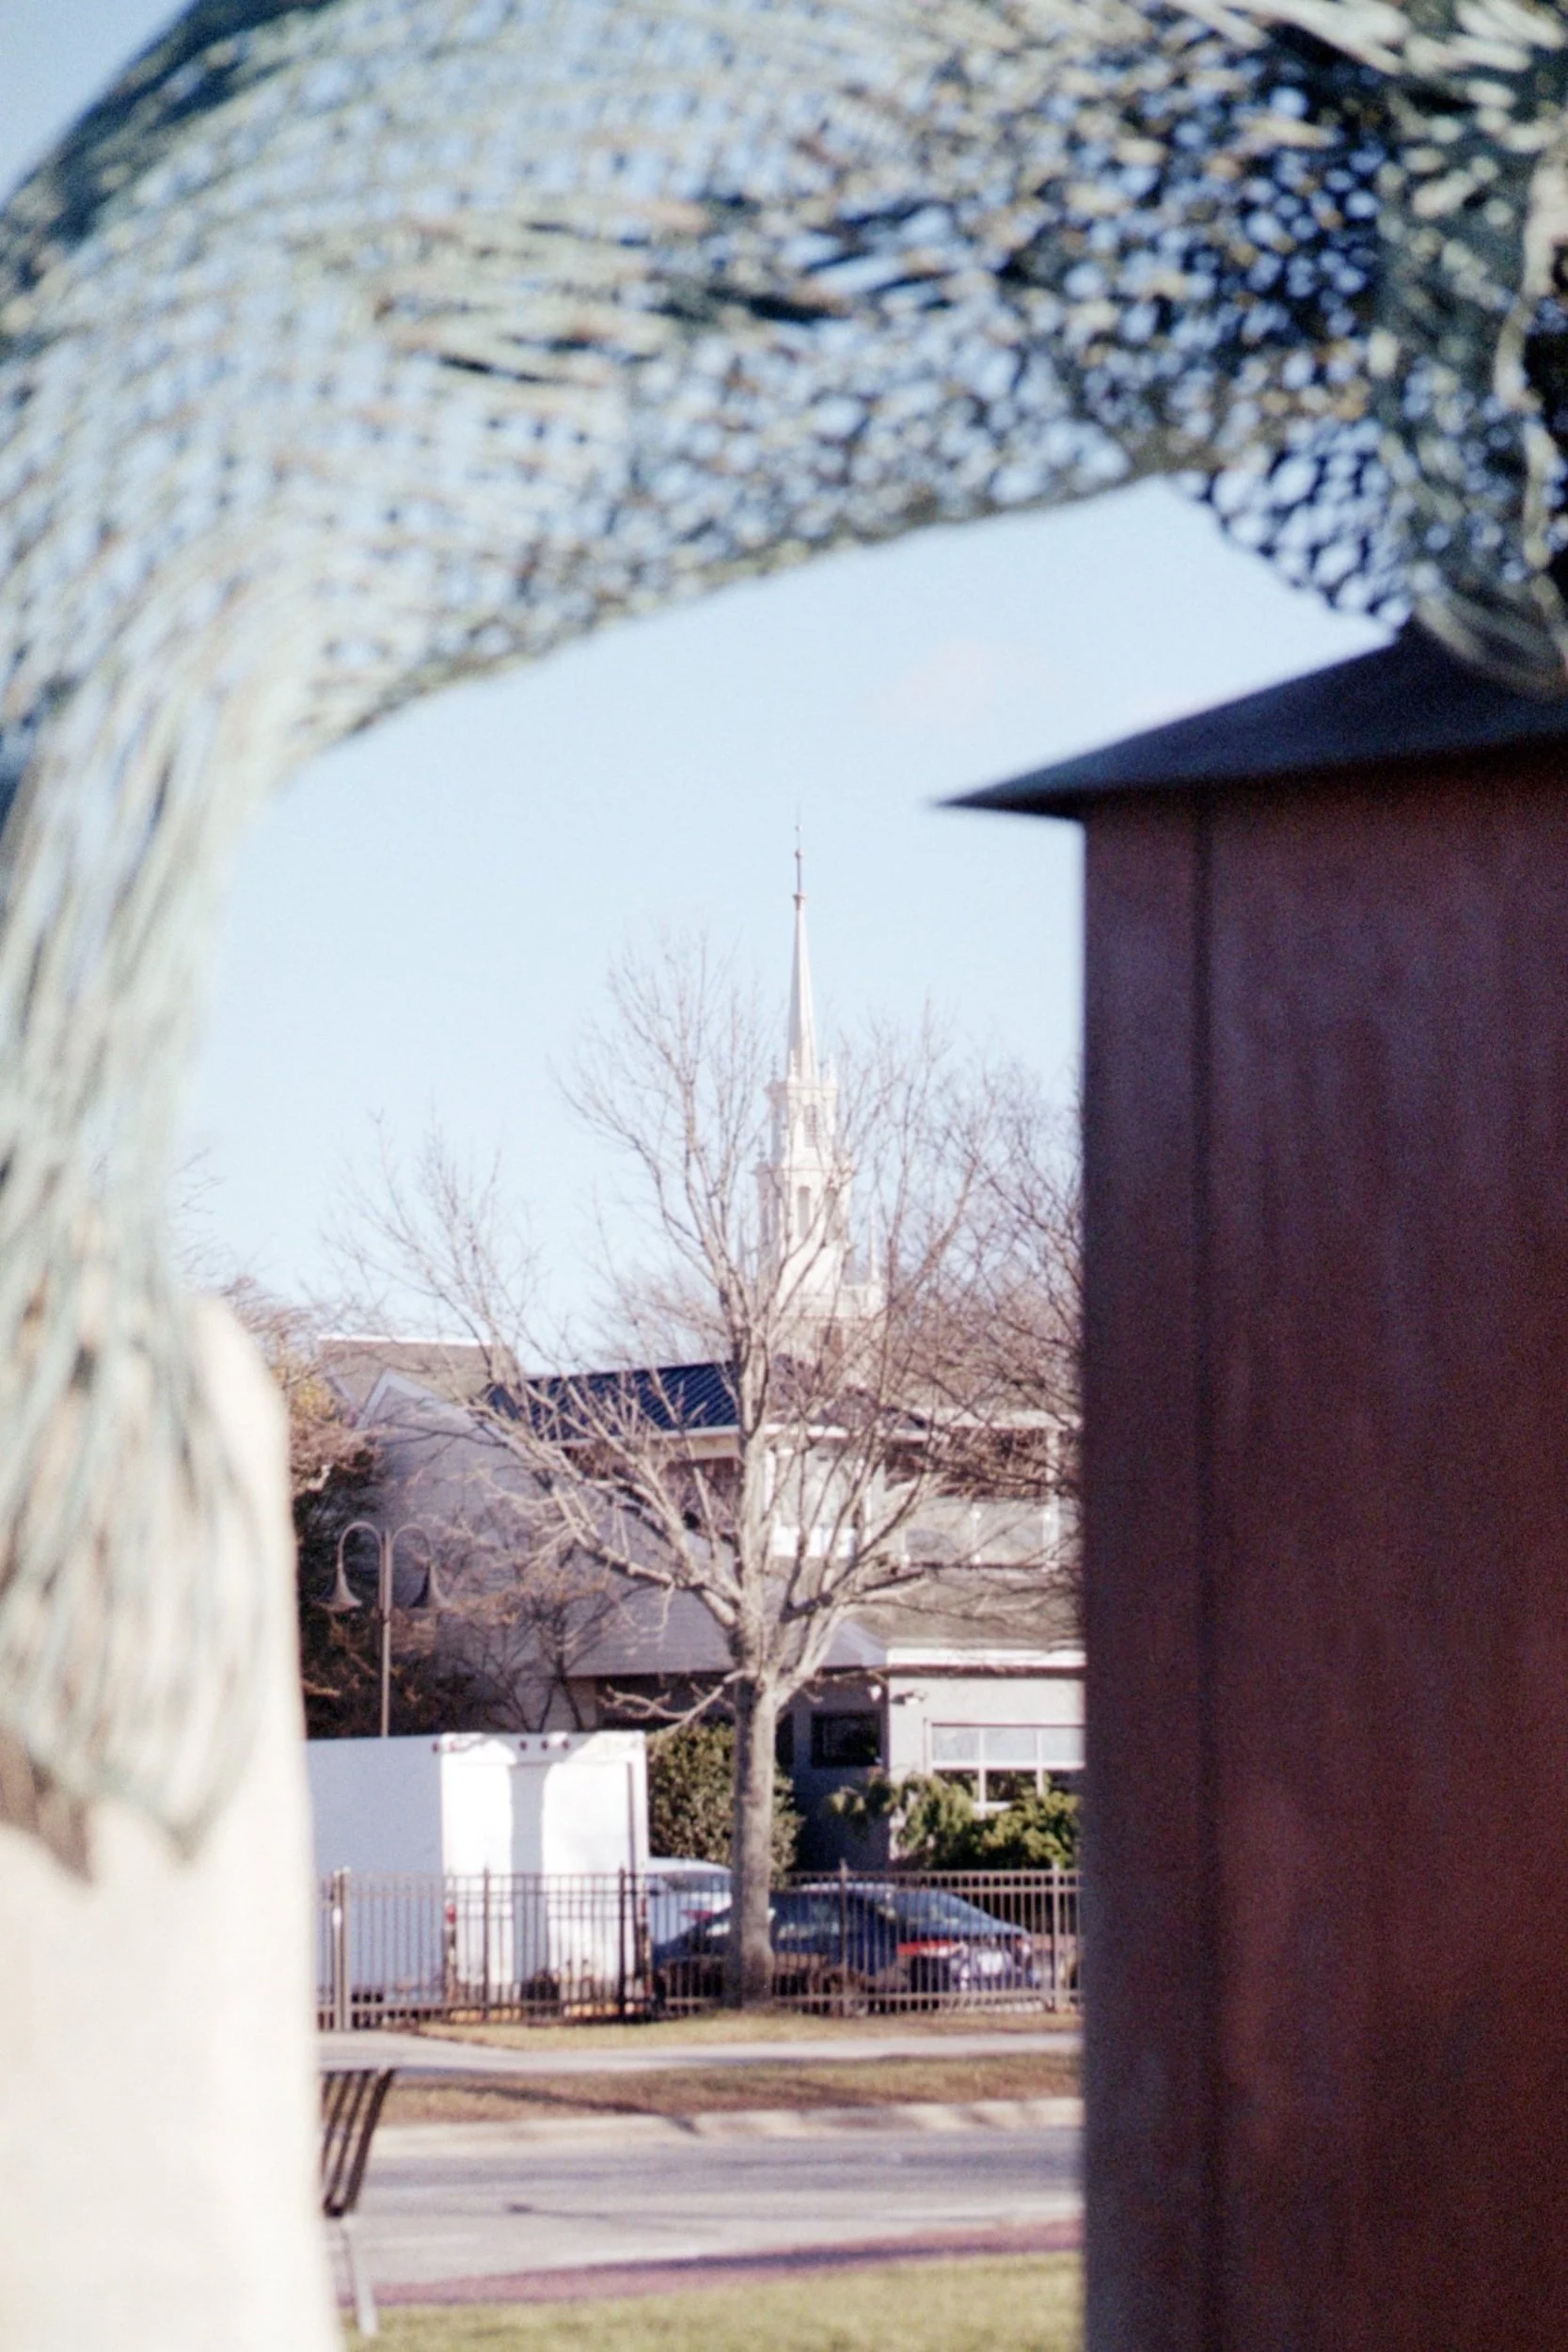
Church Tower Through Dolphins Structure
Here was another attempt at me being artsy-ish. I tried to capture the church tower through an opening in the dolphins structure. I should have composed this a bit better so that the tower was in the center of the opening and the sliver of the bench was hidden.
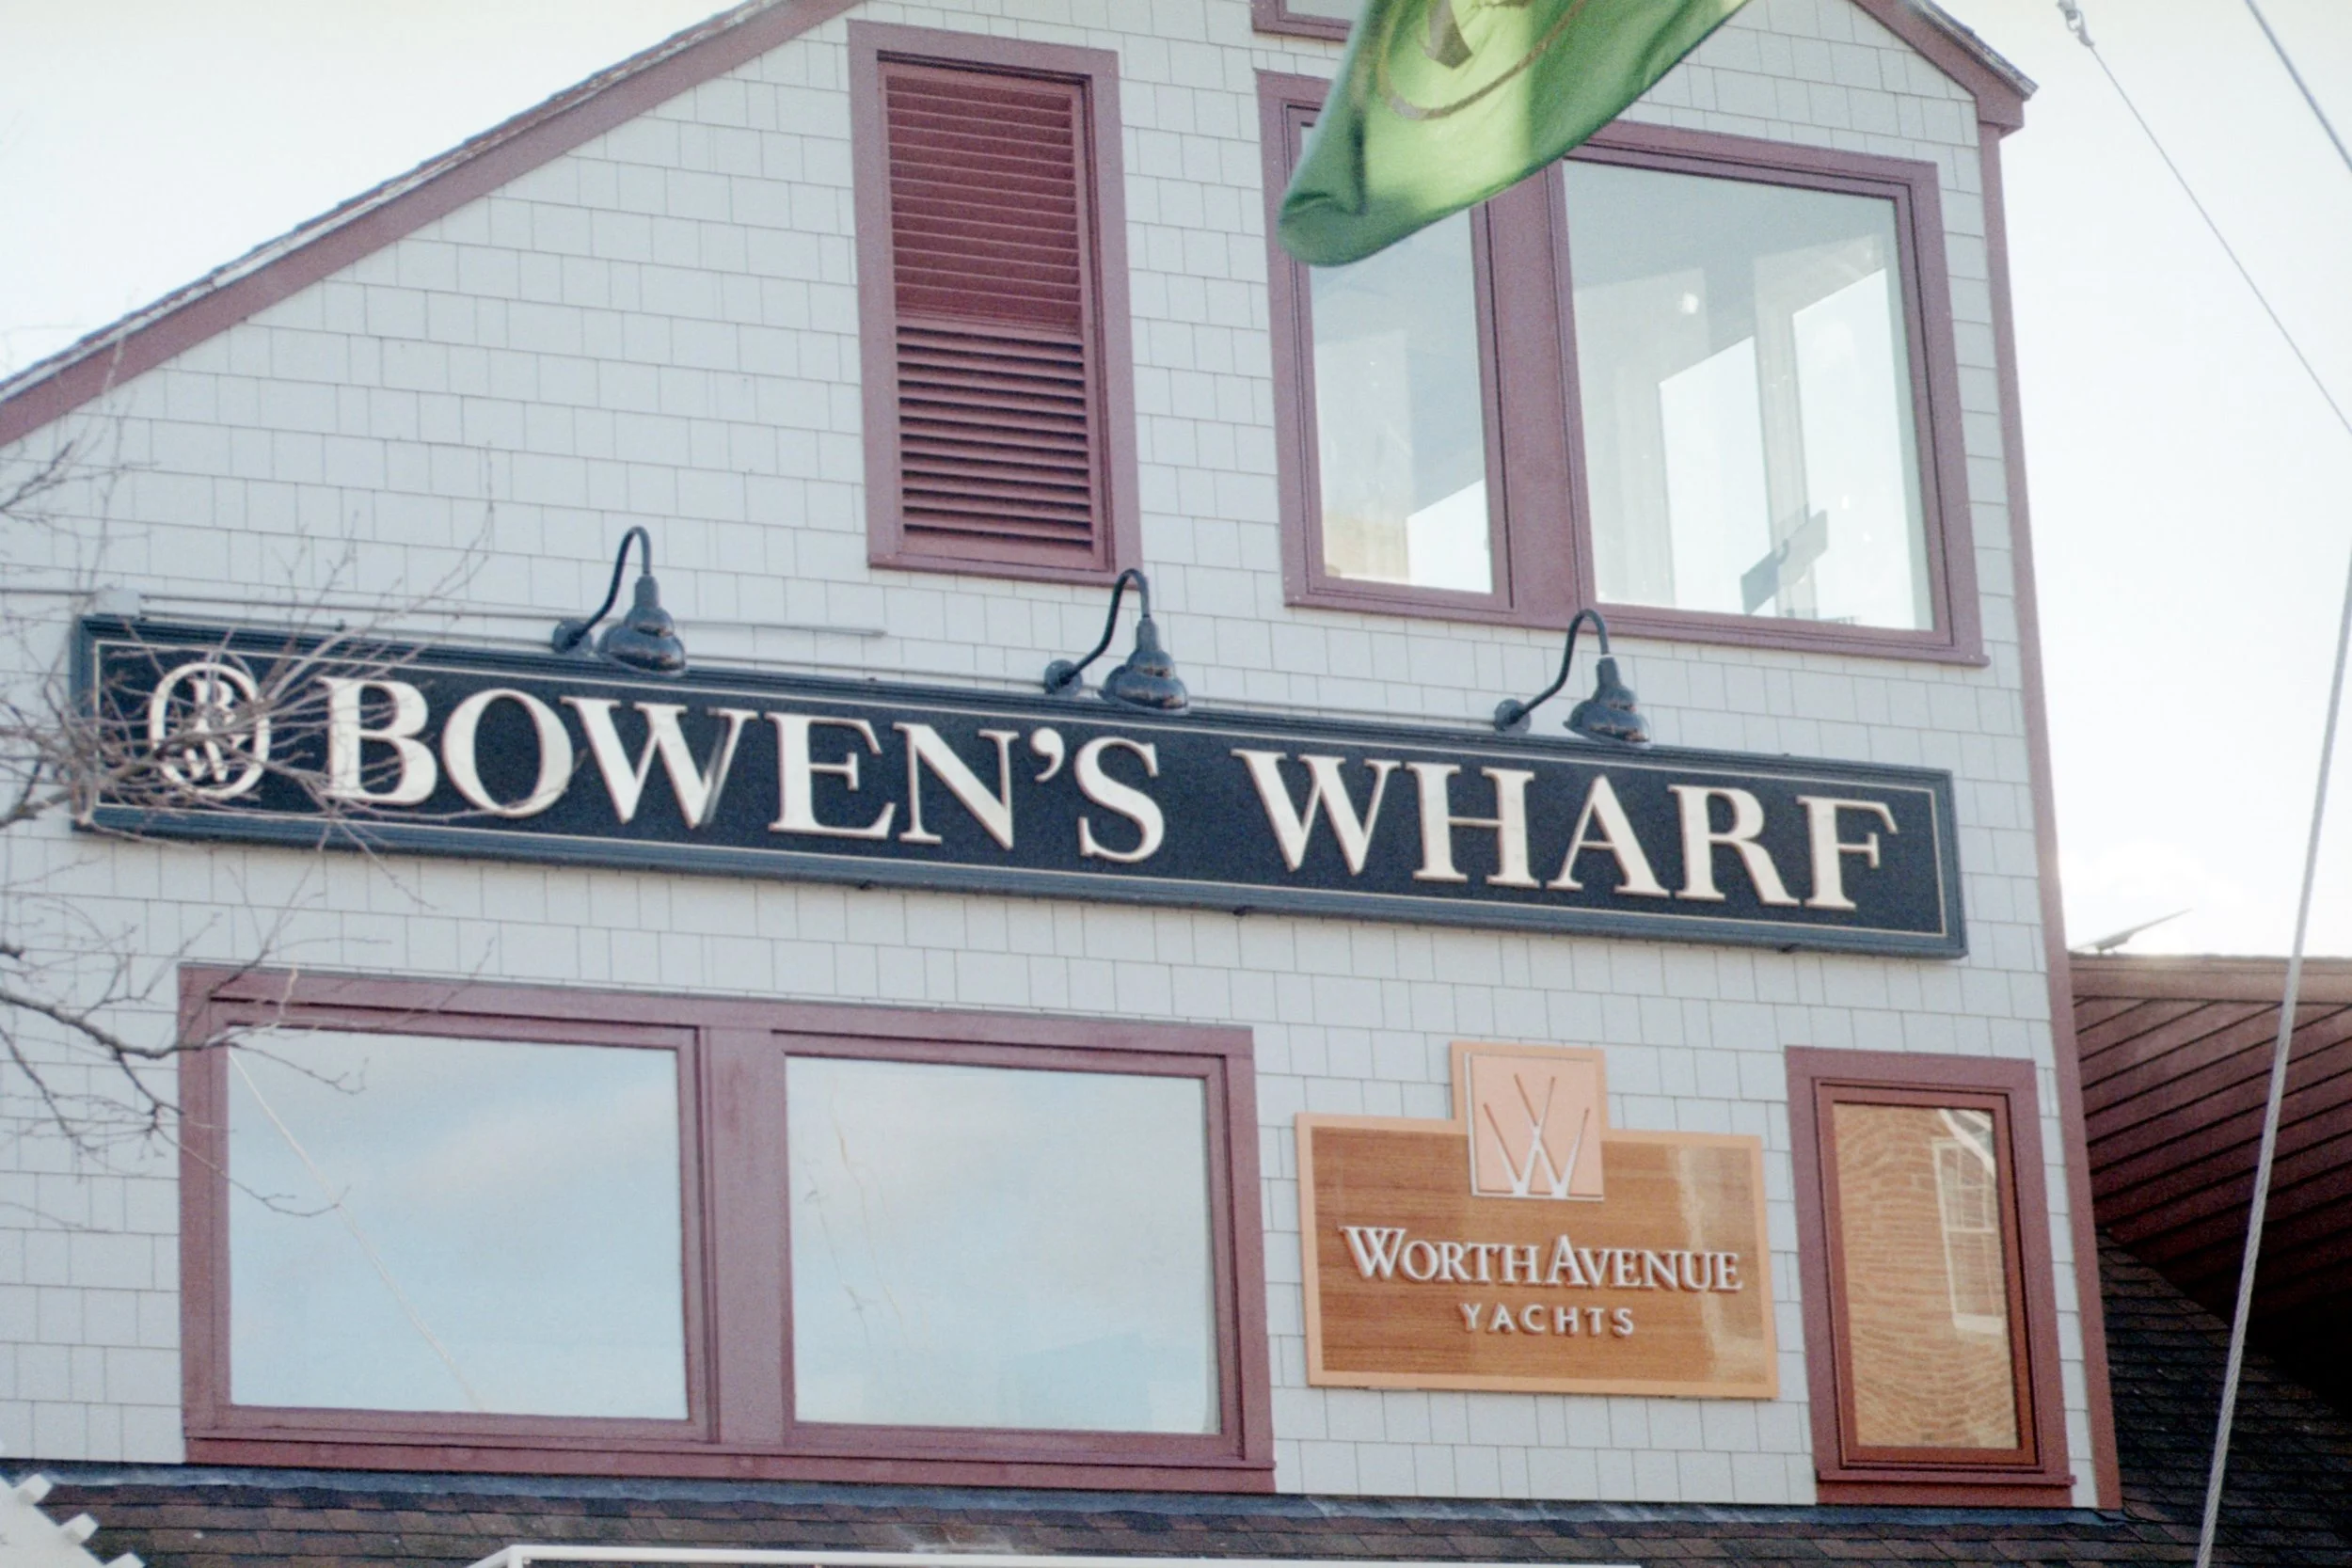
Bowen’s Wharf Sign
I tried to capture this photo with the flag getting in the way. The sky is overexposed in this one. You can see there really isn’t any blue and you can’t see any of the clouds.
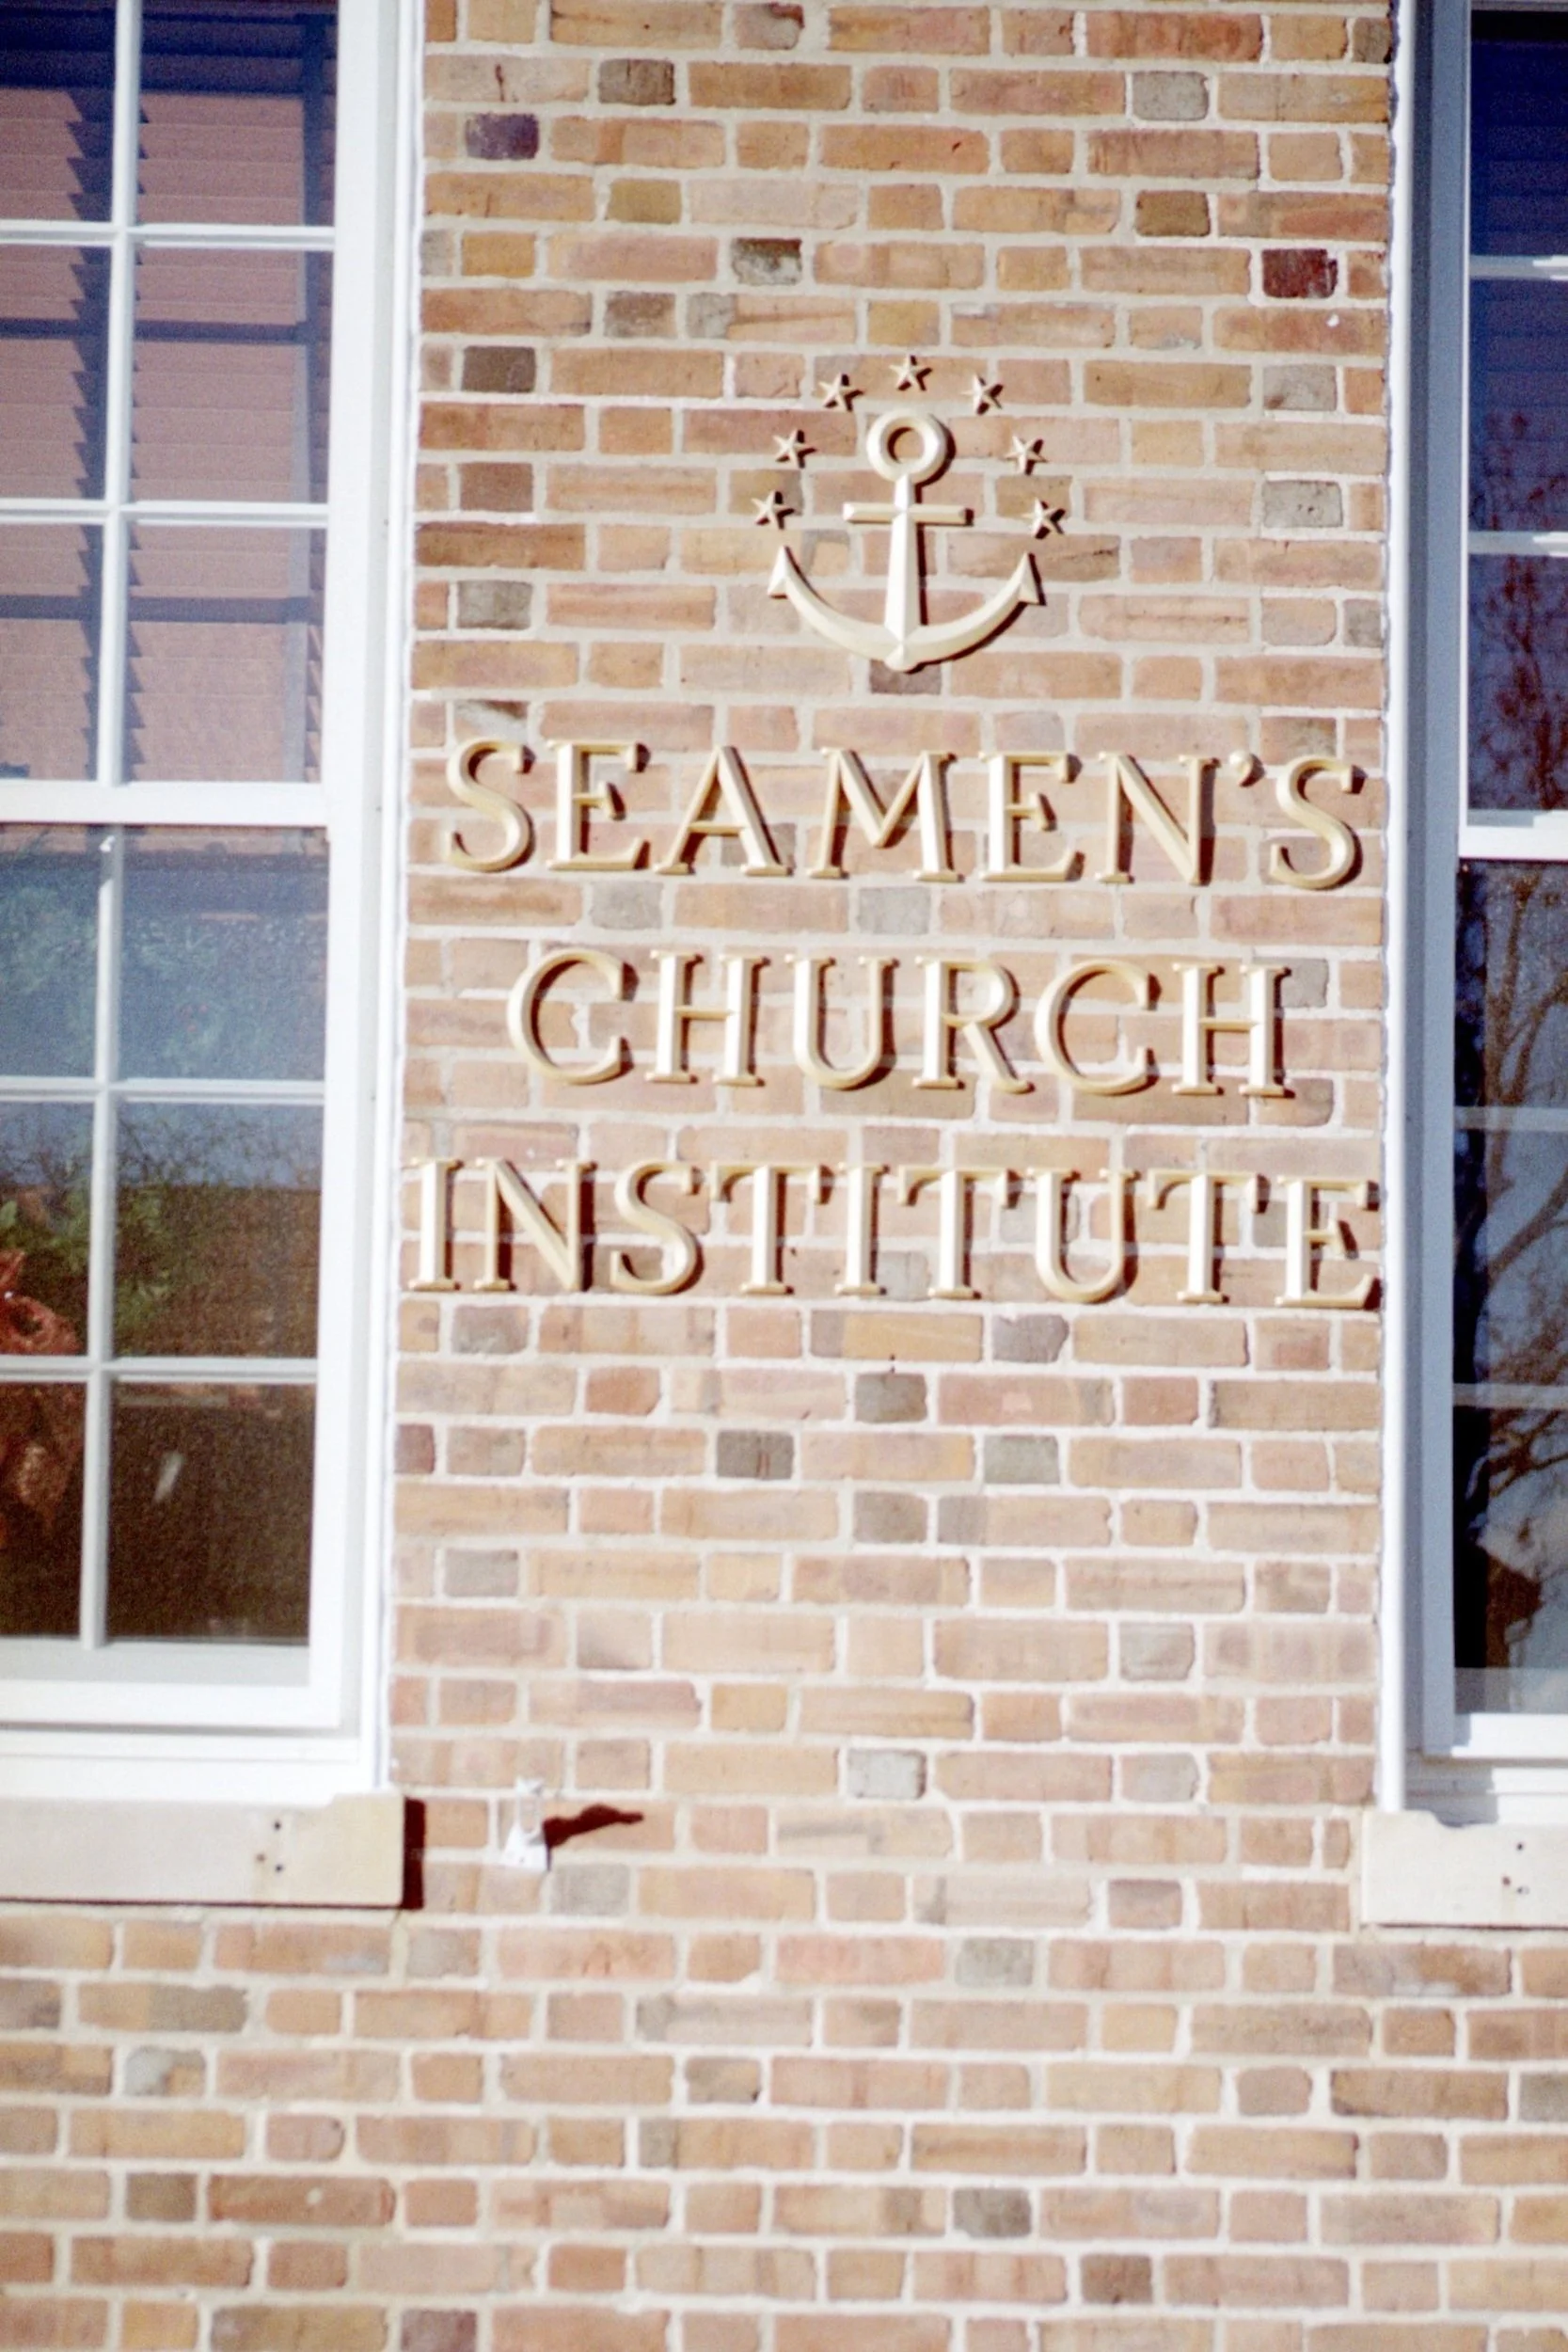
Seamen’s Church Institute
We’re coming up on the last few photos. This photo could benefit from a bit more centered composition and bringing down the exposure a bit. Not one of my favorites, but not bad.
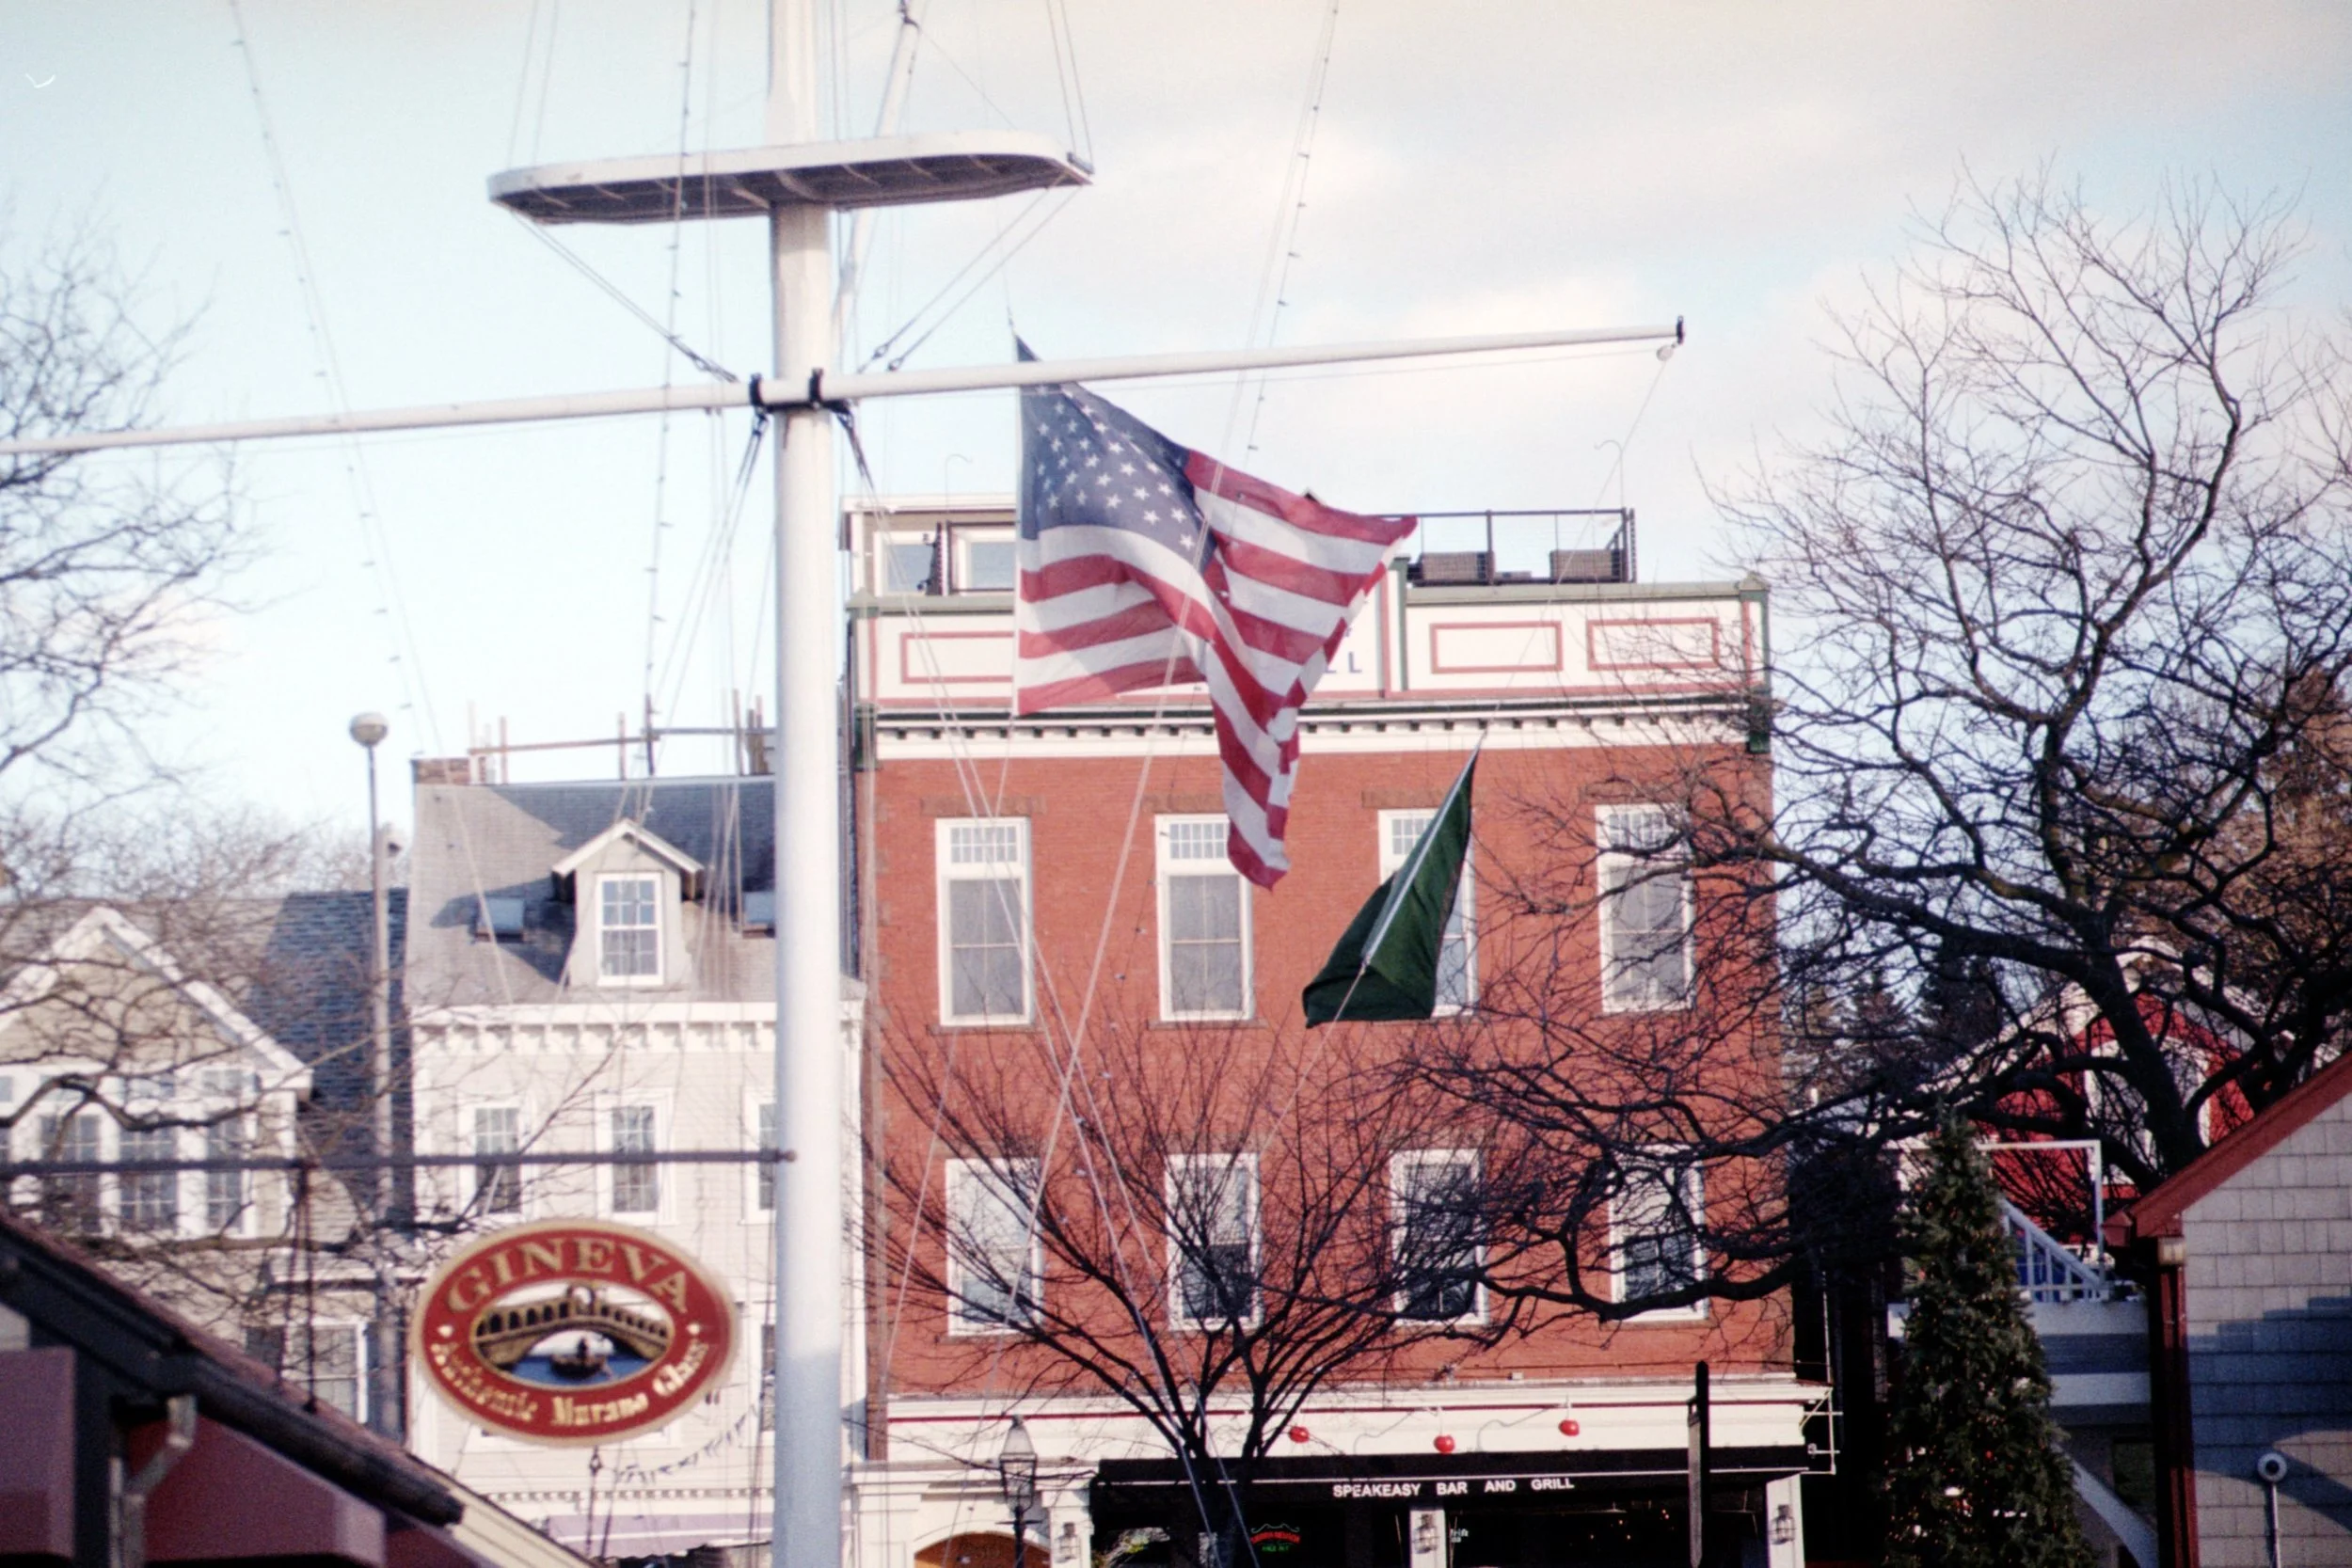
Flag at Marina
Here we are…the last photo from this roll. We made it! My biggest complaint…I screwed up the horizon again. I need to have a grid added to my viewfinder lol. I think this photo is exposed well. I’m also glad I was able to capture the flag in motion.
Final Thoughts for January
Overall, I’m happy with how my first roll of film turned out. For the most part, the photos were decently exposed. When I first pulled them out and looked at them, I had to remind myself that these are film photos so they are going to have some grain in them. I also had to remind myself that I’m shooting with a kit that was less than $75 so I can’t expect Sony A7RIII with a sharp Sony lens quality photos. Once I managed my expectations, I could enjoy these photos more.
I dropped my film off at Wal-Mart to get processed. I wanted to make sure the camera was working and the film would develop so that’s why I sent it off to be developed. That way if I got black or messed up photos back I would know, more than likely, something was wrong with the camera and not the developing process. However, I was a bit annoyed with Wal-Mart because my photos were supposed to be ready on the 13th, but they weren’t ready until the 14th. I know…I know…a day really isn’t that big of deal, but I had already waited a week and I was excited about getting my photos back lol. (First world problems, I know lol.)
I’m not sure what city I’m going to visit in February, but I’ll do some digging to try and find a cool one. I can’t wait to shoot another roll.

Frugal Film Project 2025
Learn about what the Frugal Film Project is and how I plan to participate in 2025.
Happy 2025! Not only is it a new year, but it is also the start of a new Frugal Film Project. I found out about this cool project last year on Facebook. What is the Frugal Film Project? I’m so glad you asked.
What is the Frugal Film Project?
The Frugal Film Project was created in January 2019 by a group of photographers. The photographers were Aragon Etzel, Matt Melcher, Dale Rogers, Graham Binns, Dan Marinelli, Monette Cruz, Sherry Christensen, Nelson Mullis, Kate Johnson, Marius Voicu, Nick Orloff, Matt Murray, and Sam Warner. The goal of the project at the time was to use a camera that cost $50 or less (including any shipping) and the cheapest film they could find locally. They also committed to using the same camera and film stock for three months and then they could switch to another cheap camera if they wanted. (To learn more about the original project, click here.)
Now, the new cost limit is $75 for your entire kit. This means your camera and lens(es) and any filters, flashes, tripods, etc. There is no price limit for the film, but you have to keep with the nature of the project and keep the film inexpensive as well. You also have to shoot with the same camera and film stock for the entire year (unless your camera breaks or your film goes out of stock). There is also an awesome Facebook group where people can participate in the project, share their work, and ask any questions they may have. Click here to join the Facebook group.
What’s My Experience with the Frugal Film Project?
This will be my second year attempting the project. I started it last year and was able to complete about four months worth, but then work got in the way and I fell off. Last year, I attempted the project with my Instax SQ6 and square format film. Click here if you want to see my YouTube playlist about the project.
What am I shooting with this year?
This year I’m going to shoot with an actual film camera. This will be my first time attempting to shoot film (not including the film disposable cameras). I’ll be shooting with a Minolta X-9, 50mm lens, and 80-200mm lens. My film stock of choice will be the Kodak Gold 200. Each roll comes with 24 exposures.
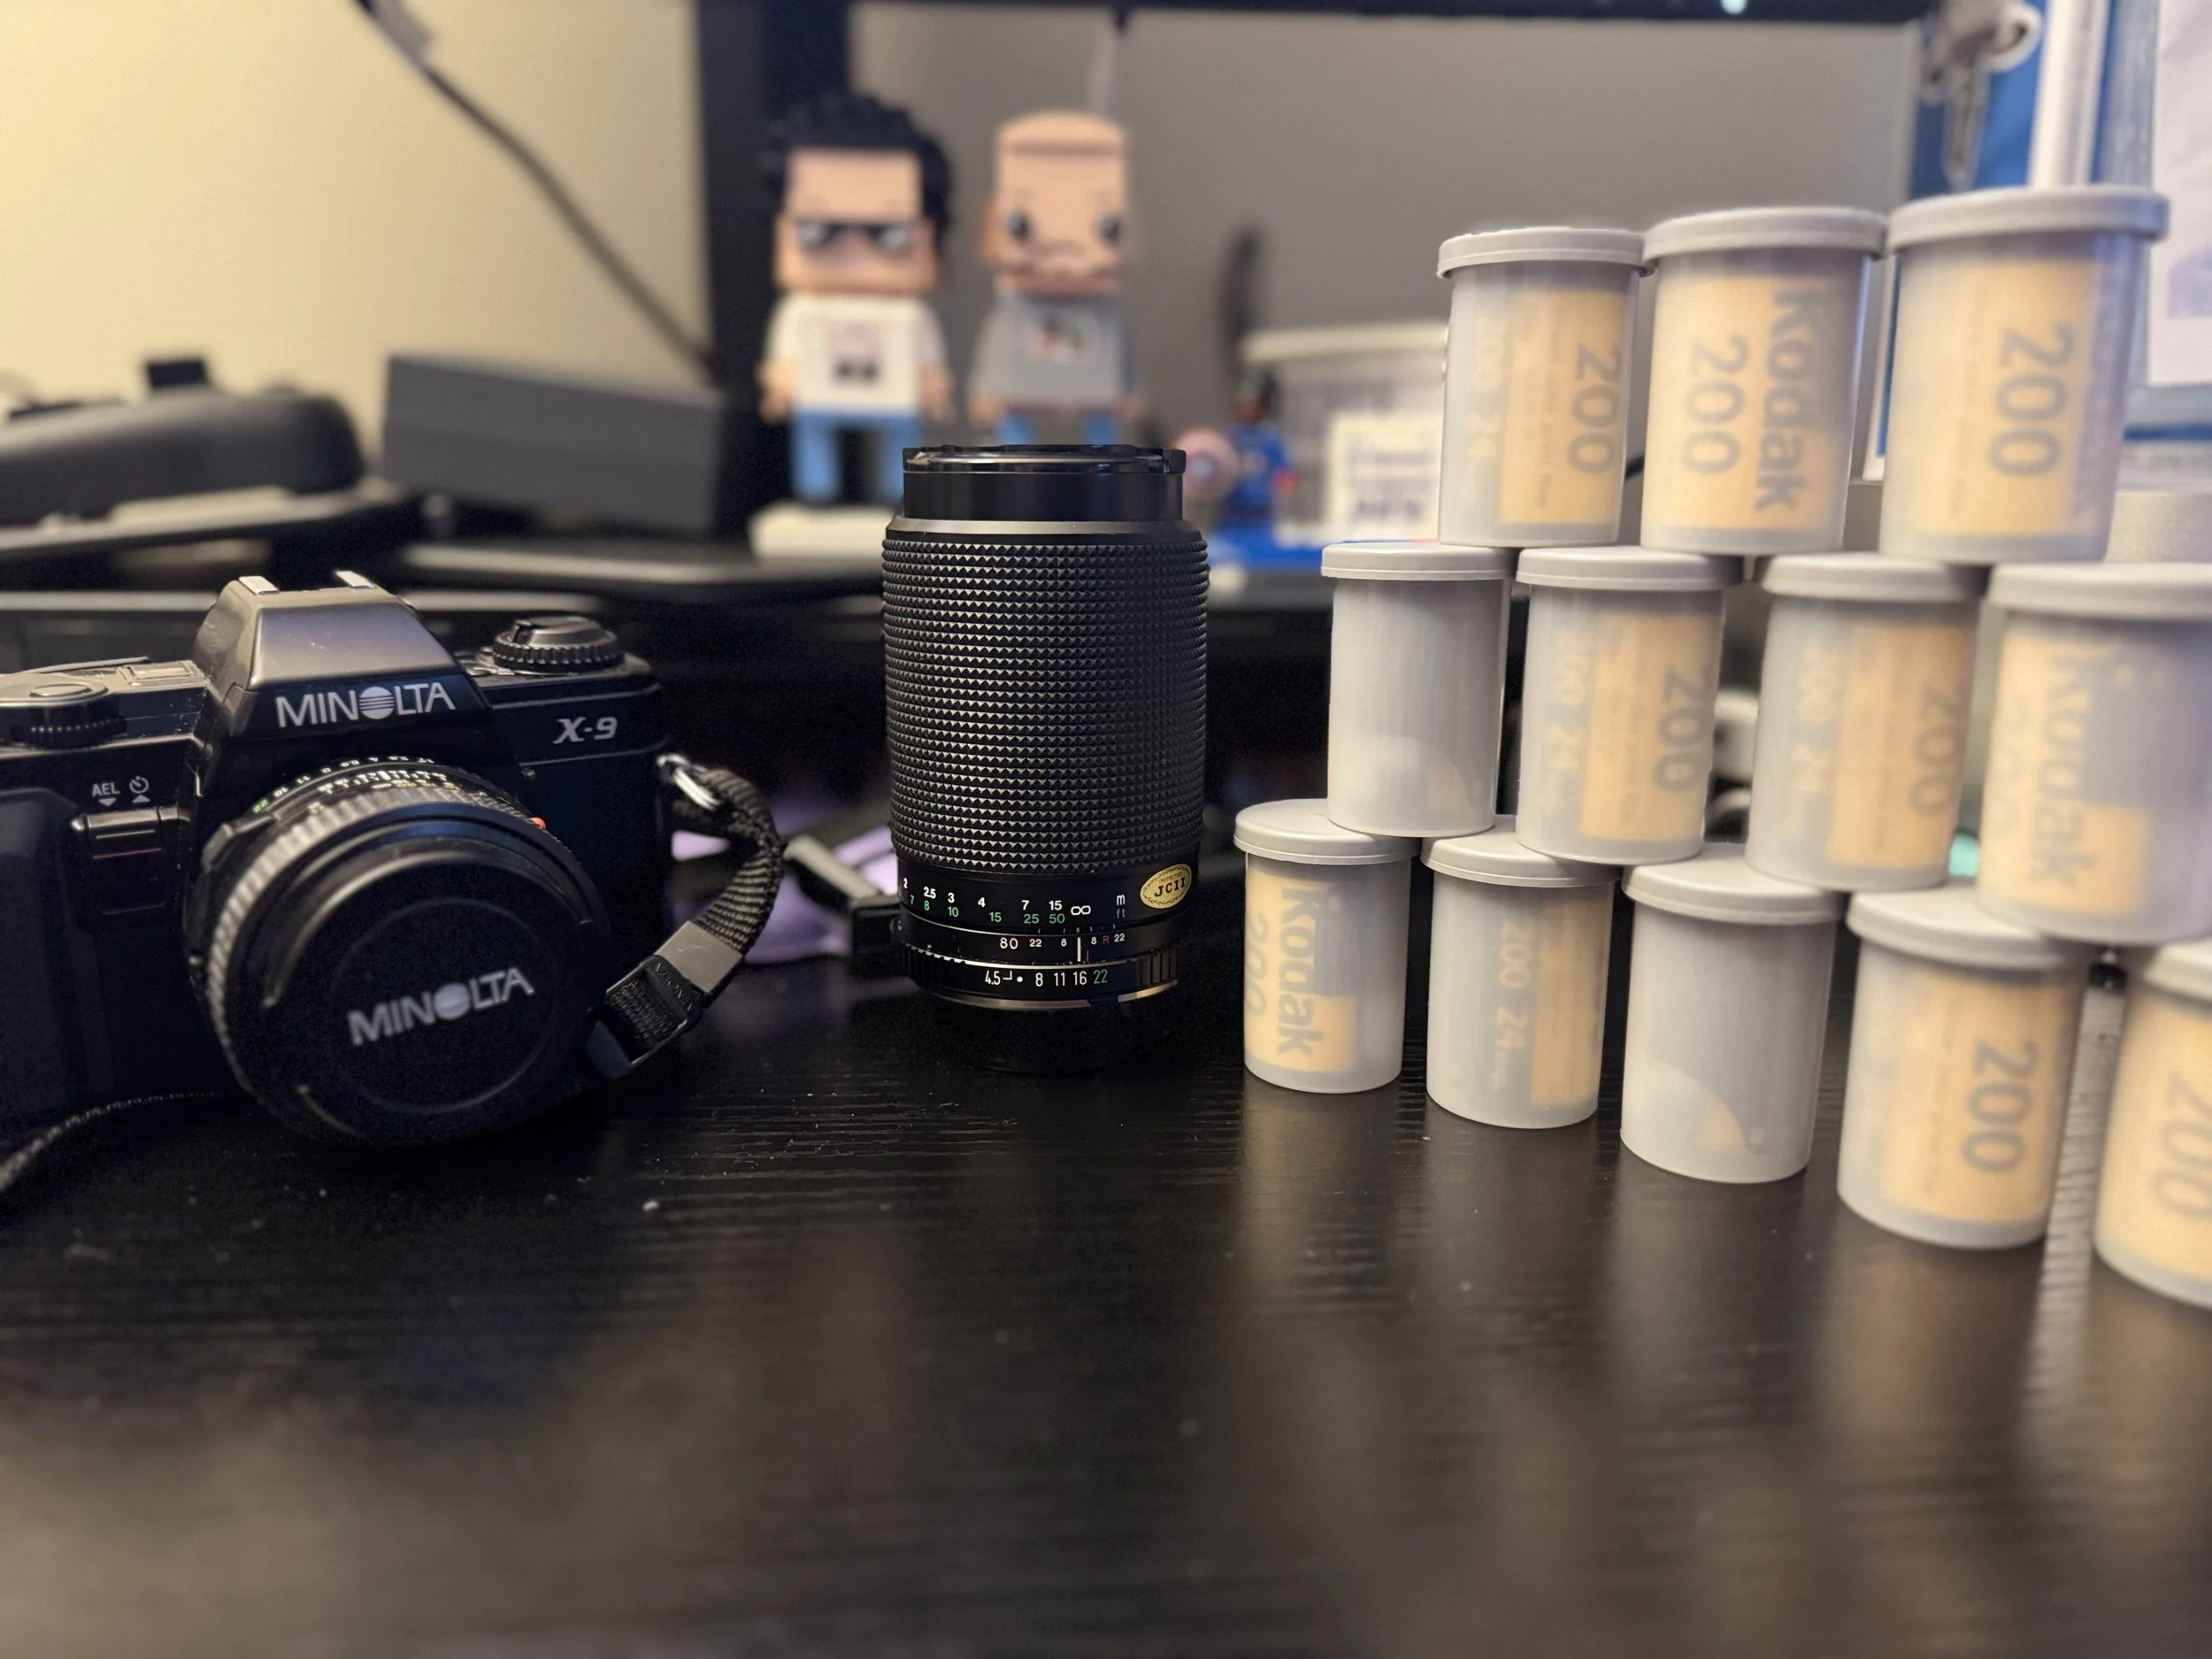
Minolta X-9, 50mm lens, 80-200mm lens, and 12 rolls of Kodak Gold 200.
I initially got a Minolta X-9 off Facebook Marketplace and the two lenses for $65. The kit also came with a flash, camera strap, camera bag, and instruction manual. I took the camera home, added some film, and I couldn’t get it to work. The lever wouldn’t catch the film properly and the shutter wouldn’t released. I switched the batteries out, looked on YouTube, but just couldn’t get it to work. After further research, I’m pretty sure it’s the capacitor that needs to be replaced. As this was my first film camera, I didn’t really know what to look for as far as making sure the camera worked…and I didn’t do my due diligence to make sure I knew what I was looking for. I’m trying to find a capacitor so I can attempt to replace it and see if I can get the camera to work. The capacitor has been harder to find than I thought it would.
Enter Minolta X-9 the Second. I found one of eBay for about $70 (including shipping) that came with a 50mm. They said it worked and that they would take it back if it didn’t work. So I pulled the trigger and got it like a week later. Put in some batteries, loaded the film, and boom…it worked!
What’s my plan for this year?
Last year, I asked ChatGPT to give me 12 themes to shoot for a film project. This year, I was going to do the same, but I saw someone post in the Facebook group that they are going to take photos in a new city each month in the state they are in. I think that is the route I’m going to go this year.
At the time of me writing this, I’ve already shot my first roll of film so it won’t be a new city for me, but I did shoot in a city so it’ll still fit the theme of cities. Also, I’ll be moving to a different state this year, but I can still shoot in a city I haven’t visited in that state.
I would also like to try my hand at developing my own film. I sent my first roll off at Walmart and just got it back. It’s not horrible or anything, but I would like a bit more creative control over my film. I’ll tell y’all more about that experience with an upcoming blog post.
Anyone else doing the Frugal Film Project this year? If so, tell me about in the comments below. I’d love to follow everyone’s journey!

Gift Ideas - 2024
Gift ideas for the photographers, videographers, and content creators in your life!
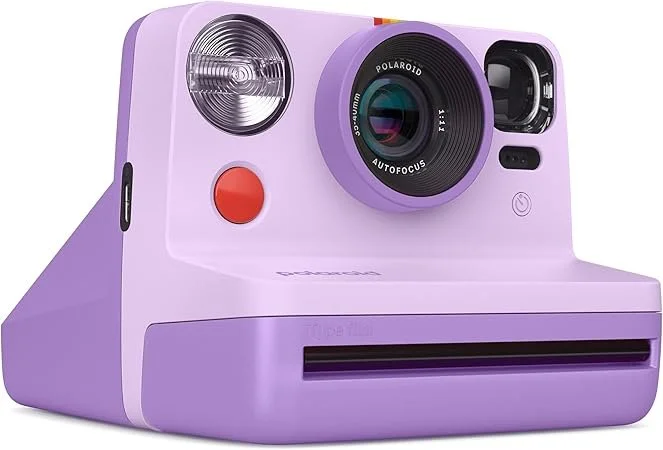
Purple Polaroid Now 2
This blog post is going to be a running list of potential gift ideas and deals for 2024. I can’t guarantee the prices when you click on the link, but I’ll put the date I found the price on the listing. Some of the links will be affiliate links. That means I’ll get a small kickback if you shop through my link. If it’s an Amazon link, it’ll be an affiliate link. I’ll also try to annotate any affiliate link. I’ll also put an astrix on items I’ve used.
CAMERAS
Sony ZV-E10* (30NOV24) - $698.00; https://amzn.to/3D1XipO
Sony ZV-1F (01DEC24) - $398.00; https://amzn.to/3Viv5S6
Sony A7R V (30NOV24) - $3397.99; https://amzn.to/4fSz3sN
Sony A7III (01DEC24) - $1298.00; https://amzn.to/4igwEcY
Instax360 X4 (01DEC24) - $424.99; https://amzn.to/4ia6zMF
DJI Osmo Action 4 (01DEC24) - $209.00; https://amzn.to/3OyElh2
INSTANT PRINTERS
HP Sprocket 200* (30NOV24) - $67.99; https://amzn.to/4iazGj5
Canon Ivy 2* (30NOV24) - $79.99; https://amzn.to/3B7hHJx
Instax Mini Link 3 (30NOV24) - $119.95; https://amzn.to/4f3lm9q
Instax Square LINK (30NOV24) - $140.34; https://amzn.to/3B9J71r
Instax WIDE Link (30NOV24) - $119.00; https://amzn.to/3OwIfXF
Canon SELPHY Square QX10* (01DEC24) - $99.00; https://amzn.to/3Vi0hkx
INSTANT CAMERAS
Instax Mini 99* (30NOV24) - $189.95; https://amzn.to/4eXWYWD
Instax Mini EVO* (30NOV24) - https://amzn.to/3D4F0Ek
Instax SQ6* (30NOV24) - https://amzn.to/3ViD2GZ
Polaroid Go 2* (30NOV24) - https://www.polaroid.com/en_us/products/go-polaroid-camera
Polaroid Now 2* (30NOV24) - https://amzn.to/3ZtNdLk / https://www.polaroid.com/en_us/products/polaroid-now/purple
Polaroid I-2* (30NOV24) - https://www.polaroid.com/en_us/products/i2-polaroid-camera
Lomo’Instant Wide Glass - https://shop.lomography.com/us/lomo-instant-wide-glass-camera
INSTANT CAMERA ACCESSORIES
Plastic case for Instax Wide 300* (30NOV24)- https://amzn.to/3AVBhsp
Plastic case for Instax Mini 99 (30NOV24)- https://amzn.to/3B6WpvC
Plastic case for Instax Mini EVO (30NOV24)- https://amzn.to/4gdMbbG
Polaroid Go Camera Bag (30NOV24) - https://www.polaroid.com/en_us/products/polaroid-go-camera-bag
Polaroid Large Album (30NOV24) - $22.99; https://www.polaroid.com/en_us/products/polaroid-photo-album-large
Polaroid Go Puffy Album (30NOV24) - $14.99; https://www.polaroid.com/en_us/products/polaroid-go-puffy-album
Ripstop Crossbody Bag (30NOV24) - $34.99; https://www.polaroid.com/en_us/products/polaroid-ripstop-crossbody-bag
Giant Acrylic Floating Frame (06DEC24) - $16.99; https://amzn.to/3VqU3yS
Instant Mini Photo Calendar (06DEC24) - $20.99; https://amzn.to/49s6bFe
2 Pack Instax Mini Photo Album (Holographic) (06DEC24) - $9.99; https://amzn.to/3DcvSxv
LIGHTING
Neewer CB200C (01DEC24) - $209.99; https://amzn.to/4eXBzwK
Neewer CB200B (01DEC24) - $167.99; https://amzn.to/4idGT1K
Mini LED Camera Light (Film Case Edition) (06DEC24) - $9.90; https://amzn.to/4f3UfLg
MISCELLANEOUS
Elgato Prompter* (30NOV24) - https://amzn.to/49ehSQ2
Oradilend Keyboard/Earbuds Cleaning Kit (01DEC24) - $13.58; https://amzn.to/4fLTgjY
SOFTWARE
Davinci Resolve Studio* (30NOV24) - $295; https://www.blackmagicdesign.com/products/davinciresolve/studio
You Played Yourself
Maaaaaaaannnnn…I played myself this morning. So I’m working on getting my fitness life together. I’ve been slacking for like the past two years. I started working out again regularly last week. I had been running on a treadmill. Now, that’s not my favorite type of running. I get really bored running in place. Which means I run worst and just dread that session.
Well I was finally able to get outside for a run today. I downloaded the ZRX app. It used to be known as the Zombies, Run app. I had used the app years before and it was fun. They also have a new Marvel section that I want to try out, but I’m going to save that for the future.
Anyways, so I park my car, get my stuff, and start setting up for my run. I open the ZRX app and begin the run. It’s just like I remember…I’m in a helicopter being flown to the safe zone…something happens..and now I’m on the ground and have to escape. Now, I set up the app so that it would include chases. Chases require that you run 30% faster than your current speed. (Keep this in mind.)
I’m chugging along…listening to my music…enjoying the run. It was a bit humid (use to running indoors), but overall a nice day outside. My music started speeding up and so did I. Here is where I messed up. My starting pace was pretty quick for my current level of fitness. What I mean by that is that I was pushing myself moderately. I am also getting over a cold so my breathing isn’t quite back to normal.
Boom! I hit my first chase. Problem is, I’m currently winded and pushing to 30% more is burning me out. In fact, I ended up having to “drop” something to in order to distract the zombies (aka I was too slow). I was disappointed, but I was like okay, is what it is. I forgot, there was another chase near the end of the run. Them zombies were gaining quickly.

Not my proudest moment, but I paused the run because I wasn’t sure what would happen if I got caught again. I’m pretty sure I just would have “dropped” something again, but I didn’t want to risk it. Overall, I finished my run, just not the run via the app.
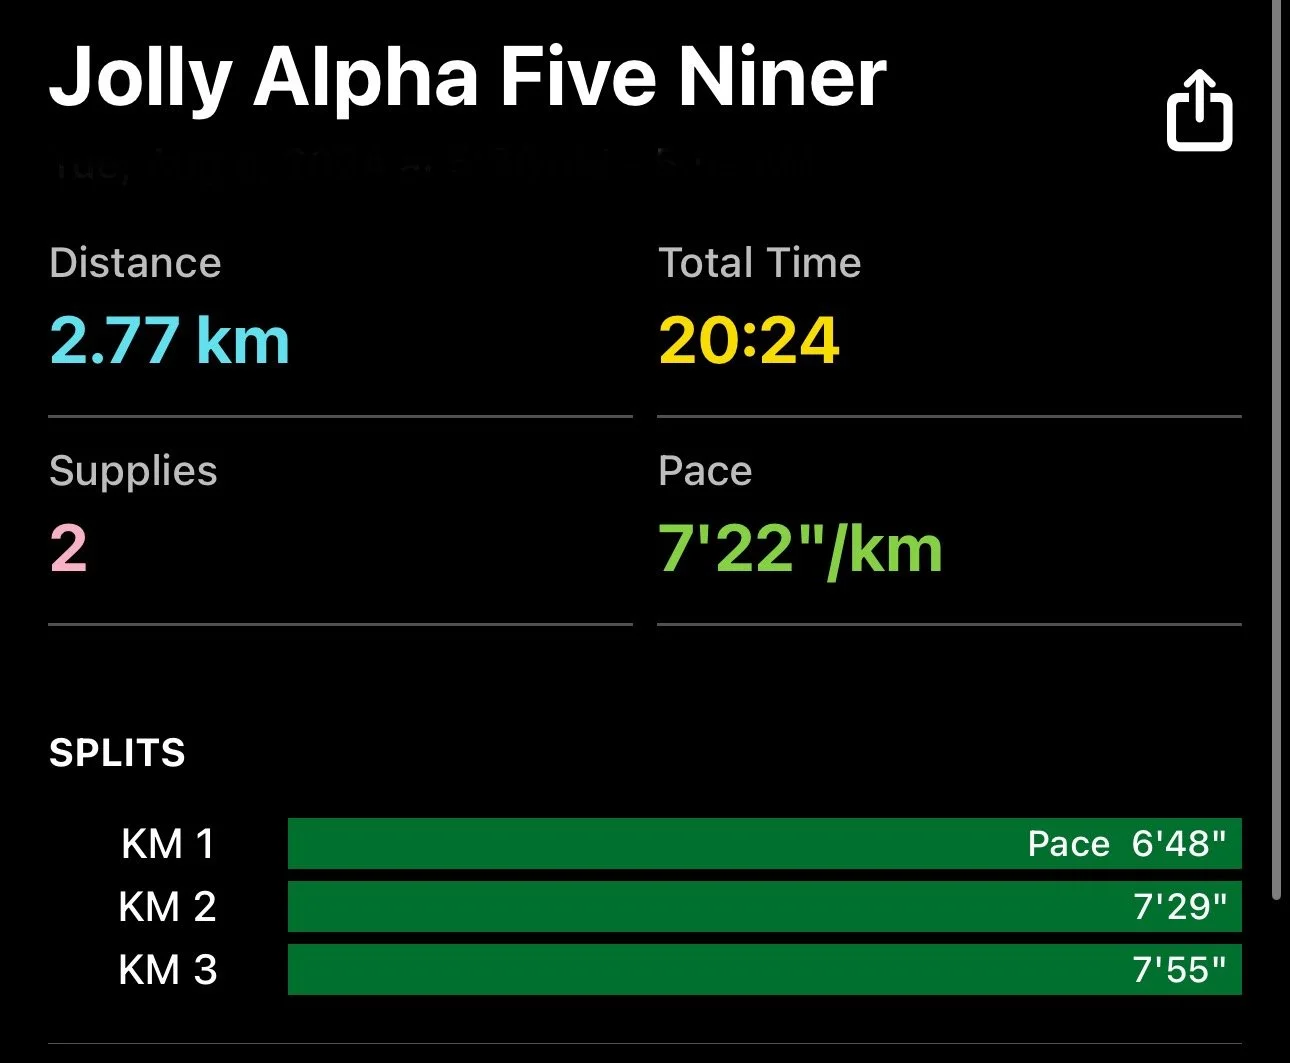
Don’t judge my slowness.
It’s supposed to rain all this week, so I’m not sure if I’m going to get a chance to run outside again. But if I do, I’m going to replay the first run. I’m going to start slower so that when I get to a chase, I can actually survive the 30% bump in speed.
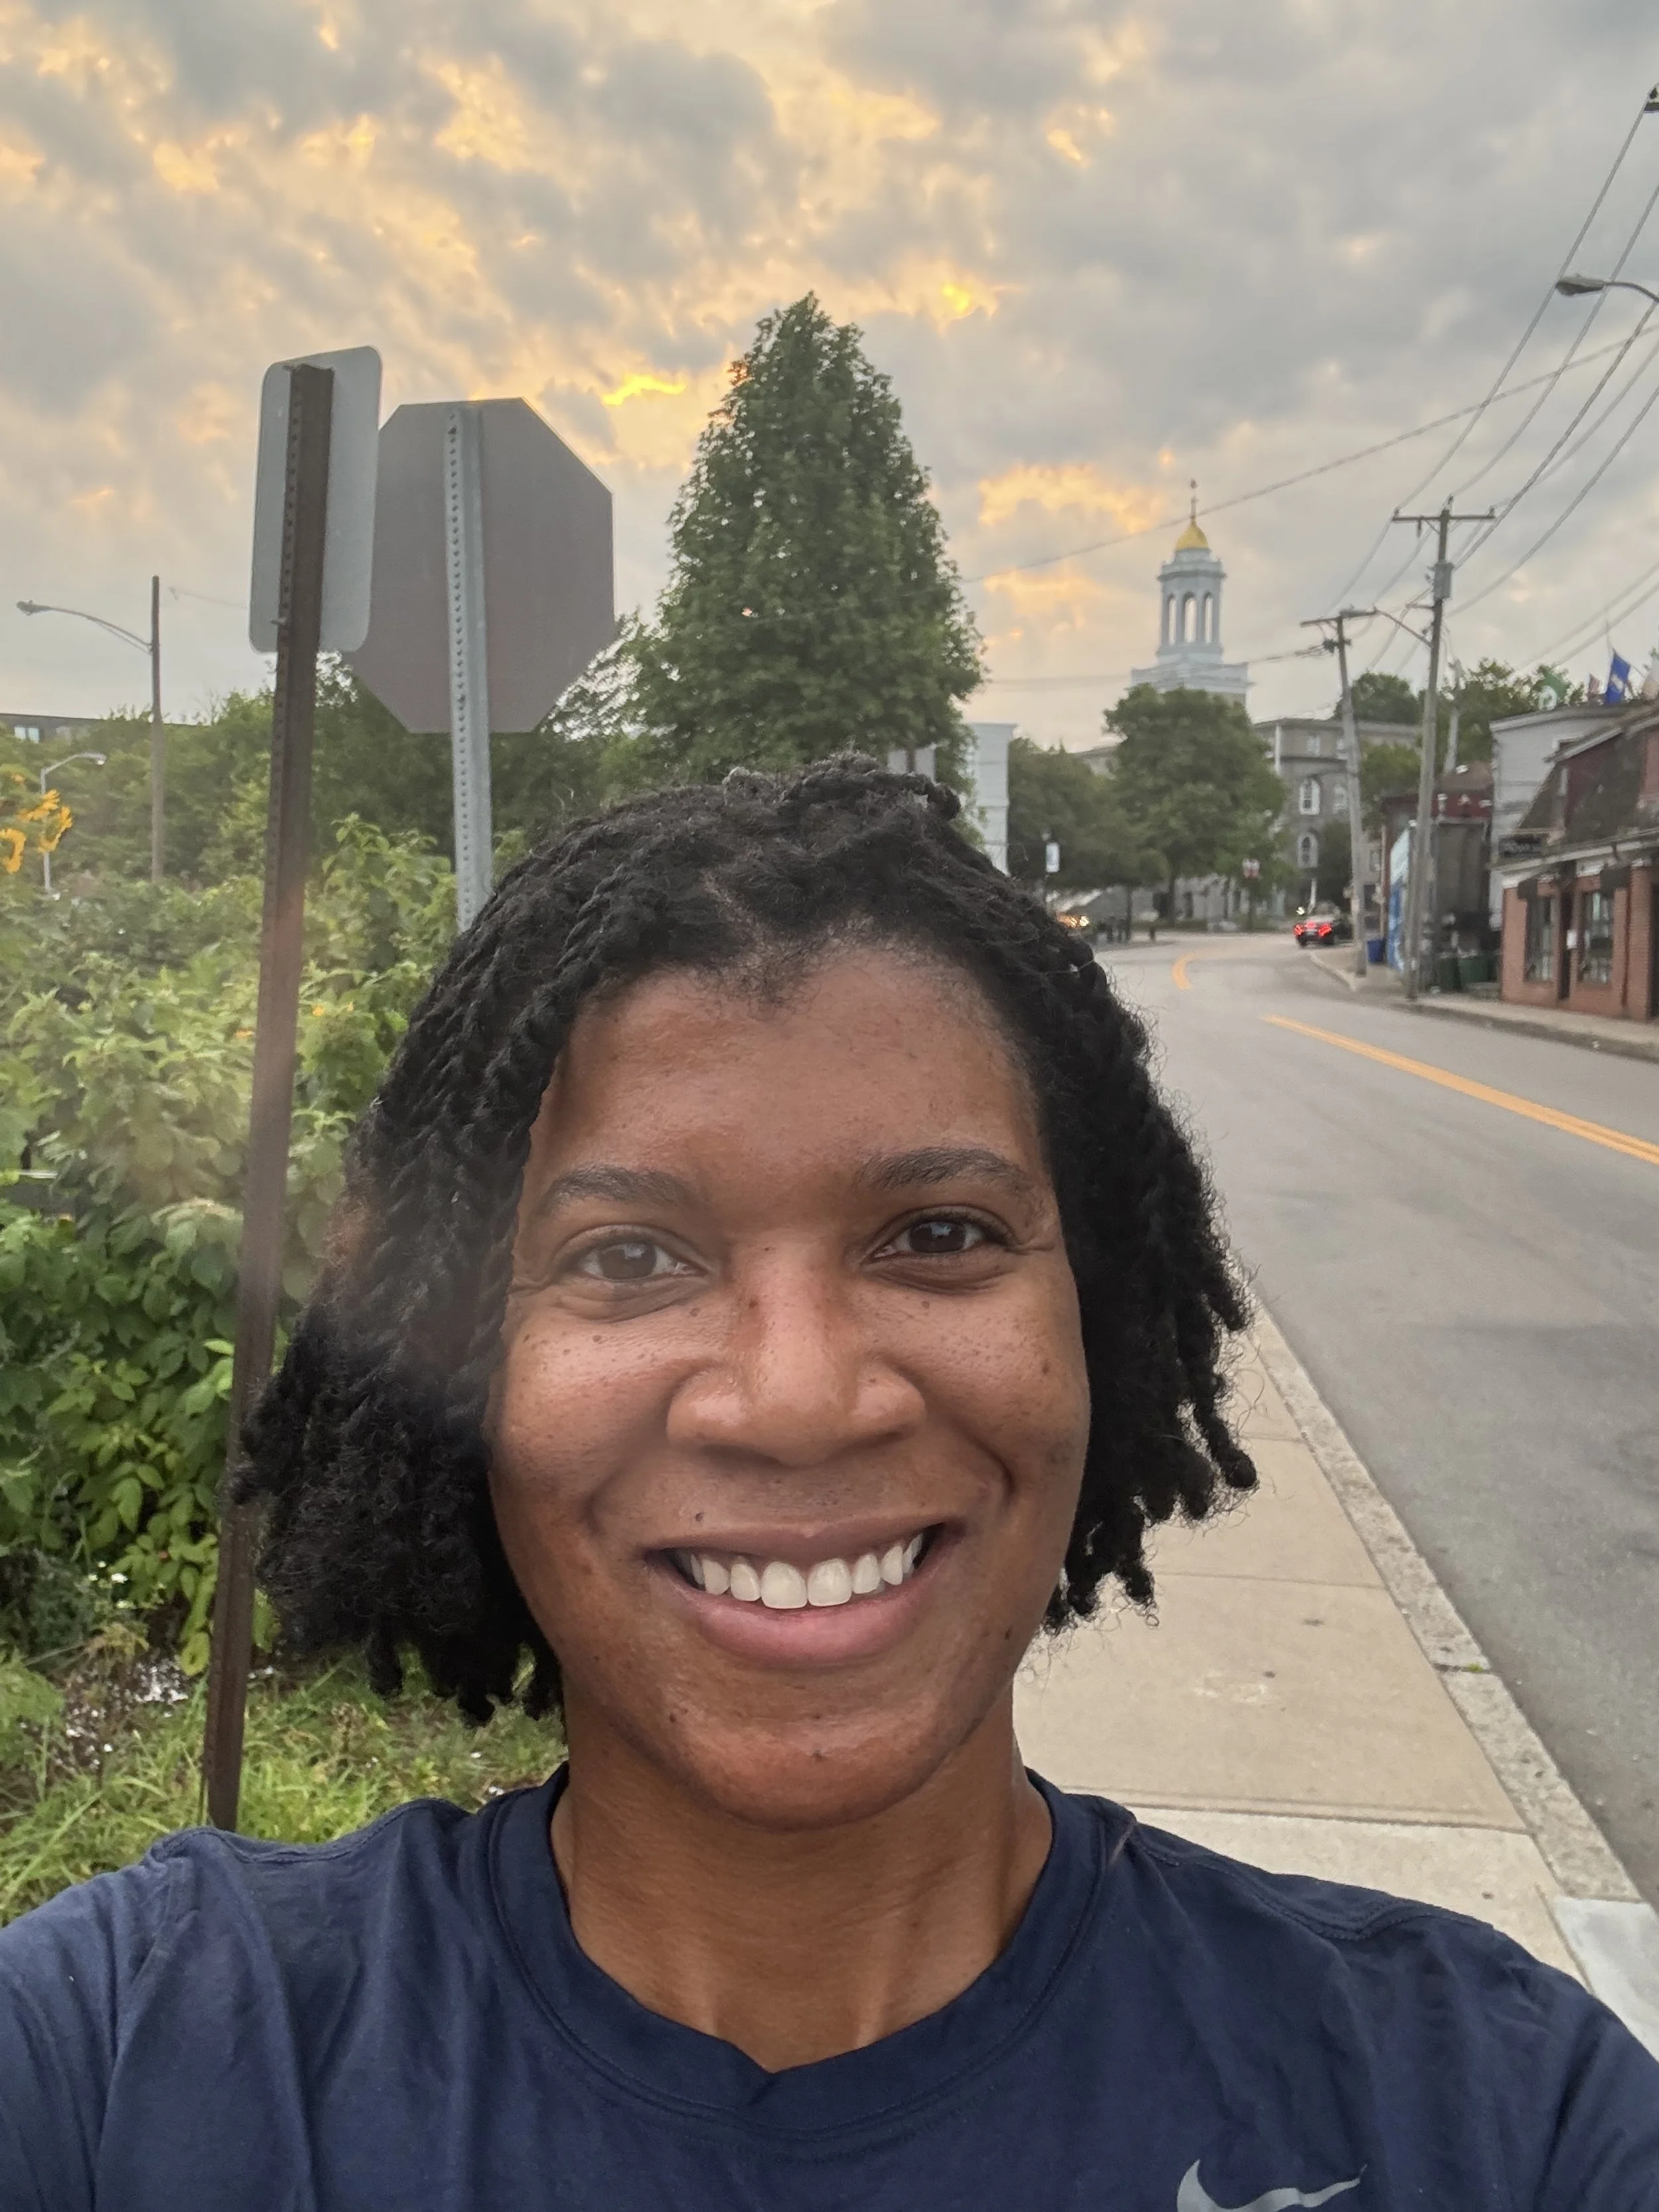
Sweaty, but finished!

Rota, Spain: Instax SQ20 Edition
Check out some of the photos I took with the Instax SQ20 in Rota, Spain.
So of course I’ve been wanting to take my Instax SQ20 out for a test drive. Today was a perfect morning for that. I thought about going to Seville or Cadiz, but I had some stuff to do for work and I couldn’t afford to be gone all day (with tomorrow being the 4th and pretty much everything being closed). I packed pretty light this morning for this outing. I just took my Instax SQ20, my DJI Pocket 3, and my Insta360 Go 3. I brought the last two so I could record some video from this photo shoot. I’m trying to get back into my YouTube channel so I wanted to have some video footage to be able to create a quick video of the shoot.
I knew exactly what I wanted to take a picture of: the Rota sign. (insert Rota sign photo)
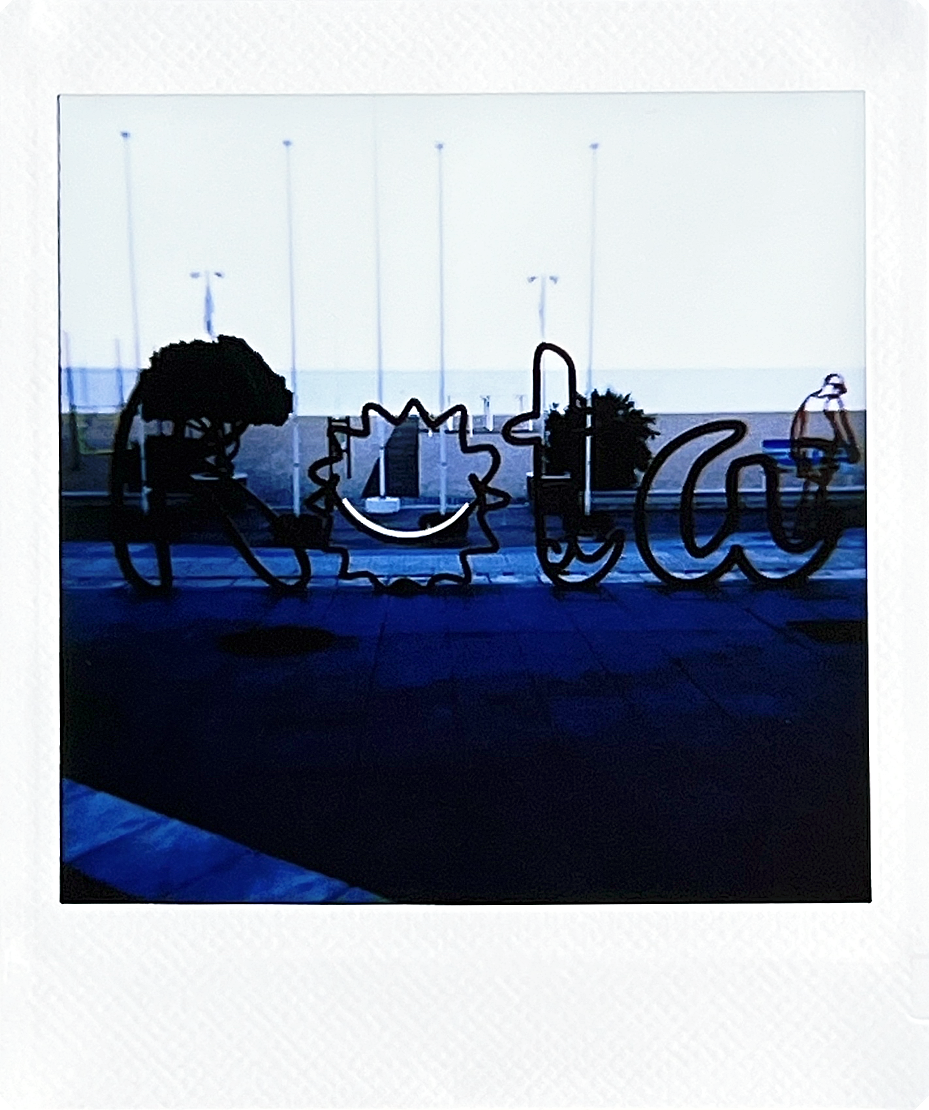
Rota Sign
To get to the sign from where I am, it’s about a 30 minute walk. I turned in my car to ship it back to the states so even if I wanted to drive to it, I wouldn’t be able to. Also, parking in Rota with my American size car can be a pain in the butt. Luckily, it was still cloudy and it wasn’t super hot outside. So about 0730, I put in my ear buds and got to walking. I make it to Rota sign, compose my shot, and take the photo.
Now, this photo is a bit dark and has a blue-ish tint. It’s about 0800 when I get to the sign, but the sun is being blocked by the buildings. Instax film needs a good amount of light in order to capture good details. You can of course still see the sign, but you don’t get to see the color of the different letters or more detail. If I went back around say 1100, when the sun was more overhead, I would be able to capture more of the details and colors of the area.
While not my favorite photo from my photo walk, I don’t have it. I just wish there was more light. I could have used exposure compensation to help with the darkness, but for this photo walk, I was just testing out the straight out of camera look.
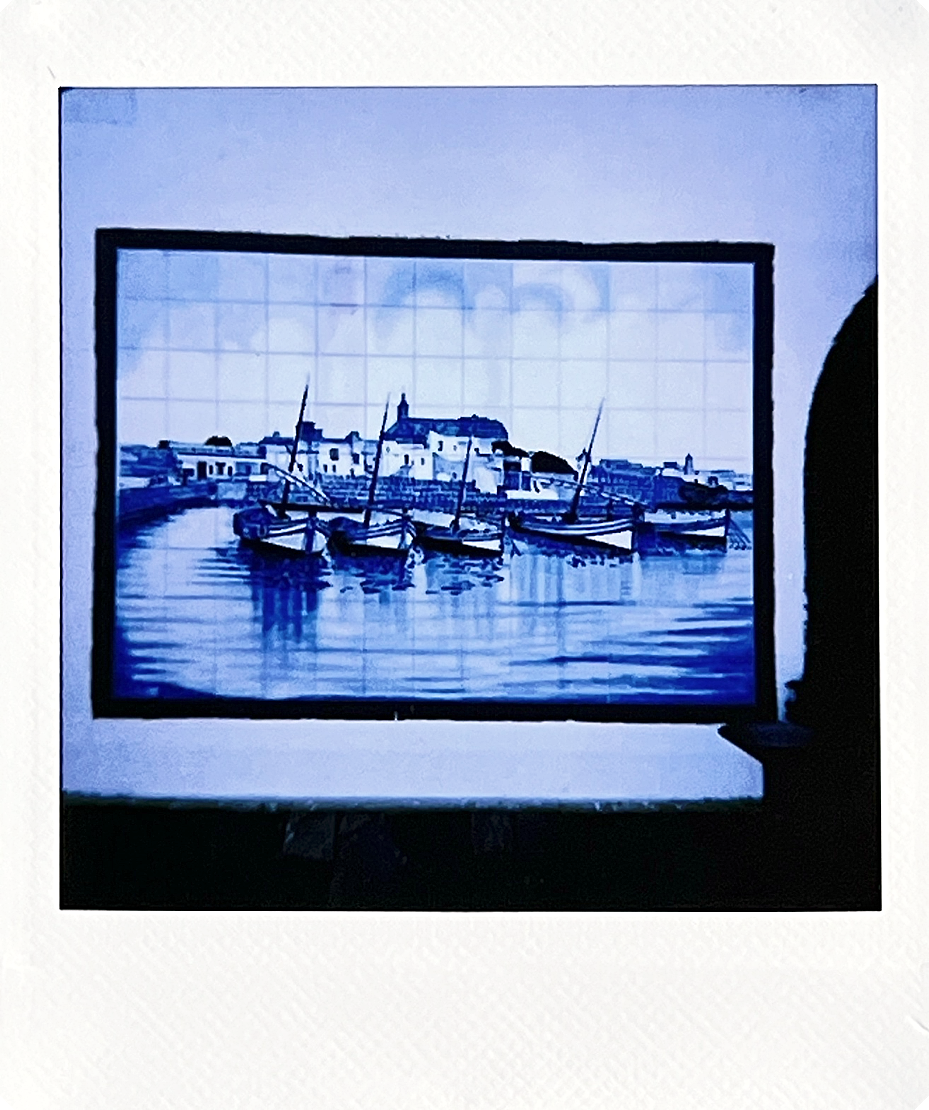
Ruta Paseo
After I took a photo of the Rota sign, I was off again. I figured I would head to the Libertad statue. On the way there, I passed this cool tile painting on one of the walls. I was initially just going to walk past it. Much like the issue I had with the Rota sign, this image also came out bluer than I would have liked. Now yes, the painting is blue-tinted, but you can see like the white wall that the painting is on is also tinted blue. With a little more sunshine, I think the blue painting would have stuck out more in the photo.
I went back to heading towards Libertad when I ran across this archway. Now, I’m big on things like patterns, reflections, etc. Basically anything that catches my eye. Enter archway framing steeple in the background. When I stopped to take the photo, I wasn’t sure if the steeple would show up in the background. I was concerned the background (sky/steeple) would be over exposed due to the darker portion of the archway and tunnel.
However, I was pleasantly surprised when I was able to see the steeple in the background. Like the previous photo, the overall image is still a bit blue (it’s still early-ish in the morning), but I’m not upset with this photo. Besides the color temperature of this photo, the only really thing I think I would change about this photo is to better center the steeple in the archway. As you can see in the image, it’s slightly off center of the archway.
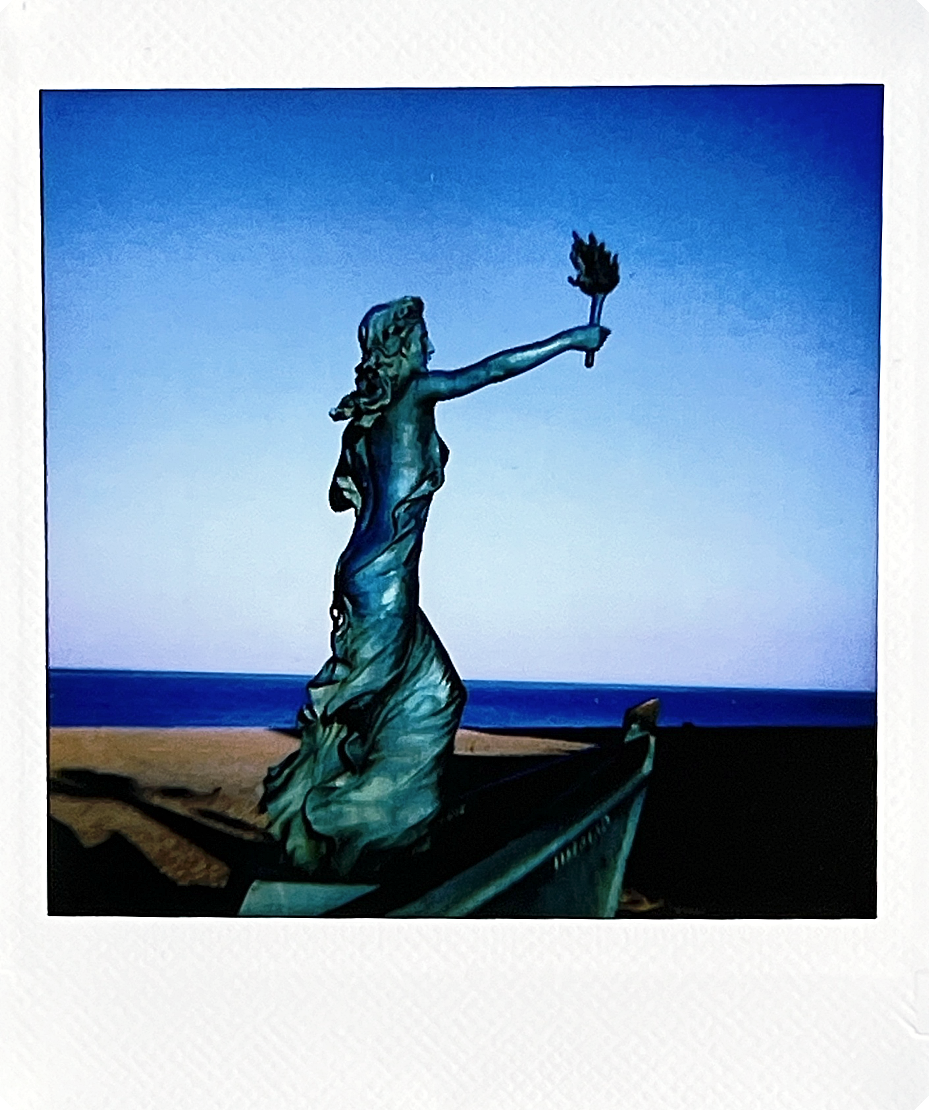
Libertad
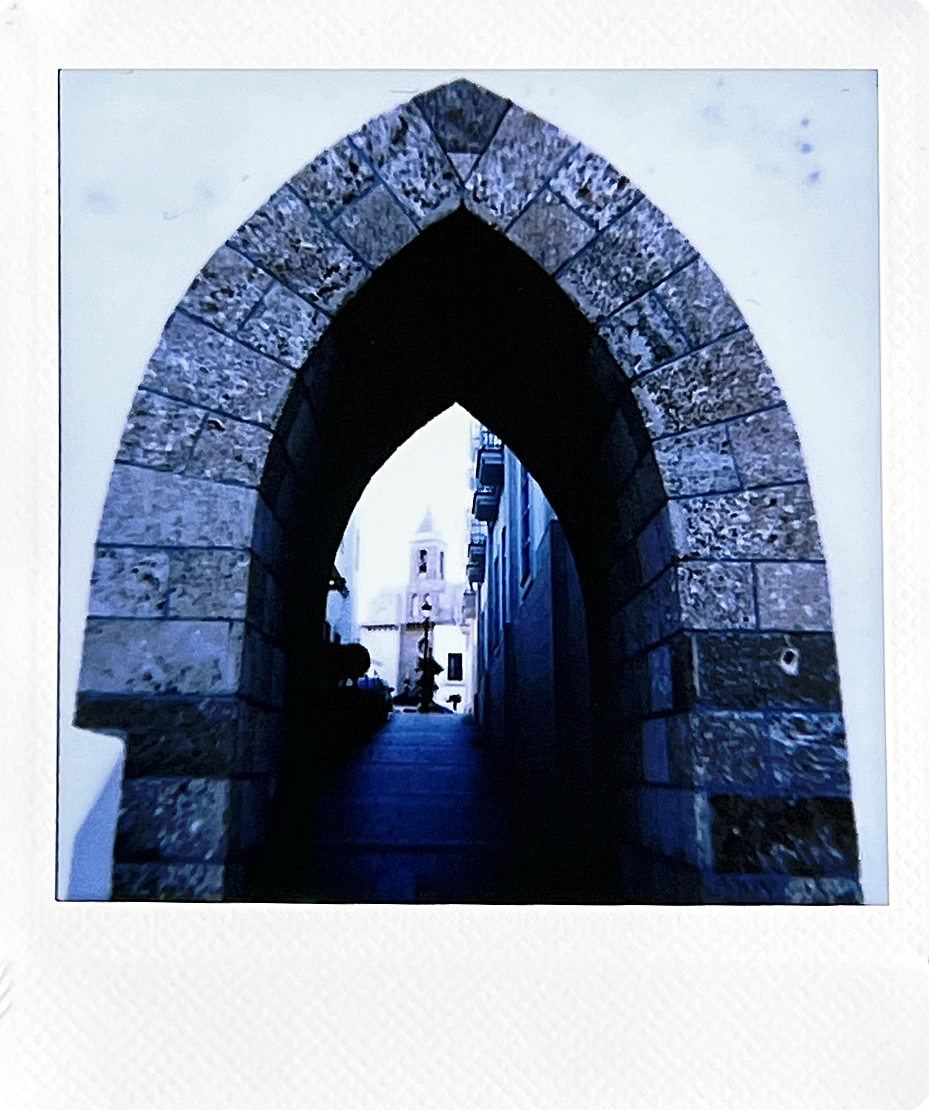
Archway
The Libertad statue isn’t far from the lighthouse in Rota. It took about five minutes to walk from the painting to the status. I wanted to capture more of the woman’s face, but her face was in the shadow and I knew I wouldn’t get much detail so I opted to shoot the side of the statue in the sun. It’s interesting how much the elements affect this statue. Click on this link to see a look of the statue less than two years ago (photo credit to Bill Bowman). Overall, I’m happy with this photo though. It has some good coloring in both the statue and the sky. I wish there would have been more (or any) clouds in the sky, but I still like this photo.

Pink Flowers
So besides shadows, reflections, etc., I am a big fan of capturing photos of flowers. Now, why? I don’t know. I’m not big on receiving flowers, because they’ll just die and it seems like a waste. But taking a photo of them? Chef’s kiss
I prefer to take macro photos of flowers as I like showcasing the details of the flowers. However, macro photography isn’t necessarily a thing with Instax cameras. (Although, shameless plug, I tried to a type of macro photography with my Instax SQ6. Click the link to check out the YouTube video.)
The biggest thing I would change about this photo is the composition. I would have liked to get a bit closer to the flowers so they filled the entire frame instead of having like that line of green in the top portion of the photo.
Double Exposure
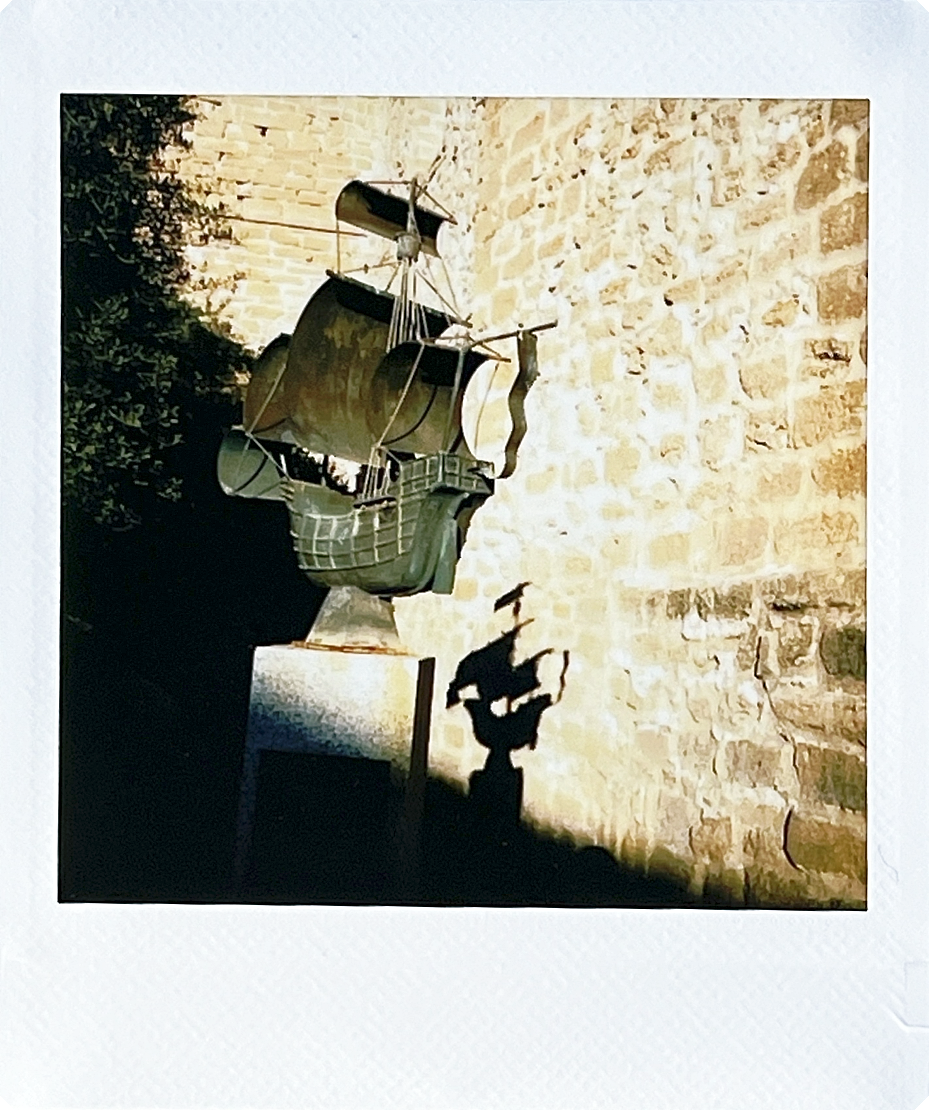
Once I attempted my double exposure, I cut left through a side street and started walking. I started heading towards what looked like some type of castle or fortress. As I walked around the building, I came across this statue of a ship.
I stopped and took this photo for a couple of different reasons. The biggest being that with the location of the sun, there was a nicely defined shadow of the statue. I also like the shadow line of demarcation based on the angle.
When I initially took the photo, it was a bit overexposed. I initially was just going to leave it like it was because I was just going to take one shot of each image. However, the more I thought about it, the more I was like why? The camera I’m using is literally meant to take multiple pictures and I select the image I like best.
Flower Pots
Alright, so I’ve got one photo left and I’m not 100% what I want to take a photo of. I keep just walking around to look and see what I can find. I initially was trying to find this archway that I kept seeing signs for. However, it was getting hot and I was still going to have to walk all the back so at this point, I was just looking for something that looked interesting.
Lo and behold, I came across this tower. This tower is attached to one of the popular markets in the area. What I learned when taking this photo is that I need to leave more space near the place where the photo and frame meets. When I framed this photo and looked through the LCD screen, the skinny pole(?) near the top of the tower was fully in the photo. However, when I printed it, the very top of it was cut off.
Overall, I’m not mad at this photo though. Yes, I would have liked to see more detail in the tower, but I like the fact that the sky isn’t completely blown out.
Next up, I tried my hand at some double exposure. Now I don’t really do much double exposure photography. In fact, this is probably the first time I’ve actually attempted it now that I think about it. As you can tell (or maybe not lol), I need a lot of work on my double exposure work. I think where I messed up here is that my darker subject (first image) wasn’t large enough. I should have chosen a different subject or gotten closer to the subject I chose.
I got the first image by taking a photo of Libertad with the sun behind it (to give me the shadow look) and then I found some flowers and took a picture of those for the second photo. The more I look at the photo, the better I think it looks, but I still need some practice with this technique. I do like that I can see pretty much all of Libertad’s silhouette and the full background of flowers.
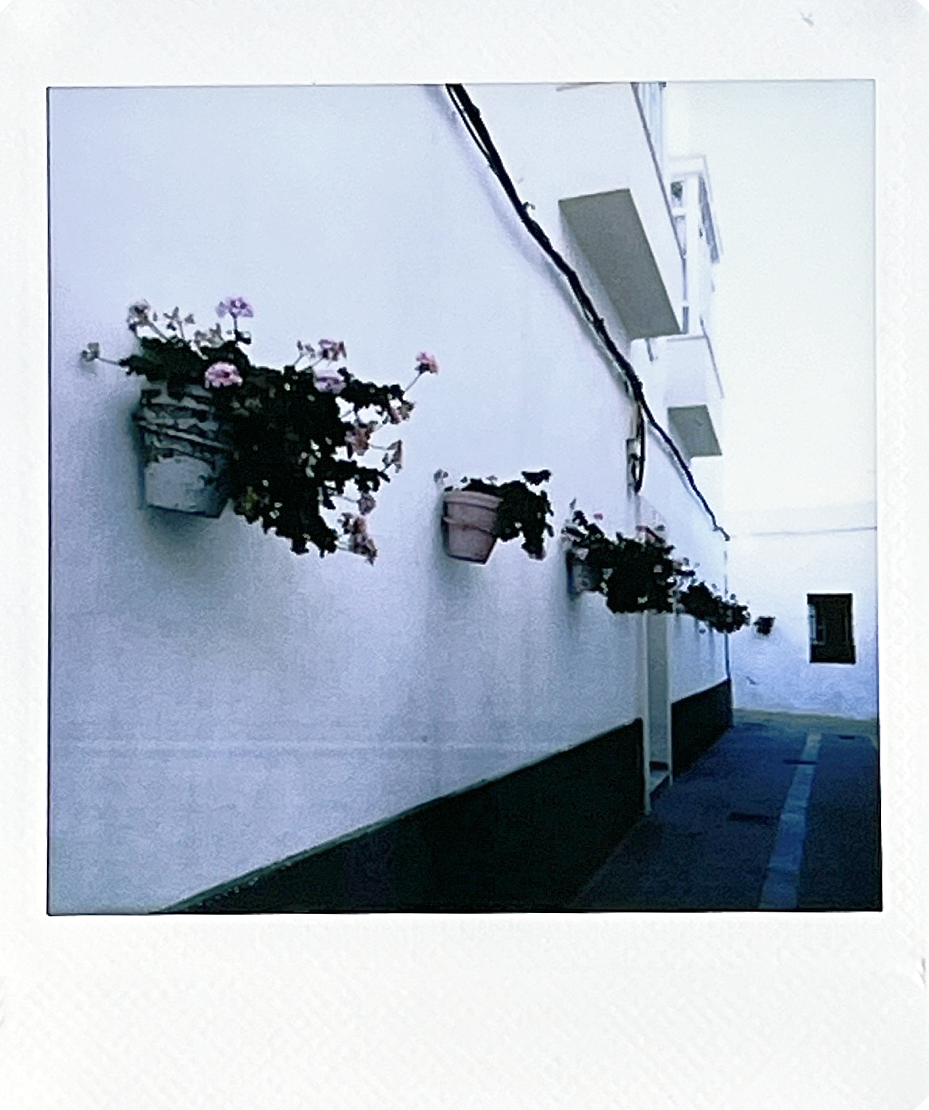
Homenaje a los Descubridores de América
My next photo wasn’t too far away from the statue. It was another side street. The reason I had stopped to take this photo is because of the symmetry. You can’t see it in this photo, there were actually another wall with flower pots like in the photo on the other side of the street. However, the reason you are only seeing one wall is because the other wall was missing some flower pots. To me, the image would no longer be symmetrical.
My biggest gripe with this photo is the lack of detail and color. This is mostly due this alleyway being in the shadow. If I had used exposure compensation, I may have been able to capture more of the greens and pinks of the flowers and leaves. I also think the white wall would have been whiter. However, as you can see in the right upper corner, I may have blown out more of that portion of the photo if I used exposure compensation.
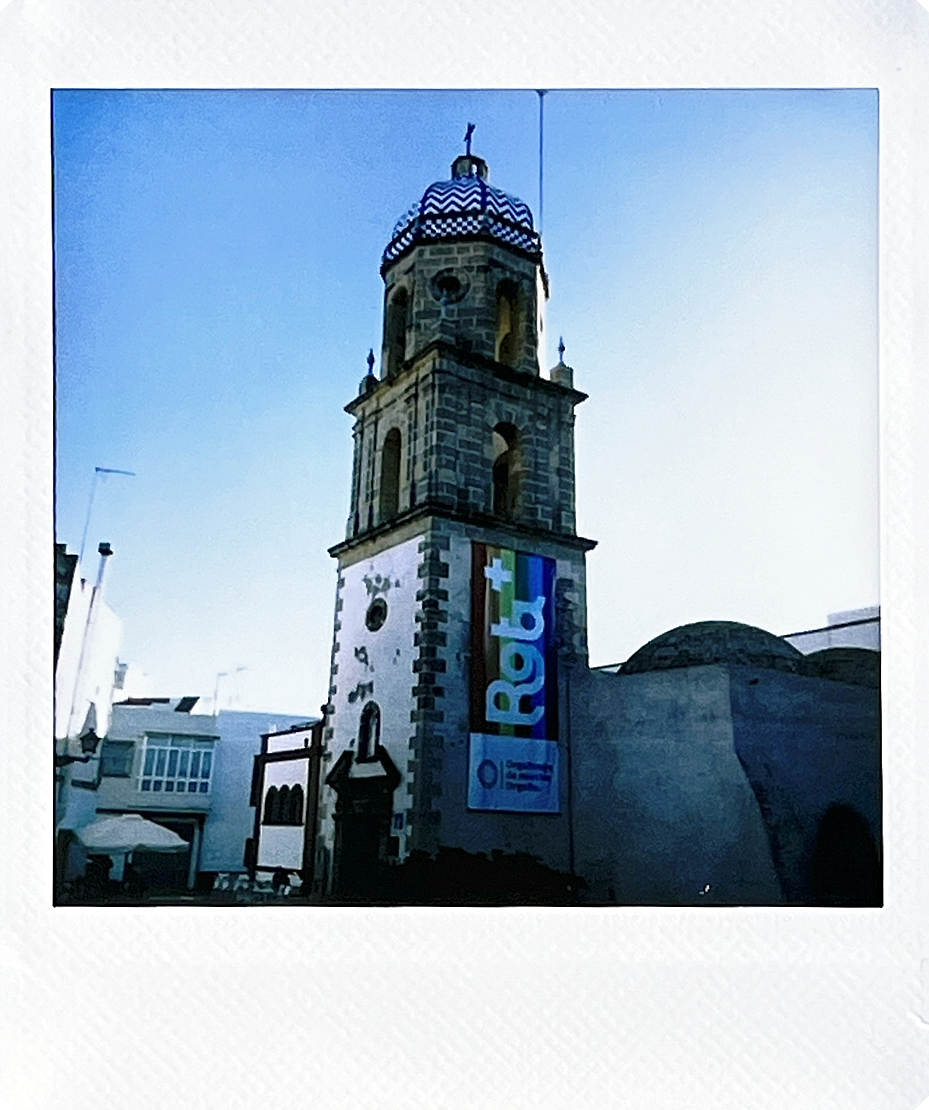
Torre del Convento de la Merced
Finally Thoughts
It was so nice to get out and just go shooting. I’m so glad that I was able to get this camera. It was easy to use and has the potential to take some great instant photos. As always, I have to remember that this is an instant camera and it won’t produce images like a mirrorless/DSLR camera. However, I love the ability to physically have photos in my hand. Now, I’ve just gotta figure out how I want to display these photos. Normally, I just put them in a photo album, but I think some of the photos I take should be displayed. Maybe I’ll find some type of hanging frame or go back to scrapbooking. What do you guys think?
Until next time!

Let’s Welcome a New Camera!
Welcome the Instax SQ20 to the family! Let’s talk specs, user experience, and more!

Look at my new camera!
So I did a thing! I added a new instant camera to my collection. Welcome the Instax SQ20!
For those of you that don’t know, the Instax SQ20 is somewhat like an older square version of the Instax Mini EVO. One of the biggest differences between the two (besides film size) is that the EVO has bluetooth capability while the SQ20 doesn’t. But not a deal breaker for me. Now you may be thinking Tcha, what’s the big deal about this? Like, do you really need a whole blog post about it? It’s my blog so I’ll do what I want.
So you may be wondering what’s so great about this camera. So glad you asked! First, this is what I would consider a hybrid camera. It’s a mix between a digital camera and an instant camera. Let’s dive in.
LOOKS AND FEELS
The SQ20 has a square-ish round body. What I mean by that is the overall body is square, but it has rounded corners. The camera is of course made out of plastic. The plastic is slick. I do wish the plastic was a bit textured so it wasn’t as slick, but the body has a feature that helps with that (I’ll talk about it further down.) It’s smaller and thinner than something like the Instax Wide 300. At the time of writing this post, I don’t have my Mini 11 with me, but I would say it’s probably comparable in size (just a bit thinner).
Front of Camera
On the front of the camera, you have the flash/charging/self-timer light, left and right shutter buttons, lens, zoom ring, and selfie mirror. Like with most Instax cameras, the film ejection slot is at the top of the camera.
Back of Camera
The back of the camera shows the LCD screen, all the buttons to operate the camera, and the film door lock. (Let me know if I need to update this blog to list out all the buttons on the back of the camera.)
Sides of Camera
On both sides of the camera, you have the strap hooks. On the left side (if you’re looking at the back of the camera), there is a door that contains the microUSB charging port, reset button, and microSD card slot.
Colors
This camera comes in two colors: matte black and beige. I ended up getting the beige version.
Here are two of my favorite features about this camera’s body.
Shutter buttons: This camera has shutter buttons on the left and right side so no matter if you’re a righty or lefty, you’ll be able to easily press the button and take a photo.
Thumb rests: So you remember the slick plastic I mentioned earlier? Here is how Instax combats that with this camera. The left and right sides of the back of camera have these thumb rests. They allow you to hold camera without feeling like it’s going to slip out of your hands.
FEATURES
The camera has a 1/5-inch sensor with a fixed focal length of 33.4 mm and an aperture of F2.4. The shutter speed ranges from 1/7500 to 1/2 (auto selected) and a max of 10 seconds when in bulb mode. The ISO ranges from 100 to 1600 (auto). There is also the option to use exposure compensation with a range of -2.0 EV to +2.0 EV (with increments of 1/3 EV). There are three flash options: auto, compulsory flash, and suppressed flash. The flash has a range of 50 cm to 1.6 ft to 6.6 ft.
It has single autofocus while in photo mode and continuous autofocus while in movie mode. (Movie mode for an instant camera?!?! We’ll talk more about that lol.) It has a focus range of about four inches to infinity. There are six photo shooting modes: standard, double exposure, bulb mode, split, collage, and time shift. There is also a self-timer that can go off in two-second or 10-second intervals. Lastly, there are 21 different filters (18 for photos and three for movies) and the ability to adjust brightness and add vignette.
Battery/Charging
It takes about two to three hours to fully charge the SQ20 if you’re using a 0.5A USB port. One full charge will last you about 100 prints. It uses a microUSB charger. If Instax ever does an update of this camera (hint hint Fujifilm), hopefully they will go to a USB-C charger.
FILM AND PRINTING
This is kind of a given, but it uses the standard Instax square format film. That film is about 3.4 inches x 2.8 inches with the actual photo space being 2.4 inches x 2.4 inches (hence the squareness). It takes about 12 seconds for the image to print out of the camera and about 90 seconds for it to be almost fully developed. You can only print JPEG images from the camera (if you’re importing from a microSD card).
The camera can hold about 50 photos without a microSD card. If you add a microSD card, it can hold about 1000 photos per 1 GB. I have a bunch of larger capacity microSD cards (think 64GB and up), so I’ll probably try and find an 8 GB or 16 GB card and I shouldn’t have to change the card or delete any images for a while.
Finding Film
I don’t think the square format film is that hard to find. You can find it at most major retailers…Walmart, Target, Best Buy, etc. You can also find it online at websites like Amazon, B&H, and Adorama. I usually get my film from Amazon just because I can get it delivered right to my door and I usually get a discounted price because I order several packs. A double pack (20 photos) will normally run you between $20-$25. If you get one of the specialty films like Sunset or Rainbow, they can run about $15-$20 for a pack of 10.

Instax Square Film: Sunset, White Marble, Monochrome, White, Rainbow, Black, and Star-Illumination
Okay, so I’ve talked about all the technical stuff, let’s talk about the actual user experience. I took the SQ20 out for a spin this morning (03JUL24) and it was pretty easy to use. I was able to figure it out without having to use any type of manual. It’s pretty simple to use. Simple push the sliding button(?) to the photo icon (or movie if you want to record a video), compose my shot, and then press one of the two shutter buttons. Printing the photo is pretty straight forward as well. After I took the photo, I hit the print photo button, a message popped up essentially asking me to verify that was the photo I wanted to print, I selected okay, and it printed. The autofocus worked relatively well. I wish I had the option to move the focus point because sometimes it wouldn’t focus on what I wanted it to, but I don’t have any major complaints about the focusing. Most times it focused on what I needed it to focus on.
I was even able to figure out how to take a double exposure shot by just scrolling through the menu. Now, this could be because I’ve used the Mini EVO before so I have at least an idea about the menu system for Fujifilm, but I think even if you’ve never had an EVO or LiPlay, you could figure out how to use the camera.
Overall Thoughts
Overall, my initial thoughts are that I don’t regret getting this camera. It’s nice having the option not to immediately print photos while I’m out and about. This way I don’t have to worry about losing my prints. The camera is easy enough to use and takes some great instant photos. I can’t wait to play around with it more.
Stay tuned for my next post. I’ll share some of the photos from my first outing with the SQ20 and more about my experience.
Until next time!
Here We Go Again…
Typical introductory post for a new blog. Come find out why I created this blog in 2024 and what it will be about.
So I’ve done a thing. That’s right, I’ve created a blog. ‘But Tcha, it’s 2024…and you’re creating a blog?!?!’ I know, I know…video is king right now. And that’s okay. I still dabble in video content (here’s looking at you YouTube and Instagram Reels), but I am much more comfortable with writing out my thoughts than filming them so here we are.
This is going to be a standard introductory blog post (hey, I’ve gotta start somewhere lol).
Why Am I Doing This?
Now you may be wondering why I’m starting a blog…or maybe not, but you’re here now so indulge me. So the older I get, the quicker time seems to pass by. I’ve done some what I consider are cool things during life so far, but I don’t feel like I’ve documented enough of them. I’ve gotten to travel to various countries, go to different events, and more. But…I am severely lacking in photos and documentation from all of those things. I know, I know…photos/videos/documentation doesn’t have to be taken whenever I do something to make the experience worth it, but I would love to be able to have something to go back and look at it as I get order. I want to be able to have triggers that help me remember what the food was like in a new country or some of the cool sites from another. Also, I have a trash memory so if I don’t write something down/take a photo or video, I may not remember it.
Also also, I think this blog will be a great way to share what’s happening in my life with my family and friends. I’m horrible at communicating with people on the regular. I’m very much an ‘out of sight, out of mind’ type of person. It’s not that I don’t love or miss people, I just get wrapped up in my day to day and suddenly I look up and it’s been a week since I’ve reached out to family and friends. And remember how I said my memory is trash? Even when I do call family and friends, I never remember the interesting things to tell them. If nothing else, this blog will at least help me keep a running track of interesting things to talk about lol. Plus, they can see what’s happening in my life as well in between conversations.
Finally, I also just wanted a place to talk about all things photography and other random stuff that interests me. The thing about having a YouTube channel is they say you should kinda stick to an overarching topic. Mine focuses on all things photography. However, I’m also a big geek and I love movies and all kinds of other things that don’t necessarily fall under photography. I have thoughts about them…and I want to share them…but I don’t want to create a new YouTube channel for each of those topics. So here we are.
Obligatory photo of my self lol
What’s This Blog About?
Like I said earlier, this blog will mostly focus on all things photography and then other random things that interest me. More than likely, it will mostly be photography related (gear, photo shoots, travel photography, photography news etc.), but don’t be surprised if you see me talk about a comic con or some new movie I saw. I’ll try to make sure I properly tag everything so the topics are at least easy to sort through.
Final Thoughts
I don’t know how long this is going to last. I’ve started a few blogs, but never really kept up with them. However, I have high hopes for this one. If I can post at least once a week, I think I’ll be doing good. If I can do that for like 30 days, I’ll probably have built a habit enough to keep up with this pretty regularly. Not sure where this is going to take me, but I’m excited for the journey. Hopefully, I’ll have a few people come along with me.
Until next time!